
You know, there are some dishes that just feel like a warm hug on a plate. For me, those dishes almost always involve something that’s been lovingly tossed with olive oil, herbs, and then roasted until it’s practically singing. And when it comes to roasted vegetables, oh boy, do I have a recipe for you. It’s not just about throwing a bunch of veggies in the oven; it’s about coaxing out their absolute best, transforming the ordinary into something truly spectacular. This is the kind of dish that can turn even the pickiest eater into a veggie enthusiast, and believe me, I’ve seen it happen. It’s my go-to when I need a simple side that feels fancy, or even a hearty main when I just want something wholesome and satisfying. Forget those sad, soggy steamed carrots; we’re talking about caramelization, tenderness, and a depth of flavor that’s just out of this world. It’s my secret weapon for weeknight dinners, and honestly, it’s just plain delicious. This isn’t just another roasted vegetable recipe; it’s an experience.
What is this delicious roasted vegetable salad?
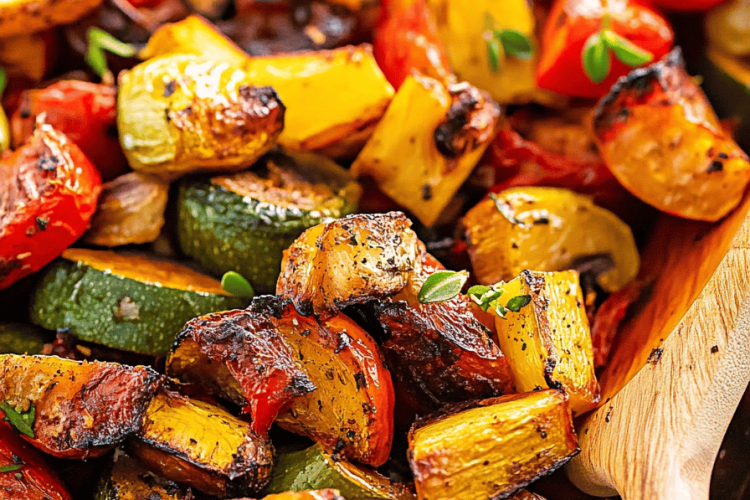
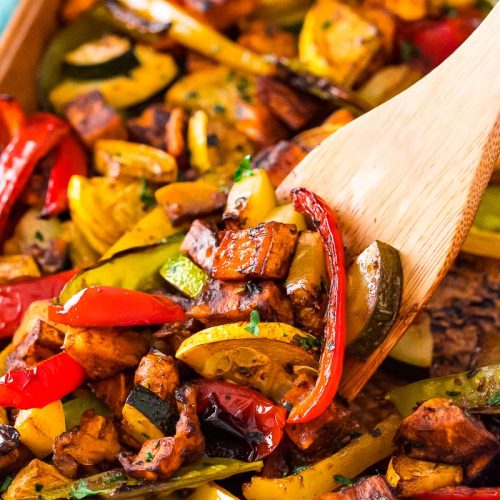
So, what exactly *is* this magical medley? Think of it as the ultimate celebration of seasonal produce, transformed by the magic of roasting. It’s a symphony of textures and flavors – a little sweet, a little savory, with a delightful tender-crisp bite. I call it my “Glorious Roasted Vegetable Medley” because, well, it truly is glorious! The name came about after my little niece, who usually turns her nose up at anything green, took one bite and exclaimed, “Auntie, this is glorious!” and it just stuck. It’s essentially a collection of my favorite vegetables – and yours, of course, as you can totally customize it – all chopped up, tossed with a simple yet potent herb and garlic dressing, and then roasted at just the right temperature to achieve that perfect tender-crisp texture with beautiful caramelized edges. It’s not complicated, it’s not fussy, but the result is a dish that tastes like it came from a high-end restaurant. It’s the kind of food that makes you feel good from the inside out.
Why you’ll love this recipe?
Oh, where do I even begin with why you’ll fall head over heels for this roasted vegetable recipe? First off, the FLAVOR! The roasting process concentrates all those natural sugars in the vegetables, bringing out a sweetness you wouldn’t believe. Paired with the savory garlic, fragrant herbs, and a kiss of olive oil, it’s a taste explosion. And it’s so EASY. Seriously, I’ve made this on nights when I’m absolutely exhausted, and it still comes together beautifully. Chop, toss, roast – that’s pretty much it. Cleanup is a breeze too, especially if you use parchment paper. It’s also incredibly budget-friendly. You can use whatever veggies are on sale or in season, and it’s still going to be a showstopper. I often find myself relying on this when I need to use up odds and ends in the fridge. And the VERSATILITY! This isn’t just a side dish. Serve it over quinoa for a healthy lunch, toss it with pasta for a quick dinner, or even add a fried egg on top for a fantastic breakfast. It’s the culinary equivalent of a chameleon! I’ve tried so many roasted vegetable recipes over the years, but this one’s different. It’s the perfect balance of tender and slightly crispy, the seasoning is just right, and it never, ever fails to impress. It’s the kind of recipe you’ll make so often, it becomes a staple in your kitchen, just like my famous Chocolate Chip Cookies.
How do I make this delicious Roasted Vegetable Medley?
Quick Overview
The beauty of this recipe lies in its simplicity. We’ll start by preheating our oven to get it nice and hot, which is key for good caramelization. Then, we’ll chop up a vibrant mix of your favorite vegetables into bite-sized pieces. The magic happens when we toss these veggies with a fragrant blend of olive oil, minced garlic, and a few select herbs. Everything gets spread out on a baking sheet and roasted until fork-tender and beautifully browned. It’s a straightforward process that yields incredibly delicious results with minimal effort. Trust me, even if you think you’re not a “veggie person,” this method will convert you.
Ingredients
For the Vegetable Base:
Let’s talk about the stars of the show! The beauty of this recipe is its adaptability. I usually start with about 6 cups of chopped vegetables. Here are some of my absolute favorites that I find work wonderfully together:
* 2 medium zucchinis, cut into 1-inch chunks (look for firm, bright green ones!)
* 2 medium carrots, peeled and sliced into 1/2-inch thick rounds or half-moons (I love the sweetness they bring)
* 1 red bell pepper, deseeded and cut into 1-inch pieces (for a pop of color and sweetness)
* 1 yellow bell pepper, deseeded and cut into 1-inch pieces (pairs perfectly with red)
* 1 red onion, cut into wedges (these get so wonderfully sweet when roasted!)
* 1 cup broccoli florets (make sure they’re bite-sized so they cook evenly)
* 1 cup cauliflower florets (similar to broccoli, lovely and tender)
* Optional: A handful of cherry tomatoes, left whole (they burst and add a lovely juicy element!)
* Optional: Cubes of sweet potato or Butternut Squash for a heartier, sweeter twist. If you add these, they might need a slightly longer roasting time or a head start.
When choosing your vegetables, aim for a variety of colors and textures. Freshness is key here, so try to pick vibrant produce that feels firm to the touch. Avoid anything that looks wilted or bruised.
For the Glorious Dressing:
This is where we infuse all the flavor! It’s simple, but impactful.
* 1/4 cup extra virgin olive oil (use a good quality one; it makes a difference!)
* 4 cloves garlic, minced (or more, if you’re a garlic lover like me!)
* 1 tablespoon dried Italian seasoning (or a mix of dried oregano, thyme, and rosemary)
* 1 teaspoon salt (adjust to your taste)
* 1/2 teaspoon black pepper, freshly ground (always fresh if you can!)
* Optional: A pinch of red pepper flakes for a subtle kick.
* Optional: Fresh herbs like chopped parsley or chives for garnish after roasting.
For Serving Suggestions (Optional):
* Freshly squeezed lemon juice, for a bright finish
* A sprinkle of grated Parmesan cheese (if not vegan)
* A dollop of your favorite hummus or yogurt dip
* A drizzle of balsamic glaze
Step-by-Step Instructions
Step 1: Preheat & Prep Pan
First things first, let’s get that oven roaring! Preheat your oven to 400°F (200°C). This high heat is crucial for achieving those lovely caramelized edges on your vegetables. Now, grab a large baking sheet or two if needed – you don’t want to overcrowd the pan. Overcrowding leads to steaming rather than roasting, and we definitely don’t want that. For super easy cleanup, I highly recommend lining your baking sheet with parchment paper. It’s a lifesaver, I tell you!
Step 2: Mix Dry Ingredients
In a small bowl, combine your salt, pepper, Italian seasoning, and red pepper flakes (if using). This little step ensures your seasonings are evenly distributed among the vegetables later on. It’s all about getting those flavors married together before they hit the heat.
Step 3: Mix Wet Ingredients
In a separate, larger bowl (this will be the bowl you toss your veggies in), whisk together the extra virgin olive oil and minced garlic. The garlic will infuse the oil beautifully as it sits, creating a wonderfully aromatic base for our dressing.
Step 4: Combine
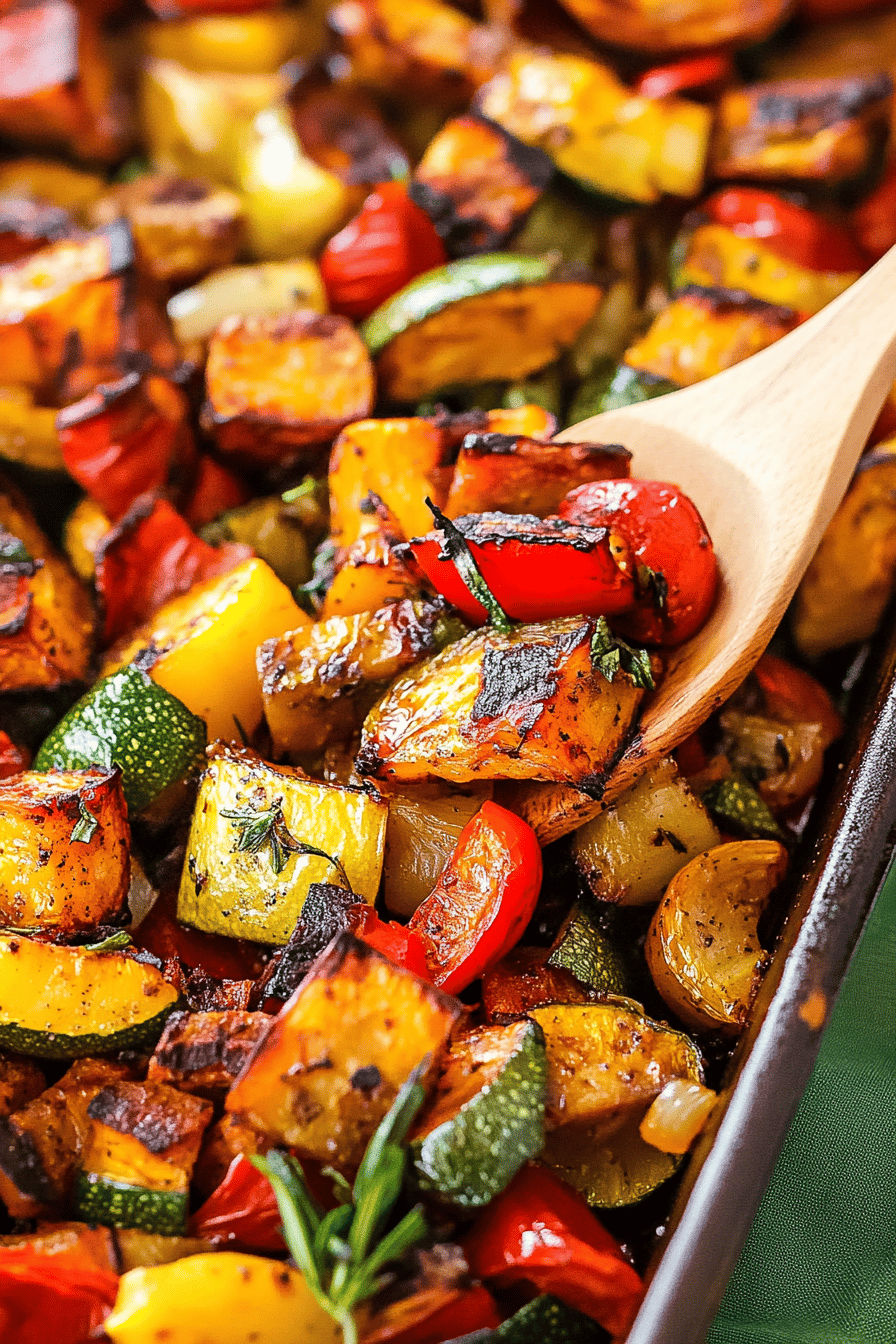
Add all your chopped vegetables to the large bowl with the garlic-infused olive oil. Sprinkle the dry seasoning mix over the top. Now, get your hands in there (or use tongs if you prefer!) and toss everything together until every single piece of vegetable is beautifully coated in the oil and seasonings. This is the most important part for flavor distribution, so don’t be shy! Make sure every nook and cranny is touched by that delicious dressing.
Step 5: Prepare Filling
This step is more about spreading the vegetables out on the prepared baking sheet. Once everything is coated, spread the vegetables out in a single, even layer on the parchment-lined baking sheet. Again, avoid overcrowding! If your vegetables are piled on top of each other, they’ll steam. If you have too many for one pan, use two. It’s worth the extra pan!
Step 6: Layer & Swirl
This isn’t a layering or swirling recipe in the traditional sense, but the key is ensuring an even layer for optimal roasting. No swirling needed here, just an even spread for maximum deliciousness!
Step 7: Bake
Pop that baking sheet into your preheated oven. Roast for 20-30 minutes, or until the vegetables are tender and have lovely caramelized, slightly browned edges. The exact time will depend on your oven and the size of your vegetable pieces. About halfway through the roasting time (around the 15-minute mark), give the vegetables a good toss or shake the pan to ensure even cooking and browning on all sides. You’re looking for that perfect fork-tender texture, with just a hint of crispness around the edges.
Step 8: Cool & Glaze
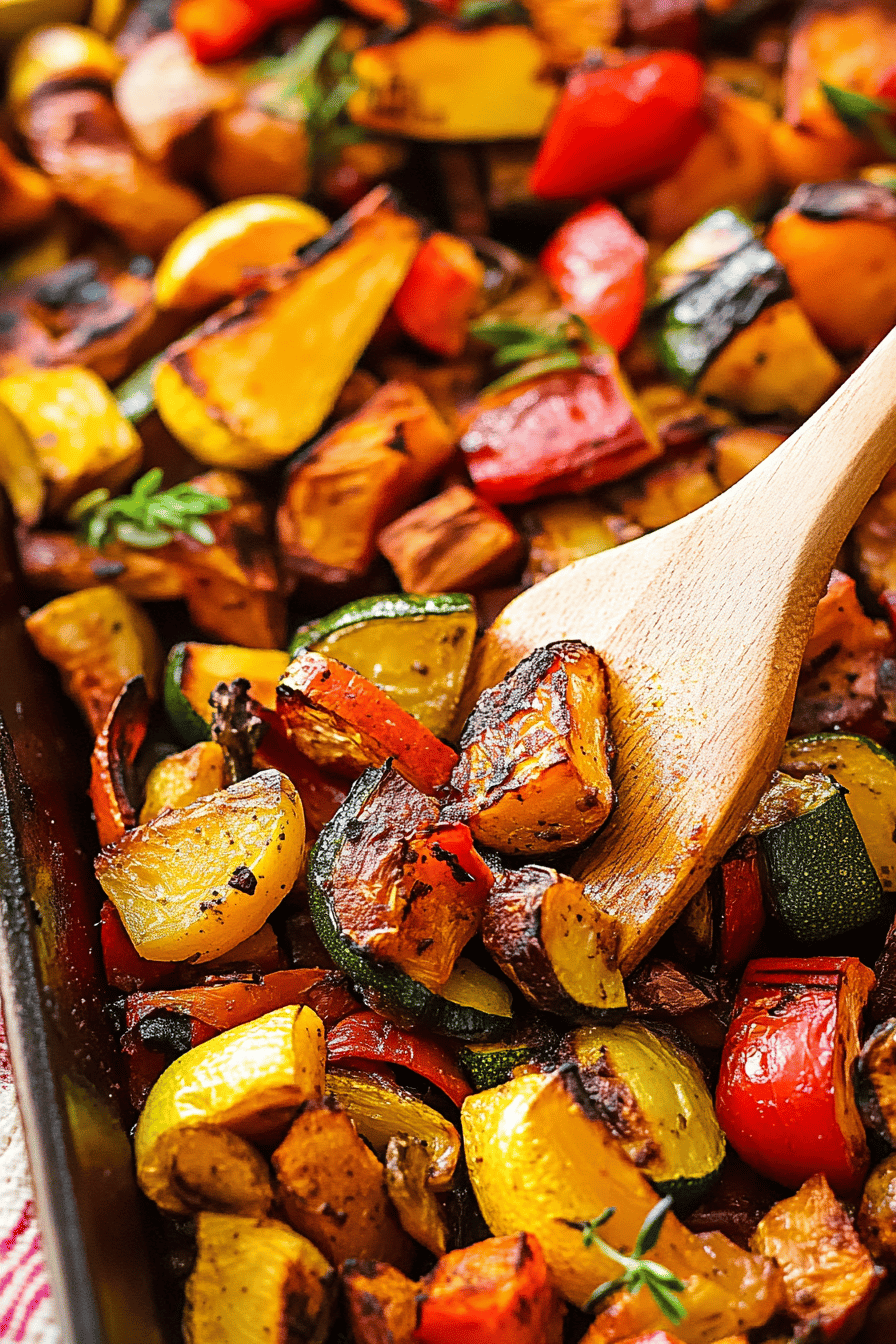
Once they’re done, remove the baking sheet from the oven. Let them cool for just a few minutes directly on the pan. If you’re adding any fresh herbs like parsley or chives, now is the time to sprinkle them over the top. A squeeze of fresh lemon juice at this stage also adds a wonderful brightness that I adore. You can also add a sprinkle of Parmesan cheese if you like, or a drizzle of balsamic glaze for a touch of sweetness and tang.
Step 9: Slice & Serve
Serve these glorious roasted vegetables warm as a side dish, or get creative with how you use them! They’re fantastic on their own, but also make a great addition to salads, grain bowls, or even as a topping for pizzas. I love serving them straight from the pan while they’re still hot and fragrant.
What to Serve It With
The beauty of this glorious roasted vegetable medley is its incredible versatility. It’s not just a side dish; it’s a building block for so many delicious meals!
For Breakfast: I often find myself with leftover roasted veggies, and they are AMAZING scrambled into eggs or folded into an omelet. A sprinkle of cheese makes it extra special. They also pair wonderfully with a side of toast or even some breakfast sausage for a hearty start to the day.
For Brunch: Elevate your brunch spread! Serve these beauties alongside poached eggs, avocado toast, or even a frittata. They add color, flavor, and a healthy element to any brunch table. A simple sprinkle of fresh herbs makes them look restaurant-worthy.
As Dessert: Okay, hear me out! While not a traditional dessert, I’ve found that a slightly sweeter version (think adding cubes of sweet potato or Butternut Squash and maybe a touch of maple syrup to the dressing) can be a surprisingly satisfying end to a meal, especially when you’re trying to be mindful of sugar. It’s a different kind of sweet, and it’s surprisingly comforting.
For Cozy Snacks: When that 3 pm slump hits, or I’m just craving something savory and satisfying, a small bowl of these roasted vegetables hits the spot. They’re much more satisfying than chips, and they’re packed with nutrients. I love them served with a side of hummus or a dollop of plain Greek yogurt. My kids will happily munch on them while doing homework. It’s a much healthier alternative to processed snacks, and honestly, they’re just so tasty!
Top Tips for Perfecting Your Roasted Vegetables
I’ve made this recipe more times than I can count, and over the years, I’ve picked up a few tricks that really make a difference. Think of these as the little nudges that take your roasted vegetables from good to absolutely phenomenal.
**Vegetable Prep:** When it comes to zucchini, I sometimes find it can release a lot of water. If you’re using very large zucchinis, I’ve found that cutting them into slightly larger chunks and maybe even giving them a quick pat down with a paper towel after tossing can help minimize sogginess. For carrots, consistent thickness is key for even cooking. If you have some super thick and some thin, they won’t be ready at the same time, which can be frustrating. So, try to keep those slices uniform.
**Mixing Advice:** The absolute biggest mistake I see people make is overcrowding the pan! I cannot stress this enough. Vegetables need space to breathe and caramelize. If they’re piled up, they’ll steam, and you’ll end up with mushy, sad veggies. If you have to use two baking sheets, do it. It’s totally worth it for that perfect texture. Also, make sure every single piece of vegetable is coated in that delicious oil and seasoning mixture. I learned this the hard way when I had a few bland, unseasoned bites.
**Swirl Customization:** While this recipe doesn’t really involve swirling, the concept of even distribution is what’s important. Think about arranging your vegetables in a single layer so the hot air can circulate around each piece.
**Ingredient Swaps:** This is where the fun really begins! Don’t be afraid to experiment. Brussels sprouts are fantastic roasted this way – just halve them. Asparagus spears are wonderful too, but they roast much faster, so add them towards the end of the cooking time. Root vegetables like parsnips or sweet potatoes are also fantastic, though they might need a bit more time to soften. If you’re using denser vegetables like potatoes or squash, I often chop them a bit smaller than the other vegetables or give them a 10-minute head start in the oven before adding the quicker-cooking veggies like bell peppers or zucchini.
**Baking Tips:** Oven temperatures can vary, so get to know yours! If you find your oven tends to run hot, you might want to reduce the temperature slightly or keep a closer eye on things. Placing the baking sheet on the middle rack usually provides the most even heat. Another great tip I learned is to use the “broil” setting for the last minute or two (watch very carefully!) to get an extra burst of browning on the edges, but be warned, it happens fast!
**Glaze Variations:** While a simple drizzle of balsamic glaze is divine, consider a honey-soy glaze for an Asian-inspired twist, or even a pesto drizzle for an Italian flair. For a touch of sweetness, a maple-Dijon glaze is also a winner. I’ve even done a tahini-lemon drizzle that was absolutely out of this world with roasted root vegetables. The possibilities are truly endless, and it’s these little variations that keep things exciting in the kitchen.
Storing and Reheating Tips
One of the best things about this roasted vegetable recipe is how well they store and reheat. They’re almost as good the next day, which is a HUGE win in my book.
**Room Temperature:** Honestly, I rarely have leftovers that sit out at room temperature for long enough to worry about this! However, if you do have a small amount left and want to nibble on them within a couple of hours, it’s perfectly fine. Just cover them loosely to protect them from dust or curious critters.
**Refrigerator Storage:** Once they’ve cooled down a bit (don’t put hot food directly into the fridge, as it can raise the internal temperature), transfer your roasted vegetables to an airtight container. They’ll keep well in the refrigerator for about 3 to 4 days. I’ve found that glass containers work best for preventing any lingering smells. They maintain their texture pretty well, though they will soften slightly as they cool.
**Freezer Instructions:** While I generally prefer them fresh, you *can* freeze roasted vegetables. The texture might change slightly upon thawing, becoming a bit softer. To freeze, let them cool completely. Then, spread them in a single layer on a baking sheet and freeze until solid, about 1-2 hours. Once frozen, transfer them to a freezer-safe bag or container, removing as much air as possible. They should last in the freezer for about 2-3 months. When you’re ready to use them, thaw them overnight in the refrigerator or gently reheat them.
**Glaze Timing Advice:** If you plan on storing leftovers, it’s often best to add any glazes or fresh herb garnishes right before serving. This keeps them looking and tasting their best. For example, if you know you’ll be reheating and then serving, hold off on that balsamic glaze or fresh parsley until the very end. This prevents them from getting soggy or wilting too much. For the freezer, definitely skip any glazes or fresh herbs before freezing. Add those after reheating.
Frequently Asked Questions
Final Thoughts
I really hope you give this glorious roasted vegetable recipe a try. It’s one of those dishes that proves how simple, wholesome ingredients can create something truly spectacular. It’s not just food; it’s comfort, it’s health, and it’s a whole lot of deliciousness on one plate. Whether you’re serving it as a side dish, incorporating it into a main meal, or just snacking on it straight from the pan (guilty as charged!), I promise it will become a regular in your rotation. If you love this, you might also enjoy my recipe for the Ultimate Roasted Broccoli or my Simple Roasted Sweet Potatoes – they’re in the same vein of easy, flavorful veggie goodness! I’m so excited for you to experience this yourself. Please, when you make it, let me know how it turns out in the comments below! I’d love to hear your vegetable choices, any special twists you added, or how much your family enjoyed it. Your feedback means the world to me, and it helps other home cooks too. Happy roasting!
Roasted Vegetables
Ingredients
Main Ingredients
- 1 pound broccoli florets
- 1 pound carrots, peeled and chopped
- 0.5 pound red bell pepper, seeded and chopped
- 0.5 pound red onion, cut into wedges
- 3 tablespoon olive oil
- 0.5 teaspoon salt
- 0.25 teaspoon black pepper
Instructions
Preparation Steps
- Preheat your oven to 400°F (200°C).
- Wash and prepare all the vegetables as indicated in the ingredients list. Chop them into roughly equal-sized pieces for even roasting.
- In a large bowl, toss the prepared vegetables with olive oil, salt, and black pepper until they are evenly coated.
- Spread the seasoned vegetables in a single layer on a large baking sheet. Avoid overcrowding the pan, as this will steam the vegetables instead of roasting them. You may need to use two baking sheets.
- Roast in the preheated oven for 25-30 minutes, or until the vegetables are tender and slightly caramelized. Flip or stir the vegetables halfway through the cooking time for even browning.
- Remove from the oven and serve hot as a side dish.
