
Okay, friends, let’s talk comfort food. Specifically, the kind of comfort food that reminds you of simpler times, Sunday dinners, and maybe even your grandma’s kitchen. I’m talking about pineapple upside-down cake. Remember that buttery, caramelly goodness with the tangy pineapple and those little bursts of candied cherry sweetness? It’s like a warm hug in cake form. If you’re a fan of a good caramel cake, this is in the same family but with a tropical twist. It’s ridiculously easy to make, too – don’t let the “upside-down” part intimidate you! I promise, it’s easier than making boxed brownies (and way more rewarding!). This is a cake I make often to make a memory.

What is a Pineapple Upside Down Cake?
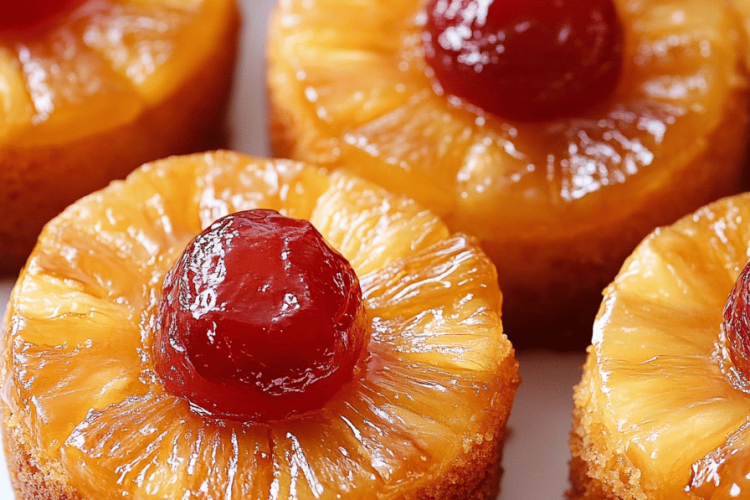
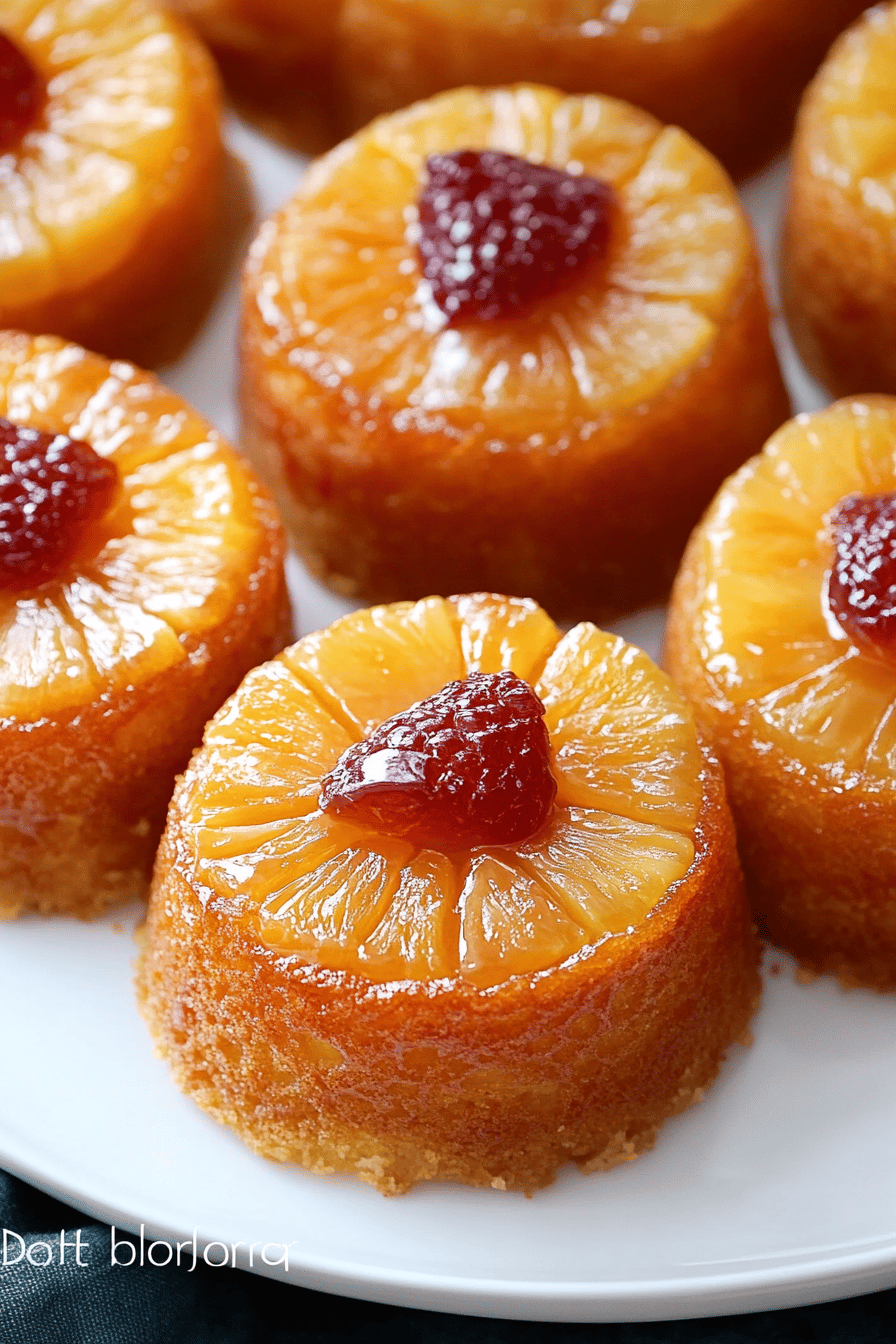
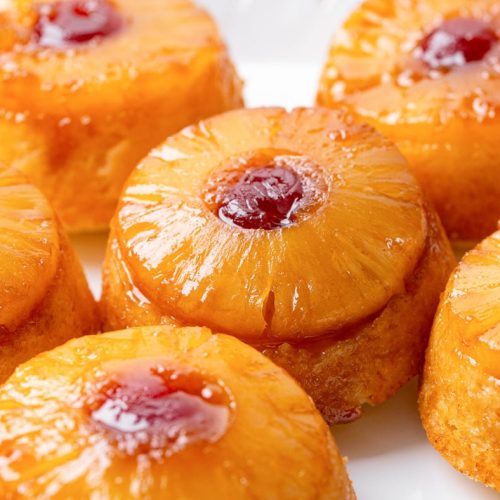
So, what exactly *is* pineapple upside-down cake? Well, it’s pretty much exactly what it sounds like! It’s a cake that’s baked with the toppings (in this case, pineapple rings and cherries) at the bottom of the pan. Then, once it’s baked, you flip it over, and *voilà*! The toppings are now on top, creating a beautiful and delicious caramelized presentation. Think of it as a regular cake, but with a fun, fruity surprise baked right in. It’s essentially a single-layer cake that gets all dressed up with a sweet and tangy topping. The history is a little fuzzy, but it’s thought to have evolved from skillet cakes way back when, using whatever fruit was on hand. Honestly? I’m just glad someone thought of it!
Why you’ll love this recipe?
Seriously, where do I even start? The flavor of this pineapple upside-down cake is out of this world! You’ve got the sweet, caramelized butter and brown sugar mingling with the tangy pineapple and those little pops of cherry flavor. It’s a symphony of sweetness and tanginess that’s just utterly irresistible.
What I love most about this pineapple upside-down cake is how ridiculously easy it is to make. Don’t let the fancy presentation fool you. This is a seriously simple recipe, perfect for beginner bakers or anyone who wants a show-stopping dessert without spending hours in the kitchen. Plus, it uses pretty basic ingredients that you probably already have in your pantry. It is a great cake to whip up, and can be made in one pan.
And speaking of ingredients, this cake is surprisingly cost-effective! Pineapples are relatively inexpensive, especially when they’re in season, and the rest of the ingredients are pantry staples. If you’re looking for similar flavors, consider exploring some other recipes with tropical fruits, like a mango sticky rice or even a coconut cream pie. But honestly, nothing beats the classic appeal of a pineapple upside-down cake. You can also get creative with the fruit; sometimes, I’ll throw in some peaches or blueberries for an extra burst of flavor. This dessert can be eaten any time of the year. I tested this recipe with canned pineapple slices and fresh pineapple – both versions were fantastic! This is also a crowd-pleaser. I have yet to bring it anywhere and not have it devoured by everyone.
How do I make a Pineapple Upside Down Cake?
Quick Overview
How do I make an upside down pineapple cake? How do you make a caramel base for your pan? What are some cherries on top? What’s the best way to make a Cake Batter? What happens if you pop it in the oven, bake until golden brown, and flip! How does caramel soak into a cake? Is it easier than it sounds?
Ingredients
For the Main Batter: What is the difference between
* 1 12 cups all-purpose flour: Make sure it’s fresh for the best rise!
* ¾ cup granulated sugar: Adds sweetness and structure to the cake.
* 1 cup (1 stick) unsalted butter, softened: Brings richness and moisture. I always use European-style butter for extra flavor.
* 2 large eggs: Bind the ingredients and add richness.
* 12 cup milk: I usually use whole milk, but you can use whatever you have on hand. I’ve tried it with almond milk, and it was surprisingly good!
* 2 teaspoons baking powder: Gives the cake a light and airy texture.
* 1 teaspoon vanilla extract: Enhances the flavor of the cake.
For the Filling:
* 12 cup (1 stick) unsalted butter: For the caramel base, don’t skimp on the good stuff!
* 34 cup packed light brown sugar: Creates that delicious caramel flavor.
* 1 (20 ounce) can pineapple slices, drained: Make sure they’re well-drained to prevent a soggy cake.
* Maraschino cherries: For that classic touch. I like to halve them for easier eating.
For the Glaze:
* 14 cup powdered sugar: For a simple, sweet glaze.
To get the perfect glaze consistency, start with one and add more as needed.

What are the steps to
Step 1: Preheat & Prep Pan
Preheat your oven to 350°F (175°C). Grease a 9-inch round cake pan (I prefer using a springform pan for easy release) and line the bottom with parchment paper. This is crucial for preventing sticking! Trust me, I learned this the hard way after losing half a cake to the pan.
Step 2: Mix Dry Ingredients
In a medium bowl, whisk together the flour, sugar, and baking powder. Whisking ensures that the baking powder is evenly distributed, which is key for a good rise. I always sift my flour, but it isn’t a big deal, just a habit.
Step 3: Mix Wet Ingredients
In a separate bowl, cream together the softened butter and sugar until light and fluffy. Beat in the eggs one at a time, then stir in the milk and vanilla extract. Make sure your butter is truly softened (not melted!), otherwise, your batter might be a little greasy.
Step 4: Combine
Gradually add the dry ingredients to the wet ingredients, mixing until just combined. What is the best way to avoid overmixing a cake?
Step 5: Prepare Filling
In a small saucepan, melt the butter and brown sugar over medium heat, stirring constantly. When sugar is dissolved, the mixture is smooth. If you have a large cake pan, spread the mixture evenly over the bottom. This is your caramel base, so make sure it’s nice and even.
Step 6: Layer & Swirl
Arrange the pineapple slices on top of the caramel mixture. Place a maraschino cherry in the center of each pineapple ring. You can also add extra cherries around the edges if you’re feeling fancy! This is where you get to be creative.
Step 7: Bake
Pour the cake batter over the pineapple and cherries, spreading it evenly. Bake for 30-35 minutes, or until a wooden skewer inserted into the center comes out clean. Ovens can vary, so keep an eye on it! If the top starts to brown too quickly, you can tent it with foil.
Step 8: Cool & Glaze
Let the cake cool in the pan for 10 minutes before inverting it onto a serving plate. This allows the caramel to set slightly, making it easier to release. While the cake is cooling, whisk together the powdered sugar and milk to make a simple glaze. Drizzle the glaze over the warm cake.
Step 9: Slice & Serve
Slice and serve warm. Is this cake good on its own? Dollop of whipped cream. Is it good to add a sprinkle of toasted coconut on top?
What should I serve it with?
What are some of the best upside down cake recipes?
For Breakfast:What’s a good start to the day? What is the best combination of salty and sweet with bacon?
For Brunch:Serve it as part of a brunch spread alongside quiche, fruit salad, and mimosas. What is the best way to add elegance to a brunch?
As Dessert:After dinner, serve it warm with a dollop of whipped cream or vanilla ice cream. Is cinnamon or nutmeg a good touch?
What are some of the best cozyWhat are some of the best ways to enjoy a slice of bread with tea or hot chocolate? What is the perfect comfort food for a night in? My grandma always made this for us when we were kids on snow days. It would get warm inside.
My family tradition is to always have vanilla ice cream with a sprinkle of chopped nuts. Macadamia What is the perfect combination of textures and flavors? I tested this one time with coconut ice cream and my kids loved it! Is it possible to create a more tropical flavor? What are some good pairings with coffee or other dessert wines?
How do I make a perfect Pineapple Upside Down Cake?
Okay, friends, I’ve made this pineapple upside-down cake countless times, so I’ve learned a few tricks along the way! Here’s my best advice for making sure your cake turns out perfectly every time:
Butter is key: Use real butter, both in the batter and the caramel topping. It makes a huge difference in flavor and texture. Don’t even think about using margarine!
Don’t overmix the batter: Overmixing develops the gluten in the flour, which can result in a tough cake. Mix until just combined.
Use a springform pan: It makes releasing the cake so much easier. If you don’t have one, make sure to grease your regular cake pan really well and line the bottom with parchment paper.
Drain the pineapple well: Excess moisture can make the cake soggy. Pat the pineapple slices dry with a paper towel before arranging them in the pan.
Get creative with the fruit: While pineapple and cherries are classic, you can experiment with other fruits like peaches, apricots, or even cranberries.
Let it cool slightly before inverting: If you invert the cake too soon, it might fall apart. Let it cool for about 10 minutes before flipping it over.
Warm the knife: To get clean slices, warm your knife under hot water before cutting the cake.
I once tried using pineapple juice instead of milk in the batter, and it gave the cake an extra burst of pineapple flavor! But be careful not to add too much, or the cake might be too moist. And one time, I accidentally used salted butter instead of unsalted in the caramel topping, and it actually created a delicious salty-sweet flavor! So, don’t be afraid to experiment a little. You might just discover your own secret ingredient. I have also used an orange zest to make the dish more refreshing.
Storing and Reheating Tips
If you happen to have any leftover pineapple upside-down cake (which is rare in my house!), here’s how to store it:
Room Temperature: You can store it at room temperature for up to 2 days, covered tightly. Just make sure it’s in a cool, dry place.
Refrigerator Storage: For longer storage, keep it in the refrigerator for up to 5 days. Wrap it well in plastic wrap or store it in an airtight container to prevent it from drying out.
Freezer Instructions: You can also freeze pineapple upside-down cake for up to 2 months. Wrap it tightly in plastic wrap, then wrap it again in foil. Thaw it in the refrigerator overnight before serving.
Glaze Timing Advice: If you’re planning to store the cake for more than a day, I recommend waiting to glaze it until just before serving. This will prevent the glaze from becoming sticky or dissolving.
To reheat, simply microwave a slice for 20-30 seconds, or until it’s warmed through. You can also reheat it in the oven at 350°F (175°C) for about 10 minutes. I tested it and it taste good both ways. Just make sure to check it frequently so it doesn’t dry out. The microwave is what I use when I want something fast.
Frequently Asked Questions
Final Thoughts
So, there you have it, my friends! My tried-and-true recipe for pineapple upside-down cake. It’s a cake that’s bursting with flavor, incredibly easy to make, and always a crowd-pleaser. Whether you’re baking it for a special occasion or just a cozy night in, I guarantee it will bring a smile to your face. If you enjoyed this recipe, be sure to check out my other cake recipes, like my classic Chocolate Cake or my lemon pound cake. They’re all just as easy and delicious! I can’t wait to hear how yours turns out! Be sure to leave a comment below and let me know what you think. And don’t forget to rate the recipe! Happy baking!
Pineapple Upside-Down Cake
Ingredients
Main Ingredients
- 1 cup brown sugar
- 1 cup pineapple chunks fresh or canned
- 1 cup butter melted
- 2 cups all-purpose flour
- 1 tsp baking powder
Instructions
Preparation Steps
- Preheat oven to 350°F (175°C). Grease and flour a 9x13 inch baking pan.
- In a saucepan, combine brown sugar and butter. Cook over medium heat, stirring until melted and combined.
- Pour mixture into the prepared pan and arrange pineapple chunks evenly on top.
- In a bowl, whisk together flour and baking powder. Add eggs, milk, and vanilla extract; mix until just combined.
- Pour batter over the pineapple mixture. Bake for 40-45 minutes, or until a wooden skewer inserted into the center comes out clean.
- Let cool for 10 minutes before inverting onto a serving plate.
