

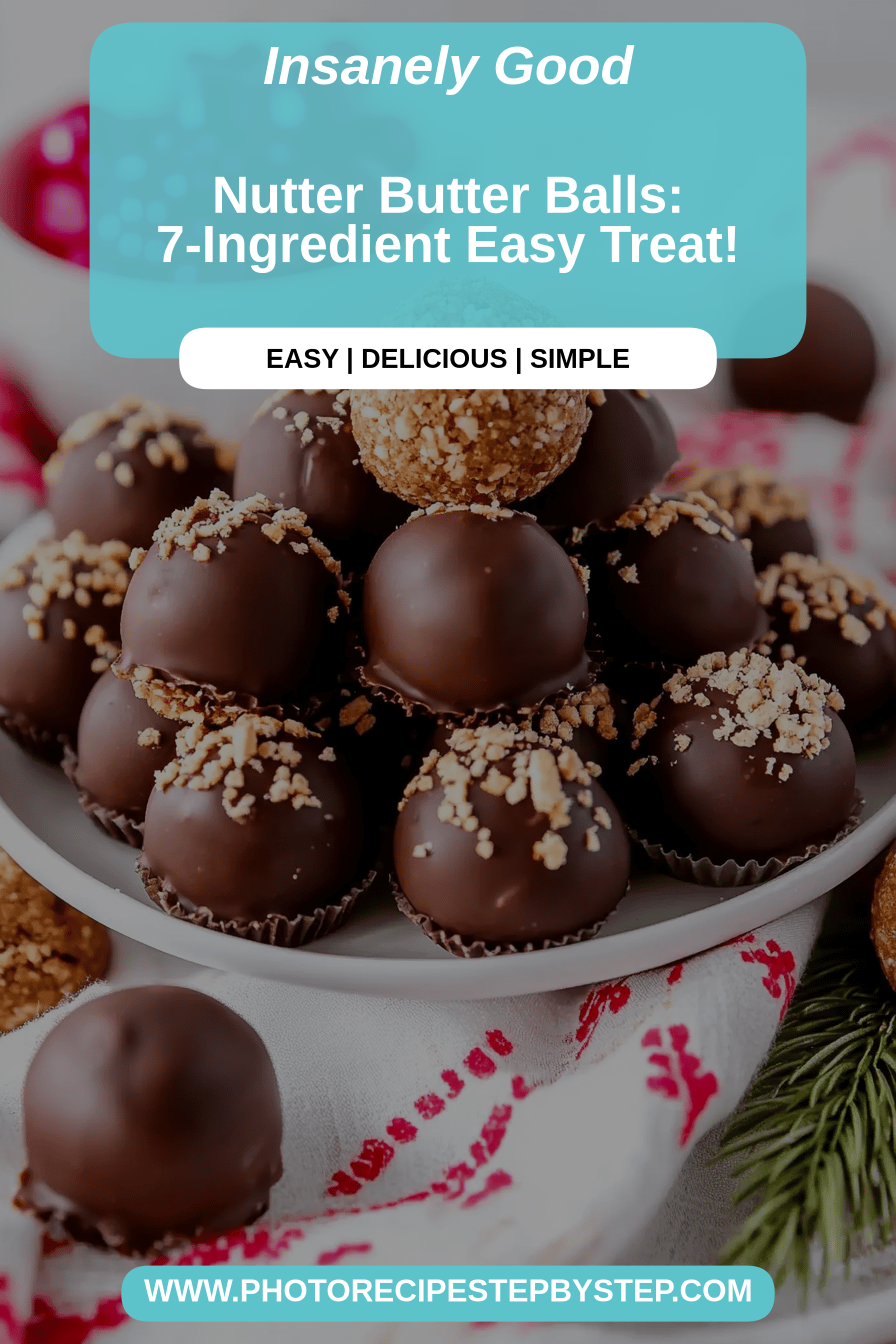
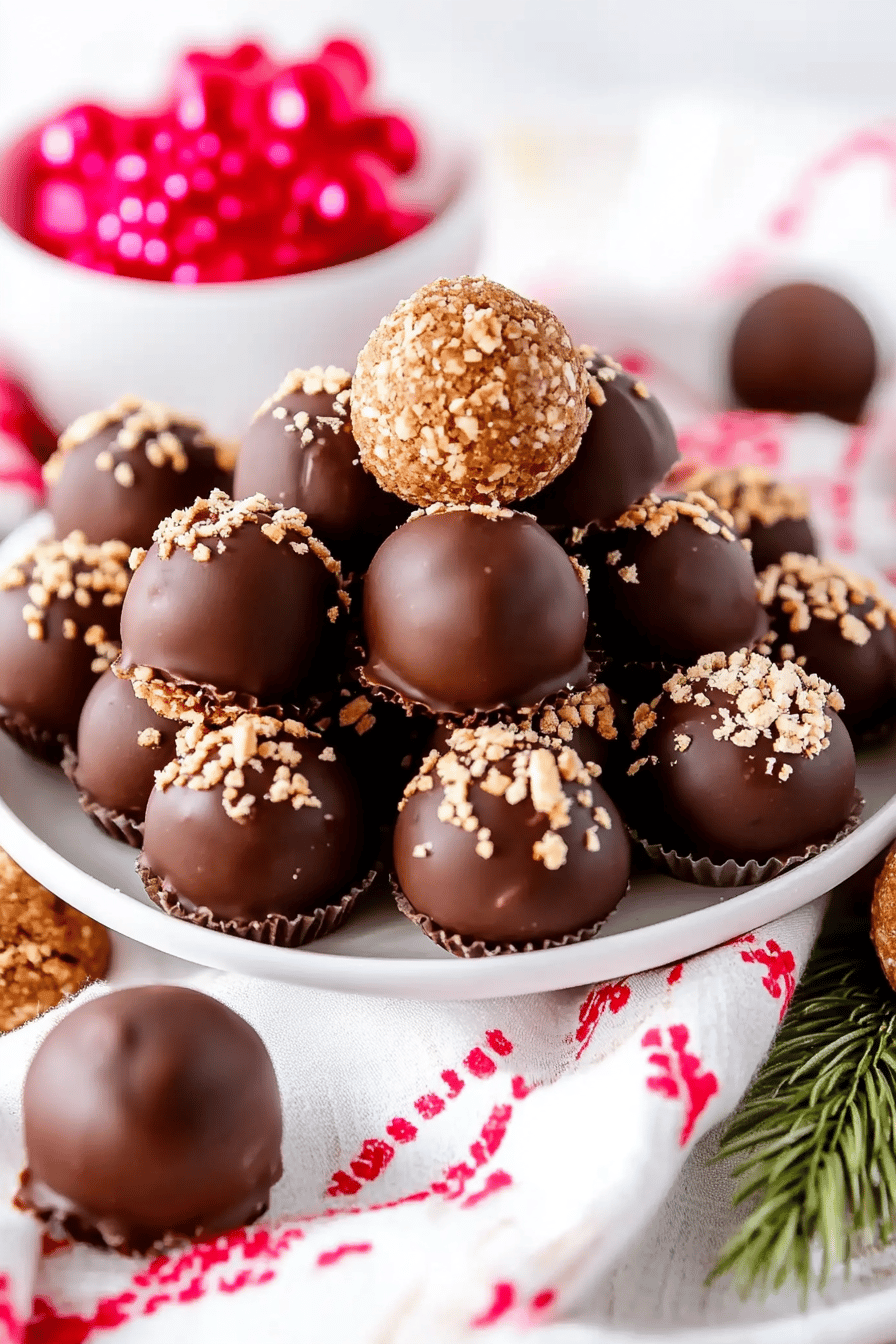
Oh, friends, gather ‘round because I’ve got a recipe that’s pure magic. Seriously, if you’re ever in a pinch, craving something ridiculously tasty without turning on the oven, or just want to make your family (or yourself!) ridiculously happy, these Nutter Butter Balls are your new best friend. They’re like the love child of peanut butter cups and decadent fudge, but with a chewy, delightful surprise inside. I remember the first time I whipped these up for a potluck; I was convinced they’d be a hit, but I had *no* idea they’d vanish so fast. People were practically fighting over the last few! If you’ve ever loved a classic Nutter Butter cookie, imagine that nutty goodness intensified and made into a melt-in-your-mouth bite. It’s that comforting, familiar flavor profile elevated. These little gems are such a lifesaver for busy holidays or just those random Tuesday nights when a sweet tooth strikes hard.
What are nutter butter balls?
So, what exactly *are* these delightful Nutter Butter Balls? Think of them as a no-bake confection that takes all the best parts of a Nutter Butter cookie – that creamy Peanut Butter goodness, the slight sweetness, that satisfying texture – and transforms them into bite-sized balls of pure joy. They’re not just mashed-up cookies, though! We’re building on that flavor with a few extra ingredients to create a rich, creamy interior that’s then enrobed in a smooth, luscious coating. It’s like a gourmet truffle but with that nostalgic Nutter Butter vibe. The name itself just makes you smile, doesn’t it? It’s simple, direct, and tells you exactly what you’re getting: a wonderfully nutty, ball-shaped treat that’s incredibly easy to make. It’s essentially happiness molded into small, irresistible spheres!
Why you’ll love this recipe?
Honestly, there are so many reasons why I keep coming back to these Nutter Butter Balls, and I just know you will too! First off, the flavor. Oh my goodness, the flavor! It’s a deep, rich Peanut Butter experience, balanced perfectly with just the right amount of sweetness. They’re not cloyingly sweet, which is something I really appreciate. Then there’s the texture – they’re soft and chewy on the inside with a delightful, slightly firm coating that gives way to that creamy center. It’s just… satisfying. And let’s talk about simplicity. This recipe is a lifesaver! No oven required, minimal fuss, and it comes together in under 30 minutes (plus chilling time, of course). This makes them perfect for when you have unexpected guests, need a quick dessert for a bake sale, or when you just need a little pick-me-up after a long day. They’re also incredibly budget-friendly. You probably have most of the ingredients in your pantry already! The main stars are usually pantry staples. Plus, they are so versatile. You can dress them up with different toppings or just keep them simple, and they’re always a crowd-pleaser. What I love most about these Nutter Butter Balls is how they bring people together. They remind me of childhood treats, but elevated enough to feel like a real indulgence. They are so much better than a store-bought candy bar, and you can feel good about what’s in them!
How do I make nutter butter balls?
Quick Overview
Making these Nutter Butter Balls is as straightforward as it gets for a homemade treat. You’ll basically be crushing up Nutter butter cookies to form the base, mixing them with a binder and some extra flavor boosters to create a dough, forming that dough into balls, and then coating them in melted chocolate. The beauty of this recipe lies in its simplicity and the fact that it requires no baking at all. Just a bit of mixing, rolling, and chilling. It’s the perfect ‘set it and forget it’ kind of recipe when you need a sweet fix without the oven drama.
Ingredients
For the Main Batter:
Here’s what you’ll need to get that delicious Nutter Butter base going:
- Nutter Butter Cookies: About 2 sleeves (around 35-40 cookies). This is the heart and soul of our Nutter Butter Balls! Make sure they’re fresh so they crush nicely.
- Cream Cheese, softened: 4 ounces. This is key for binding everything together and adding a delightful creaminess. Make sure it’s softened so it incorporates smoothly, no one wants lumpy balls!
- Peanut Butter: 1/2 cup, creamy. Use your favorite brand! I usually stick with the classic Jif or Skippy for this, as they have a good balance of sweetness and saltiness that works perfectly.
- Powdered Sugar: 1 cup. This adds sweetness and helps create that smooth, dough-like consistency we’re aiming for. Sift it if you’re worried about lumps, though usually, it’s not a big deal in this recipe.
- Vanilla Extract: 1 teaspoon. Just a touch to round out all those nutty flavors.
For the Filling:
This is where we add a little extra something-something!
- Peanut Butter: 1/4 cup, creamy. This is for those little pockets of intense peanut butter flavor within the balls.
- Chocolate Chips (optional): 2 tablespoons, mini. These add a delightful little crunch and chocolatey surprise inside if you like!
For the Glaze:
The finishing touch that makes these look and taste professional!
- Chocolate Chips: 1 1/2 cups (semi-sweet or milk chocolate, depending on your preference). I usually lean towards semi-sweet for a nice contrast to the sweetness of the balls, but milk chocolate is lovely too!
- Peanut Butter: 1 tablespoon. This makes the chocolate coating smoother and adds another layer of peanut butter goodness.
- Vegetable Oil or Coconut Oil: 1 teaspoon. This helps the chocolate melt smoothly and achieve a nice, glossy finish. Don’t skip this!
Step-by-Step Instructions
Step 1: Preheat & Prep Pan
You won’t be preheating an oven for this recipe, which is fantastic! What you *will* do is line a baking sheet with parchment paper or wax paper. This is super important because it prevents the Nutter Butter Balls from sticking once they’re coated and chilling. Make sure you have enough space in your fridge or freezer for this baking sheet, as it will need to hold quite a few little treats!
Step 2: Mix Dry Ingredients
First things first, let’s get those Nutter Butter cookies processed. The easiest way to do this is to toss them into a food processor and pulse until you have fine crumbs. If you don’t have a food processor, you can put them in a sturdy zip-top bag, seal it well, and then bash them with a rolling pin or the bottom of a heavy pan until finely crumbled. You want them to be like coarse sand. Once you have your crumbs, transfer them to a medium-sized bowl. We’re not mixing anything else in yet, but having your crumbs ready is step one!
Step 3: Mix Wet Ingredients
In a separate, larger bowl, add your softened cream cheese and creamy peanut butter. Beat them together with an electric mixer (or a sturdy whisk and some elbow grease!) until they are completely smooth and well combined. You don’t want any lumps of cream cheese visible. This forms the creamy base that will bind our cookie crumbs together. Then, gradually add your sifted powdered sugar and vanilla extract. Mix on low speed at first until the sugar is incorporated, then increase the speed and beat until everything is light and fluffy. This is going to look like a thick peanut butter frosting at this stage, and that’s exactly what you want!
Step 4: Combine
Now, it’s time to bring those cookie crumbs and the creamy peanut butter mixture together. Add the Nutter Butter cookie crumbs to the bowl with the cream cheese and peanut butter mixture. Using a sturdy spoon or a rubber spatula, start mixing everything together. It will feel a bit stiff at first, but keep working it. You can also use your hands for this part – I often find it’s the easiest way to ensure everything is thoroughly combined. You want to mix until a cohesive dough forms that you can easily roll. If the mixture feels too dry and crumbly, you can add a tiny bit more cream cheese (like, half a teaspoon at a time) or a splash of milk. If it feels too sticky, add a tablespoon more of powdered sugar.
Step 5: Prepare Filling
This step is optional but so worth it! Take your 1/4 cup of creamy peanut butter and, if you’re using them, stir in those mini chocolate chips. You want this filling mixture to be thick. If it’s too runny, pop it in the fridge for about 10 minutes. This filling is going to be the surprise center of our Nutter Butter Balls, so we want it to hold its shape.
Step 6: Layer & Swirl
Now for the fun part: rolling! Take about a tablespoon of the main dough mixture and roll it into a ball. If you’re using the filling, flatten the ball slightly in your palm, place about a teaspoon of the peanut butter filling in the center, and then carefully wrap the dough around the filling, pinching to seal it completely. Roll it gently between your palms to form a smooth ball. Place the finished ball onto your prepared baking sheet. Repeat with the remaining dough and filling. Make sure to really seal the filling inside, otherwise, it might ooze out when you coat them. You should get around 20-24 balls, depending on how big you make them.
Step 7: Bake
Just kidding! No baking required here! The balls need to firm up, though. Pop the baking sheet with your rolled balls into the freezer for about 15-20 minutes, or into the refrigerator for at least 30 minutes. This chilling step is crucial because it makes them firm enough to handle when dipping them into the melted chocolate without falling apart.
Step 8: Cool & Glaze
Once your balls are nicely chilled and firm, it’s time for the glorious chocolate coating. In a microwave-safe bowl, combine your 1 1/2 cups of chocolate chips, 1 tablespoon of peanut butter, and 1 teaspoon of oil. Microwave in 30-second intervals, stirring well after each interval, until the chocolate is completely melted and smooth. Be careful not to overheat it! You can also melt this in a double boiler on the stovetop. Now, take your chilled Nutter Butter Balls and dip them one by one into the melted chocolate, using a fork or a toothpick to help you turn them and coat them completely. Let any excess chocolate drip back into the bowl. Place the coated balls back onto the parchment-lined baking sheet. If the chocolate starts to harden, just pop it back in the microwave for a few seconds. You can even drizzle a little extra melted chocolate over the tops for decoration if you like!
Step 9: Slice & Serve
Once all your Nutter Butter Balls are coated, place the entire baking sheet back into the refrigerator for about 30 minutes, or until the chocolate coating is completely set. Once they’re firm, you can serve them immediately! They’re best served slightly chilled. To store them, keep them in an airtight container in the refrigerator. These are wonderful for parties, bake sales, or just enjoying with a glass of milk!
What to Serve It With
These Nutter Butter Balls are so incredibly versatile, they fit in pretty much anywhere! For breakfast, they’re a fun little treat to add to a platter alongside some fresh fruit and yogurt. Imagine a weekend brunch spread with these alongside pancakes and bacon – pure heaven! If you’re serving them as dessert, they’re fantastic on their own, but they also pair beautifully with a scoop of vanilla ice cream or a rich cup of coffee. My kids absolutely love them as a cozy snack after school. They’re perfect for dipping into a glass of cold milk. For more grown-up gatherings, I sometimes serve them on a pretty tiered stand with other small desserts or alongside a cheese board for a sweet counterpoint. They’re also a fantastic addition to holiday cookie platters; they add a unique texture and flavor profile that stands out amongst the usual suspects. Honestly, any time you’re craving something sweet and utterly delicious, these Nutter Butter Balls are the answer!
Top Tips for Perfecting Your Nutter Butter Balls
I’ve made these Nutter Butter Balls more times than I can count, and through all those batches, I’ve picked up a few tricks that really make a difference. For the cookie crumbs, aim for a fine texture – this is crucial for creating a dough that holds together well. If your crumbs are too chunky, the dough can be crumbly and harder to roll. When it comes to the cream cheese and peanut butter mixture, ensure the cream cheese is truly softened. I can’t stress this enough! Cold cream cheese will lead to a lumpy, uneven dough, and nobody wants that. If your peanut butter is very oily, you might want to give it a quick stir before measuring to ensure it’s well combined. For the dough itself, don’t be afraid to use your hands! It’s honestly the best way to feel if it’s the right consistency. It should be firm enough to roll into balls without sticking excessively to your hands. If it feels too sticky, add a little more powdered sugar; if it’s too dry and crumbly, a touch more cream cheese or milk will do the trick. When forming the balls with the optional filling, make sure to seal them really well. I’ve had a few escapees in my day because I didn’t pinch the dough shut tight enough, and the filling oozed out during the chocolate coating stage. For the chocolate coating, using a good quality chocolate makes a world of difference in taste and how smoothly it melts. If your chocolate seems a bit too thick, that tablespoon of peanut butter and the teaspoon of oil are your best friends for achieving a silky, pourable consistency. And remember, chilling is your friend! Properly chilled balls are much easier to coat evenly, and the chocolate sets up beautifully. For extra flair, once they’re coated, you can always sprinkle a few chopped peanuts or mini chocolate chips on top while the chocolate is still wet.
Storing and Reheating Tips
These Nutter Butter Balls are incredibly forgiving when it comes to storage, which is another reason I love them so much. Since they’re coated in chocolate and have cream cheese in the base, the refrigerator is generally the best place for them. You can store them in an airtight container at room temperature for a day or two, especially if your kitchen is cool, but they’ll hold their texture and firmness best when chilled. In the refrigerator, they’ll stay delicious for up to a week, maybe even 10 days if they’re well-sealed. Just make sure to use a container that won’t allow air in, as that can dry them out or make the chocolate coating look dull. I usually stack them in layers with parchment paper in between to prevent them from sticking together. Freezing is also an option for longer storage! You can freeze the coated balls for up to 2-3 months. The best way to do this is to freeze them on the baking sheet first until solid, then transfer them to a freezer-safe bag or container. Thaw them slowly in the refrigerator overnight before enjoying. The glaze timing advice is simple: glaze them *just before* you’re ready to store or serve them. If you glaze them too far in advance and store them at room temperature, the chocolate can get a bit soft. For refrigerator or freezer storage, glazing them beforehand is perfect because the cold environment helps the chocolate set up beautifully.
Frequently Asked Questions
Final Thoughts

So there you have it, my friends! My absolute favorite Nutter Butter Balls. They’re a testament to the fact that you don’t need a fancy oven or hours of your time to create something truly delicious and memorable. They’re nostalgic, comforting, and undeniably addictive. I hope you get a chance to make these soon and share them with your own loved ones. Whether you’re a seasoned baker or a complete beginner, these are foolproof and guaranteed to bring smiles. If you try them out, please, please let me know how they turn out! I love seeing your creations and hearing your stories. Drop a comment below, or share your pictures on social media and tag me – I can’t wait to see them! Happy baking (or rather, no-baking)!

Nutter Butter Balls
Ingredients
Main Ingredients
- 36 cookies Nutter Butter cookies
- 4 ounces cream cheese softened
- 1 cup creamy peanut butter
- 2 cups powdered sugar
- 2 cups chocolate chips for melting and drizzling
Instructions
Preparation Steps
- Crush the Nutter Butter cookies into fine crumbs. You can do this in a food processor or by placing them in a zip-top bag and crushing them with a rolling pin.
- In a large bowl, combine the cookie crumbs, softened cream cheese, and creamy peanut butter. Mix until well combined and a dough-like consistency forms.
- Gradually add the powdered sugar, mixing until the dough is no longer sticky and is easy to roll.
- Roll the dough into small balls, about 1 inch in diameter. Place the balls on a baking sheet lined with parchment paper.
- Melt the chocolate chips in a microwave-safe bowl in 30-second intervals, stirring in between, until smooth. Alternatively, melt them in a double boiler.
- Drizzle the melted chocolate over the Nutter Butter balls. You can dip them partially or fully in the chocolate if desired.
- Refrigerate the balls for at least 30 minutes to allow the chocolate to set and the balls to firm up.
- Serve and enjoy!
