

I have to tell you, there are some recipes that just become part of your soul, aren’t there? This Crockpot Candy is absolutely one of those for me. It’s the kind of treat that smells like pure happiness wafting from the kitchen, and the way it just melts in your mouth? Pure magic. I remember the first time I stumbled upon a recipe like this, and it felt like I’d unlocked a secret to effortless indulgence. It’s honestly as easy as stirring things together and letting your slow cooker do all the heavy lifting. Forget complicated baking projects when a craving strikes; this is your ultimate shortcut to something truly special. It’s honestly one of my absolute favorite sweet treats, right up there with my mom’s famous Chocolate Chip Cookies, but with a fraction of the effort!

What is crockpot candy?
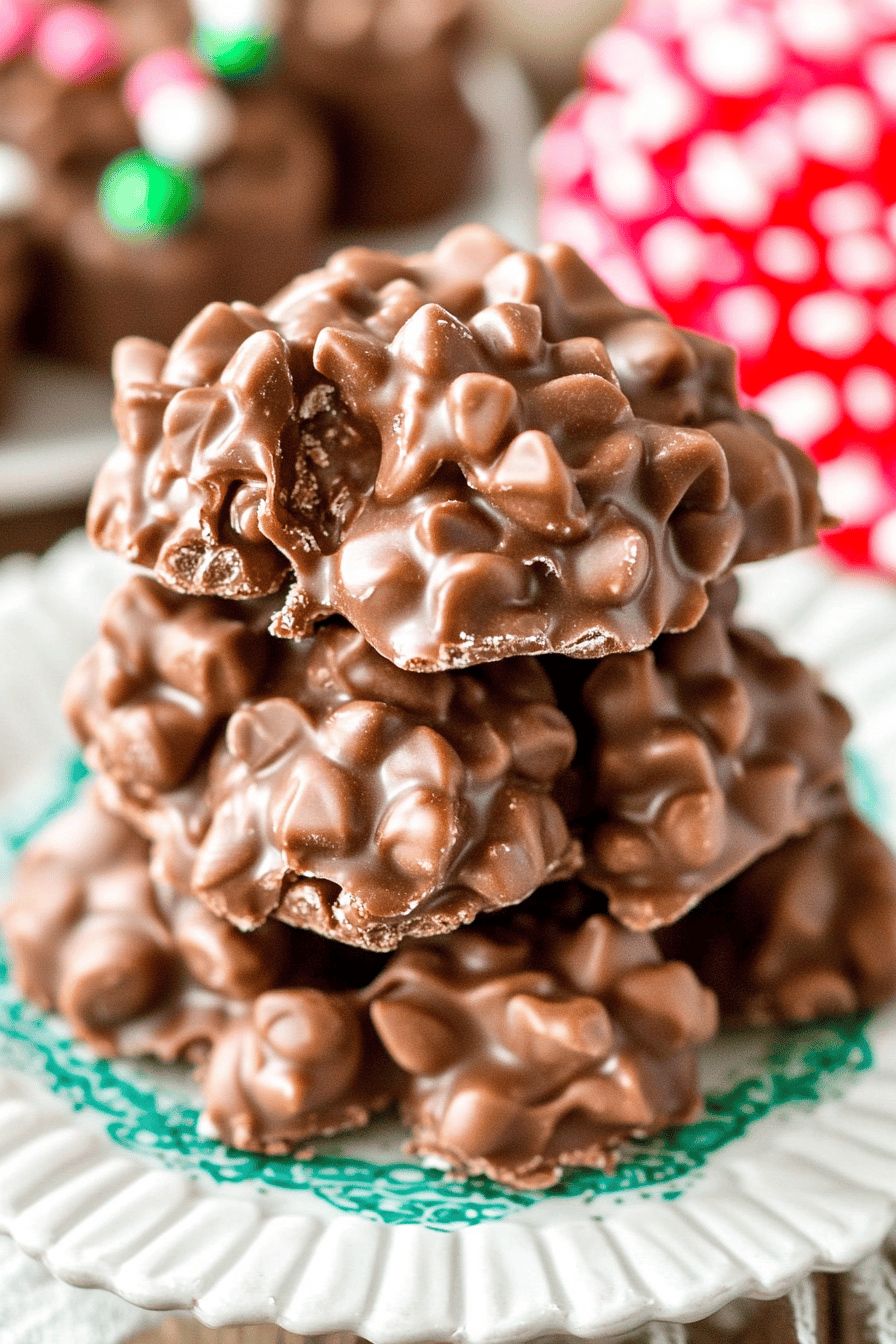
So, what exactly *is* Crockpot Candy? Think of it as the coziest, easiest no-bake fudge-like confection you could ever dream up. The name itself gives you a pretty good clue, right? It’s made right in your slow cooker! Essentially, you combine a few simple ingredients, let them melt and meld together on low heat, and then add in your delightful mix-ins. It’s this incredible blend of creamy, sweet, and often a little nutty, all achieved with minimal fuss. It’s not baked in the traditional sense, which is a huge part of its charm. It’s more like a gentle simmering process that transforms humble ingredients into a decadent treat. It’s the kind of thing that always surprises people when you tell them how you made it because it tastes so much more involved than it actually is!
Why you’ll love this recipe?
Honestly, there are so many reasons why this Crockpot Candy recipe has earned a permanent spot in my recipe binder, and I just know you’re going to fall in love with it too. First off, the flavor is just out of this world. It’s rich, sweet, and has this wonderful creamy texture that’s utterly addictive. It’s got that perfect balance of sweetness without being cloying, especially with the nuts adding a nice depth. And let’s talk about simplicity – this is where it truly shines. If you can stir, you can make this! It’s a lifesaver when you need a dessert in a hurry or when you’re just not feeling up to a whole production in the kitchen. My kids ask for this all the time, especially around holidays, and I can whip it up with hardly any stress. Plus, it’s wonderfully budget-friendly. The ingredients are staples in most pantries, making it an affordable way to create a truly gourmet-tasting treat. You can serve it at parties, package it up as gifts, or just enjoy it yourself with a cup of coffee. What I love most about this is how forgiving it is. Unlike some baked goods that can be finicky, this Crockpot Candy just seems to work, every single time. It’s a real crowd-pleaser that consistently gets rave reviews, and I know you’ll feel the same way!
How do you make crockpot candy?
Quick Overview
Making this Crockpot Candy is wonderfully straightforward. You’ll basically melt your chocolate and Peanut Butter together in the slow cooker, stir in your crunchy bits, and then let it set. That’s it! The beauty of using the slow cooker is that it provides a consistent, gentle heat, ensuring everything melts smoothly without scorching. This method guarantees a perfectly creamy and uniform texture that’s hard to achieve on the stovetop for many people. It’s designed for maximum flavor with minimum effort, making it a stress-free win for anyone looking for a delicious homemade treat.
Ingredients
For the Main Batter:
This is where the creamy magic begins! I always opt for good quality chocolate chips because it really does make a difference in the final flavor and smoothness. Semi-sweet is my go-to, but you can experiment! A good brand of Peanut Butter is also key; the creamy kind works best for that smooth texture. I’ve tested this with chunky peanut butter, and while it adds texture, it doesn’t quite give you that same melt-in-your-mouth fudge consistency. For about a 3-quart slow cooker, I usually use:
- 1 bag (12 oz) semi-sweet chocolate chips
- 1 cup creamy peanut butter (look for natural peanut butter that doesn’t separate too much for best results)
For the Filling:
This is where we add the delightful crunch and texture! These are my personal favorites, but feel free to get creative. I always make sure my nuts are lightly toasted beforehand if they aren’t already – it just brings out their flavor so much more.
- 2 cups crispy rice cereal (the classic kind!)
- 1 cup chopped peanuts (or pecans, walnuts, or even almonds!)
- 1/2 cup mini marshmallows (these add a lovely chewiness!)
For the Glaze:
This is optional, but highly recommended for that extra touch of sweetness and visual appeal. It’s super simple and really elevates the candy. You want the glaze to be pourable but not too thin.
- 1/4 cup white chocolate chips
- 1 teaspoon coconut oil (or vegetable oil)

Step-by-Step Instructions
Step 1: Preheat & Prep Pan
First things first, let’s get our slow cooker ready. You’ll want to lightly grease a 3-quart slow cooker insert or line it with parchment paper. If you’re using parchment, make sure it comes up the sides a bit so you can easily lift the candy out later. Don’t turn the slow cooker on yet! This is just about getting your workspace prepped.
Step 2: Mix Dry Ingredients
In a separate large bowl, combine all your filling ingredients: the crispy rice cereal, chopped nuts, and mini marshmallows. Give them a good stir with a spatula to distribute everything evenly. You want to make sure those marshmallows are nicely mixed in so you get a bit of chewy goodness in every bite.
Step 3: Mix Wet Ingredients
Now for the melty part! Add the semi-sweet chocolate chips and the creamy Peanut Butter directly into your prepared slow cooker insert. Turn your slow cooker to the low setting. You’ll let this melt for about 1 hour, stirring every 20 minutes or so, until it’s completely smooth and combined. Resist the urge to turn it to high; low and slow is the key here for a perfect melt without any bitterness.
Step 4: Combine
Once your chocolate and peanut butter mixture is beautifully melted and smooth in the slow cooker, it’s time to bring it all together. Pour the dry ingredients (cereal, nuts, marshmallows) directly into the slow cooker with the melted chocolate and peanut butter. Stir gently but thoroughly with a sturdy spatula until everything is evenly coated. You want to make sure every single piece of cereal and nut is enveloped in that glorious chocolatey goodness!
Step 5: Prepare Filling
This step is actually done concurrently with Step 4, but I like to think of it as preparing the “filling” of deliciousness. As you’re stirring the dry ingredients into the melted chocolate in the slow cooker, you’re essentially creating your final candy mixture. The goal is just to combine it all until no dry spots remain. The heat from the chocolate mixture will slightly soften the marshmallows, making them wonderfully chewy.
Step 6: Layer & Swirl
This step isn’t really applicable to this particular recipe as it’s not a layered cake or swirl brownie. The mixture is combined all at once in the slow cooker. What you’re aiming for is a uniform blend of all the ingredients.
Step 7: Bake
Actually, this recipe doesn’t get “baked” in the traditional sense! It’s a no-bake recipe that uses the gentle heat of the slow cooker to melt the ingredients. After you’ve thoroughly mixed everything together in Step 4, you’ll turn the slow cooker OFF. Let the mixture sit in the warm slow cooker insert for about 10-15 minutes to allow it to thicken up slightly and the marshmallows to get perfectly gooey.
Step 8: Cool & Glaze
Carefully lift the parchment paper (or pour directly if you greased the insert) onto a baking sheet or a flat surface. At this point, you can either leave it as one big slab or gently press it into your desired shape. Let it cool at room temperature for about 30 minutes until it’s firm enough to handle. If you’re adding the white chocolate glaze, melt the white chocolate chips with the coconut oil in a small bowl (either in the microwave for 30-second intervals, stirring in between, or over a double boiler). Drizzle this over the cooled candy. Then, let it set completely, which usually takes another hour or so at room temperature, or you can speed it up in the refrigerator.
Step 9: Slice & Serve
Once your Crockpot Candy is completely set and the glaze has hardened, you can cut it into squares or rectangles. Use a sharp knife for clean cuts. The easiest way to serve it is directly from the cutting board or arrange the pieces on a platter. It’s best enjoyed at room temperature when it has that perfect chewy-crisp-melty texture.
What to Serve It With
This Crockpot Candy is so versatile, it works for just about any occasion! For a cozy breakfast or brunch, I love serving it alongside a steaming mug of strong coffee or a creamy latte. It’s the perfect sweet little bite to accompany a pastry or a piece of fruit. For a more elegant brunch spread, I might arrange the squares artfully on a tiered stand with some fresh berries or even a dollop of whipped cream. As a dessert, it’s an absolute winner. It’s delicious served after a hearty meal, especially paired with a glass of milk or a dessert wine. And my personal favorite? Those late-night cravings! When I just need something sweet and satisfying but don’t want to turn on the oven, this Crockpot Candy is my go-to. I’ll just grab a small square (or two!) and a warm cup of herbal tea. It’s that perfect little indulgence that feels special without requiring any effort. My family also loves having these during movie nights – they disappear so fast!
Top Tips for Perfecting Your Crockpot Candy
Over the years, I’ve picked up a few little tricks that I think make this Crockpot Candy even better, and I’m happy to share them with you! For the crispy rice cereal, make sure it’s fresh and not stale. Stale cereal can make your candy a bit chewy instead of perfectly crisp. When you’re melting the chocolate and peanut butter, don’t be tempted to rush it by turning up the heat. Low and slow is truly the way to go to prevent scorching and ensure that super smooth texture. If your peanut butter is very stiff, you can warm it slightly in the microwave for about 15-20 seconds before adding it to the slow cooker; this helps it melt more evenly with the chocolate. For the nuts, toasting them lightly in a dry skillet before adding them really amps up their flavor. I usually do this while the chocolate is melting. If you’re using different nuts, like pecans or walnuts, give them a rough chop so you get nice pieces throughout, not just dust. When you’re mixing the dry ingredients into the melted chocolate, stir gently but thoroughly. You don’t want to crush the cereal or break the marshmallows too much, but you definitely want everything well coated. If you find your mixture seems a little too stiff to stir, you can always add another tablespoon or two of peanut butter or a tiny splash of milk (though I usually avoid milk if I can, to keep it dairy-free for some friends). For the white chocolate glaze, using a teaspoon of coconut oil or vegetable oil really helps to make it smooth and drippy, perfect for drizzling. Don’t overdo the oil, though, or it can become too runny. And if you want to make this even more festive, you can add a few sprinkles on top of the white chocolate drizzle before it sets! I’ve also experimented with adding a pinch of sea salt to the main mixture for a salted caramel vibe, which is divine!
Storing and Reheating Tips
One of the best things about this Crockpot Candy is how well it stores. Once it’s completely set, you can store it at room temperature in an airtight container for up to a week. I usually layer the pieces between parchment paper to prevent them from sticking together, especially if the weather is warm. If your kitchen tends to be on the warmer side, or if you’ve added a lot of glaze, popping it in the refrigerator is a great option. In the fridge, it will stay fresh for about two weeks. Just make sure it’s in a sealed container or a good quality zip-top bag to prevent it from absorbing any odors. Now, reheating isn’t typically necessary since it’s meant to be enjoyed at room temperature or slightly chilled, but if you find it’s gotten a bit too hard from refrigeration, you can leave it out for about 20-30 minutes before serving. If you’re making it ahead for a gift or a party, I recommend adding the glaze just before you plan to serve it or store it at room temperature, as the glaze can sometimes get a little cloudy in the fridge. For long-term storage, you can absolutely freeze this Crockpot Candy! Wrap individual pieces or small stacks tightly in plastic wrap, then place them in a freezer-safe container or bag. It should last for up to 2-3 months in the freezer. Thaw it overnight in the refrigerator, then let it come to room temperature for about an hour before enjoying.
Frequently Asked Questions
Final Thoughts
I truly hope you give this Crockpot Candy a try! It’s one of those recipes that just brings pure joy, both in the making and the eating. It’s incredibly satisfying to create something so delicious with so little effort, and it’s always a hit with family and friends. It’s the perfect example of how simple ingredients can transform into something truly special. If you love easy, no-bake treats, you might also enjoy my recipe for easy no-bake cookies or my foolproof fudge! I can’t wait to hear what you think once you’ve made it. Let me know in the comments below how yours turned out, what delicious variations you tried, or any other tips you discovered. Happy candy-making!

Crockpot Candy
Ingredients
Main Ingredients
- 0.5 cup butter
- 1 cup granulated sugar
- 1 can evaporated milk 12 oz
- 1 package semisweet chocolate chips 11.5 oz
- 1 package peanut butter chips 11.5 oz
- 1 teaspoon vanilla extract
- 1 cup peanuts or other nuts like pecans or walnuts, optional
Instructions
Preparation Steps
- Grease a 9x13 inch baking dish with butter or cooking spray.
- In a slow cooker, combine butter, granulated sugar, and evaporated milk.
- Cook on low for 1 hour, stirring occasionally.
- Remove from heat and stir in the semisweet chocolate chips and peanut butter chips until completely melted and smooth.
- Stir in the vanilla extract and peanuts (if using).
- Pour the mixture into the prepared baking dish and spread evenly.
- Let it cool completely at room temperature, then cut into squares.
