
There are some dishes that just feel like a warm hug in a bowl, and for me, that’s always been chili mac and cheese. It’s the ultimate comfort food, a perfect marriage of two beloved classics that somehow tastes even better than the sum of its parts. I remember my mom making a version of this when I was a kid, usually on those chilly fall evenings when the leaves were turning vibrant shades of red and orange. The aroma would fill our little house, and I’d practically be glued to the kitchen doorway, waiting for my steaming bowl. It’s that kind of magic, that nostalgic warmth, that I’ve tried to capture in this recipe. If you’ve ever thought about combining the rich, hearty goodness of chili with the creamy, cheesy delight of macaroni and cheese, then trust me, you’re in for a real treat. This isn’t just a meal; it’s an experience. It’s the kind of dish that makes a weeknight feel special and a weekend feel even more relaxed. It’s hands-down one of my family’s favorite meals, and I’m so excited to share my go-to chili mac and cheese recipe with you.

What is Chili Mac
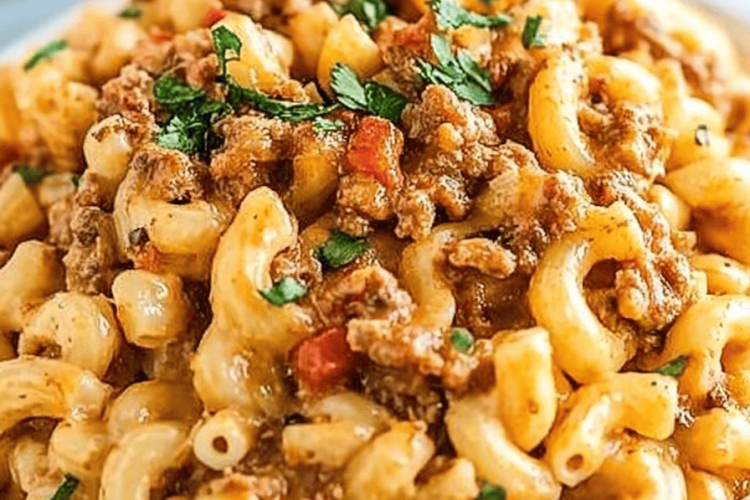
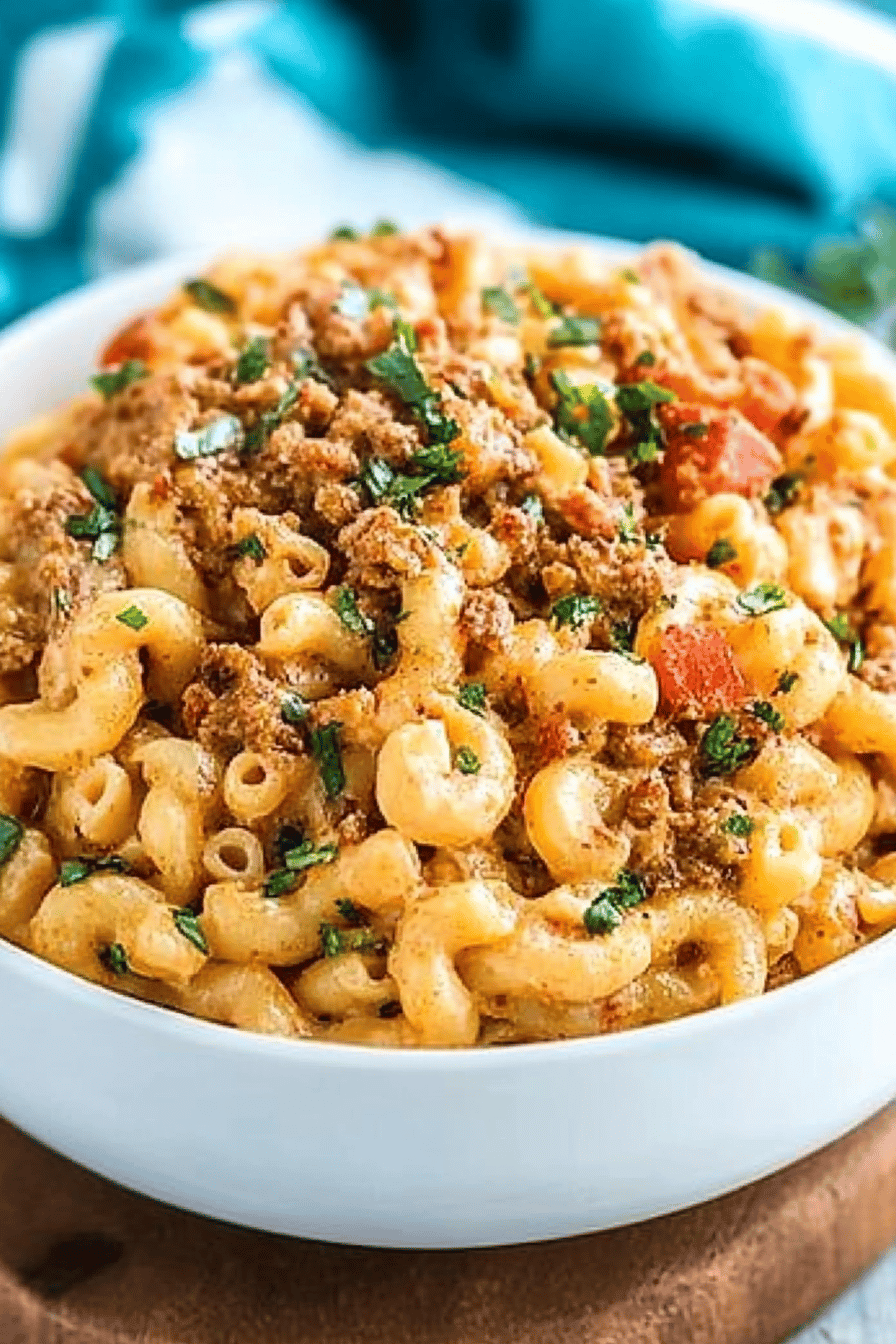
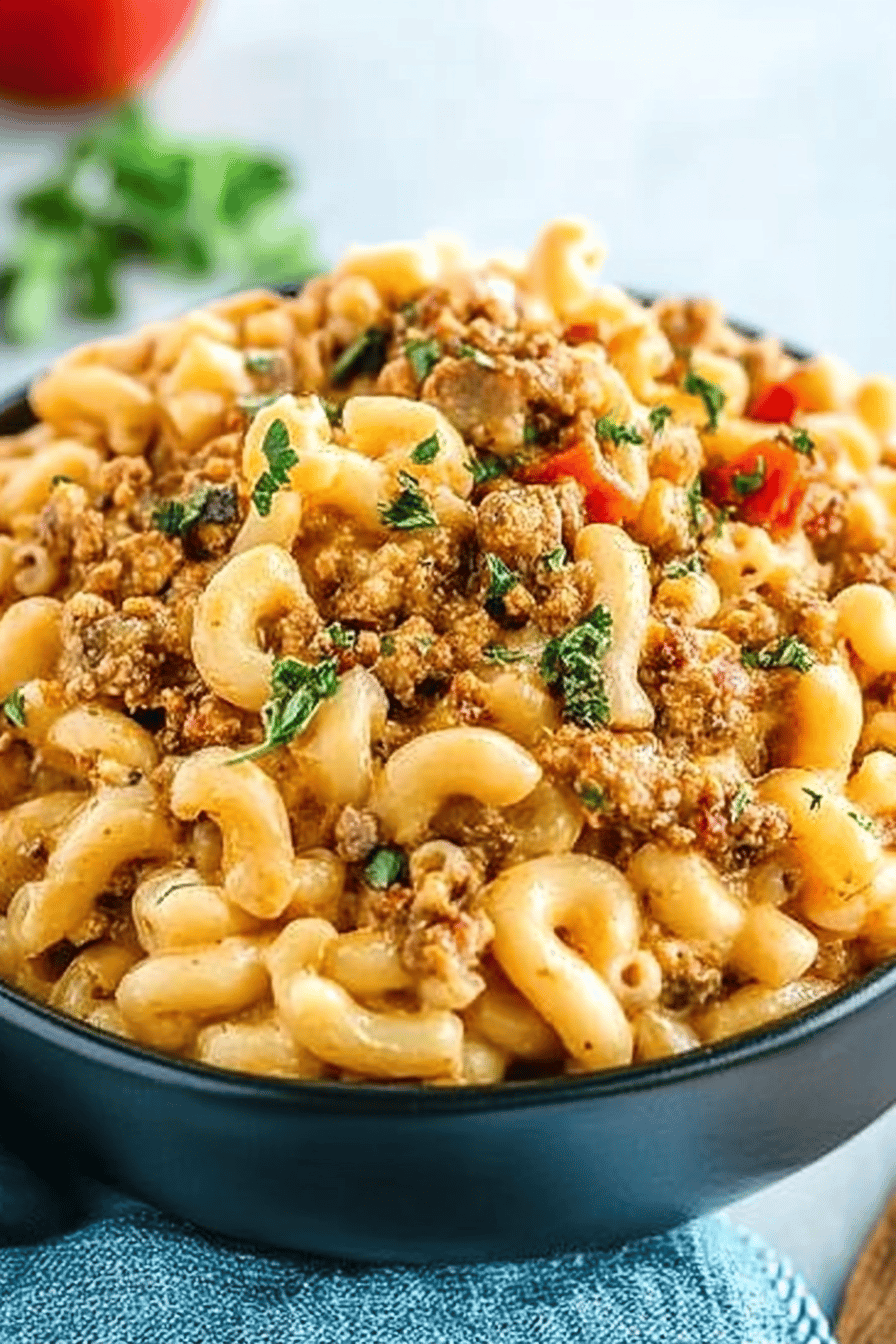
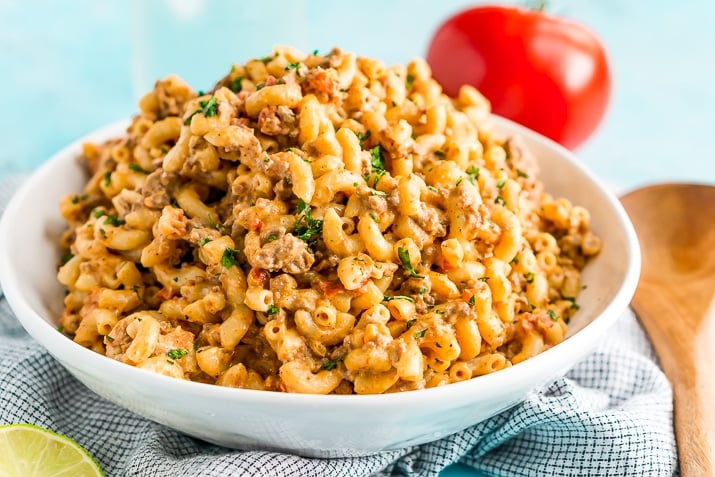
So, what exactly *is* chili mac and cheese? In its simplest, most glorious form, it’s exactly what it sounds like: a delightful fusion of chili and macaroni and cheese. Think of it as the best of both worlds rolled into one incredibly satisfying dish. You’ve got the robust, flavorful elements of a hearty chili – the tender ground meat, the savory spices, the rich tomato base – all mingling with the comforting, velvety goodness of perfectly cooked macaroni coated in a creamy cheese sauce. It’s not just dumping chili on top of mac and cheese, though; it’s about creating a harmonious blend where the flavors complement and enhance each other. The spices from the chili weave through the cheesy pasta, and the creamy sauce mellows the chili just enough to make it utterly irresistible. It’s a dish that manages to be both familiar and excitingly new, all at once. It’s that kind of culinary alchemy that makes me fall in love with cooking all over again, every single time I make it.
Why you’ll love this
There are so many reasons why this chili mac and cheese recipe has become a staple in my kitchen, and I’m pretty sure it’s going to win over your family too! First and foremost, the flavor is just out of this world. It’s a deep, rich, savory experience with just the right amount of warmth from the spices. The creamy cheese sauce cuts through the heartiness of the chili, creating this perfect balance that’s just… sublime. My kids, who can be notoriously picky, devour this. Seriously, it disappears in minutes! Beyond the incredible taste, what I truly adore about this recipe is its simplicity. Even on a busy weeknight, I can whip this up without feeling overwhelmed. It’s a lifesaver when you need a filling, delicious meal that doesn’t require hours in the kitchen. And let’s talk about budget-friendliness! The ingredients are all really common and affordable, making it a fantastic option for feeding a crowd or just treating your family without breaking the bank. Plus, it’s incredibly versatile. You can easily customize the level of spice, add different vegetables, or swap out the types of cheese. It’s also perfect for leftovers; in fact, I think it tastes even better the next day! It’s a dish that truly delivers on all fronts: taste, ease, and affordability, making it a winner in my book.
How do I make chili mac
Quick Overview
Making this chili mac and cheese is surprisingly straightforward. We’ll start by browning some savory ground beef with onions and garlic, then simmer it with tomatoes, beans, and a medley of chili spices. While that’s bubbling away, we’ll cook our macaroni to al dente perfection and whip up a quick, ultra-creamy cheese sauce. Finally, we’ll combine everything, bake it until it’s bubbly and golden, and serve it up hot. It’s a process that truly builds layers of flavor, resulting in a dish that’s both deeply satisfying and incredibly comforting. The best part? It all comes together without any fuss.
Ingredients
For the Chili Base:
1 pound ground beef (80/20 is my go-to for flavor)
1 medium yellow onion, finely chopped
2 cloves garlic, minced
1 (15-ounce) can kidney beans, rinsed and drained
1 (15-ounce) can black beans, rinsed and drained
1 (28-ounce) can crushed tomatoes
1 (8-ounce) can tomato sauce
2 tablespoons chili powder (adjust to your spice preference!)
1 teaspoon cumin
1/2 teaspoon smoked paprika
1/4 teaspoon cayenne pepper (optional, for a little kick)
Salt and freshly ground black pepper to taste
For the Macaroni and Cheese:
12 ounces elbow macaroni (or your favorite pasta shape that holds sauce well)
1/4 cup unsalted butter
1/4 cup all-purpose flour
3 cups whole milk (I find whole milk makes the creamiest sauce)
8 ounces sharp cheddar cheese, shredded
4 ounces Monterey Jack cheese, shredded (for extra meltiness)
Salt and freshly ground black pepper to taste
For Topping (Optional but Recommended!):
Shredded cheddar cheese
Chopped fresh cilantro
Sour Cream or plain Greek yogurt
Diced red onion
Step-by-Step Instructions
Step 1: Preheat & Prep Pan
First things first, let’s get our oven preheated to 375°F (190°C). I like to use a 9×13 inch baking dish for this. If it’s not a non-stick one, a quick spray with cooking oil or a little butter will prevent any sticking nightmares later on. Trust me, it’s worth that extra little step!
Step 2: Mix Dry Ingredients
This step is actually part of the chili process. In a large pot or Dutch Oven, I like to start by browning my ground beef over medium-high heat. Once it’s nicely browned, I’ll drain off any excess grease. Then, I’ll add the chopped onion and cook until it’s softened and a little translucent, usually about 5-7 minutes. After that, the minced garlic goes in for about a minute until fragrant. Now for the dry spices: chili powder, cumin, smoked paprika, and cayenne if you’re feeling brave! Stir them in and let them toast for about 30 seconds; this really wakes up their flavors.
Step 3: Mix Wet Ingredients
To the pot with the beef and onion mixture, I add the crushed tomatoes and tomato sauce. Give it a good stir to combine everything. Now, here’s where the heartiness comes in: add the rinsed and drained kidney and black beans. Season generously with salt and pepper. Bring the mixture to a simmer, then reduce the heat to low, cover, and let it cook for at least 20 minutes. The longer it simmers, the more the flavors meld together, which is exactly what we want for the best chili base. While the chili simmers, let’s get the mac and cheese going!
Step 4: Combine
While the chili is simmering, cook your elbow macaroni according to package directions until it’s just al dente – we don’t want mushy pasta! Drain it well and set aside. Now, let’s make our cheese sauce. In a separate saucepan, melt the butter over medium heat. Whisk in the flour and cook for about 1-2 minutes, stirring constantly, to make a roux. This will thicken our sauce. Gradually whisk in the milk, a little at a time, ensuring it’s smooth before adding more. Keep stirring until the sauce thickens and just begins to bubble. Remove from heat and stir in the shredded cheddar and Monterey Jack cheeses until they’re completely melted and the sauce is wonderfully smooth and creamy. Season with salt and pepper to taste. Don’t be tempted to boil this sauce once the cheese is in!
Step 5: Prepare Filling
The chili base itself is our filling here! After simmering for at least 20 minutes, taste and adjust seasonings if needed. You want it to be rich, savory, and perfectly spiced. If it seems a little too thick, you can always add a splash more water or tomato sauce. If it’s not thick enough, let it simmer uncovered for a few more minutes.
Step 6: Layer & Swirl
This is where the magic happens! Add the cooked macaroni to the pot with the chili base. Stir gently to combine everything until the pasta is well coated. Now, pour about half of this chili-mac mixture into your prepared baking dish. Spoon the cheese sauce evenly over the top, trying to get it into all the nooks and crannies. Then, carefully spoon the remaining chili-mac mixture over the cheese sauce. You can lightly spread it or leave it a little rustic – either way works! If you want to go the extra mile, you can sprinkle a little more shredded cheddar cheese over the top for an even cheesier finish.
Step 7: Bake
Pop that baking dish into your preheated oven. Bake for 20-25 minutes, or until the chili mac and cheese is heated through, bubbly around the edges, and the cheese on top is melted and slightly golden. The whole house will start to smell amazing at this point, I guarantee it!
Step 8: Cool & Glaze
Once it’s out of the oven, resist the urge to dive in immediately! Let it cool for about 5-10 minutes. This allows everything to set up slightly, making it easier to serve and preventing those accidental burns. If you’re adding extra cheese on top, this is when it melts into perfection. The “glaze” here is really the melted cheese and the rich chili sauce – no need for a separate glaze!
Step 9: Slice & Serve
Cut into generous portions and serve hot. Now’s the time to add your favorite toppings! A dollop of sour cream, some fresh cilantro, a sprinkle of diced red onion – they all add wonderful texture and freshness. Enjoy every delicious, comforting bite!
What to Serve It With
This chili mac and cheese is practically a meal in itself, but if you’re looking to round it out or create a more special spread, there are tons of fantastic pairings! For a classic, casual dinner, a simple side salad with a light vinaigrette is always a winner. It provides a nice fresh contrast to the richness of the dish. My family also loves serving it with some crusty Garlic Bread for dipping into any extra sauce. If you’re feeling a bit more adventurous, you could try serving it with some cornbread muffins – the slightly sweet and crumbly texture is divine alongside the savory chili mac. For a bit of a kick, a side of pickled jalapeños or a spicy slaw can be a great addition. And don’t forget those toppings! A variety of toppings, like sour cream, shredded cheese, chopped onions, and fresh cilantro, are a must in my house. It’s like a little build-your-own chili mac bar, and everyone gets exactly what they want. It really makes the meal feel more interactive and fun, especially for kids.
Top Tips for Perfecting Your Chili Mac and Cheese
I’ve made this chili mac and cheese more times than I can count, and over the years, I’ve picked up a few tricks that I think really elevate it. Here are some of my top tips to ensure yours turns out absolutely perfect every time! When it comes to the chili base, don’t skimp on the simmering time. The longer it simmers, the deeper and richer the flavors become. I often make the chili part a day ahead if I can; it just tastes even better when it has a chance to meld overnight. For the macaroni, cooking it just to al dente is crucial. It will continue to cook in the oven, and you don’t want it to turn into mush. I always err on the side of slightly undercooked when I drain it. When making the cheese sauce, using good quality cheese makes a difference. Shredding your own cheese from a block is also better than using pre-shredded, as it melts more smoothly and isn’t coated with anti-caking agents. Whole milk is my preferred choice for the sauce because it gives it that luxurious, creamy texture that’s simply unbeatable. If you’re out of whole milk, you can use 2% milk, but the sauce might be a little less rich. Don’t be afraid to adjust the spices to your liking! If you love a spicier chili, add more cayenne pepper or even a pinch of red pepper flakes. If you prefer it milder, just reduce the chili powder or omit the cayenne altogether. For an extra layer of flavor, I sometimes add a tablespoon of Worcestershire sauce or a splash of hot sauce to the chili base. And finally, experiment with your cheese! While cheddar and Monterey Jack are my favorites, a bit of Gruyere or even a spicy pepper jack can add an interesting twist.
Storing and Reheating Tips
This chili mac and cheese is fantastic as leftovers! Once it’s cooled down a bit, I like to store any extra portions in an airtight container in the refrigerator. It usually stays fresh and delicious for about 3-4 days. When you’re ready to reheat, the best way is to pop it back into an oven-safe dish at around 350°F (175°C) until it’s warmed through. This helps maintain that lovely baked texture. You can also reheat individual portions in the microwave, just cover it loosely to prevent splattering. If it seems a little dry after reheating, a small splash of milk or water stirred in can help revive that creamy texture. If you plan to freeze it, I highly recommend portioning it into freezer-safe containers or bags. It should keep well in the freezer for up to 2-3 months. Thaw it overnight in the refrigerator before reheating it in the oven or microwave. For the best flavor and texture, try not to freeze it for too long, as the pasta can sometimes get a little softer upon thawing and reheating.
Frequently Asked Questions
Final Thoughts
There you have it – my absolute favorite recipe for chili mac and cheese! It’s more than just a meal; it’s a feeling. It’s the comfort of macaroni and cheese, the satisfying heartiness of chili, all wrapped up into one incredibly delicious package. I truly hope you give this a try. It’s the kind of dish that brings people together, sparks joy, and makes any day feel a little bit brighter. Don’t be intimidated by the steps; it’s all very manageable, and the result is so worth it. The aroma alone will have everyone gathering in the kitchen, eagerly awaiting their bowls. If you make this, please let me know how it turns out! I’d love to hear about your family’s reactions and any little twists you might have added. Leave a comment below or share your creations with me. Happy cooking!
One-Pot Chili Mac and Cheese
Ingredients
Main Ingredients
- 1 pound ground beef
- 1 medium onion chopped
- 2 cloves garlic minced
- 1 can (15 ounces) kidney beans drained and rinsed
- 1 can (15 ounces) diced tomatoes undrained
- 1 can (8 ounces) tomato sauce
- 2 cups beef broth
- 1 cup elbow macaroni uncooked
- 1 teaspoon chili powder
- 0.5 teaspoon cumin
- 0.25 teaspoon paprika
- 0.25 teaspoon salt
- 0.125 teaspoon black pepper
- 1 cup shredded cheddar cheese
Instructions
Preparation Steps
- In a large pot or Dutch oven, brown the ground beef over medium-high heat. Drain off any excess grease.
- Add the chopped onion and cook until softened, about 5 minutes. Stir in the minced garlic and cook for another minute until fragrant.
- Stir in the kidney beans, diced tomatoes (undrained), tomato sauce, beef broth, uncooked elbow macaroni, chili powder, cumin, paprika, salt, and pepper.
- Bring the mixture to a boil, then reduce the heat to low, cover, and simmer for 15-20 minutes, or until the macaroni is tender and most of the liquid has been absorbed. Stir occasionally to prevent sticking.
- Remove from heat and stir in the shredded cheddar cheese until melted and creamy.
- Serve hot, garnished with extra cheese or your favorite chili toppings if desired.
