

You know those mornings? The ones where you hit snooze one too many times, and suddenly, you’re scrambling like a culinary ninja trying to get something delicious and somewhat healthy into everyone’s hands before they bolt out the door? Yeah, I’ve lived those mornings. And for the longest time, my go-to was always a frantic scramble for a piece of toast or, let’s be honest, sometimes just a handful of cereal. But then, a few years ago, after a particularly chaotic Tuesday, I stumbled upon a recipe that completely changed my breakfast game. It’s become my absolute secret weapon, the thing I whip up when I want to feel like a super-mom (or just a person who has their life together for five minutes). These breakfast sliders are tiny marvels – packed with flavor, surprisingly satisfying, and frankly, just ridiculously cute. They’re like a hug for your taste buds first thing in the morning, a much more elegant cousin to those greasy diner breakfast sandwiches, and something everyone, from my picky eaters to my husband who claims to “not be a breakfast person,” devours. Honestly, if you’re looking for a breakfast that’s as much a joy to make as it is to eat, you’ve found it.

What are these breakfast sliders?
So, what exactly are these magical little breakfast sliders? Think of them as your favorite breakfast flavors – fluffy eggs, savory sausage (or your preferred protein!), maybe a hint of cheese – all nestled inside a tender, slightly sweet, mini muffin-like bun. They’re not quite muffins, not quite biscuits, but something wonderfully in-between. The magic happens because we’re essentially baking the fillings right into a tender batter. It’s a brilliant way to get all those classic breakfast components into one perfect, bite-sized package. The name “sliders” really captures it; they’re small, easily handled, and you could honestly eat a few without feeling overstuffed, making them ideal for busy mornings or when you want a little bit of everything. They originated from my desire to combine the ease of a grab-and-go breakfast with the satisfying heartiness of a sit-down meal. It’s comfort food, simplified.
Why you’ll love this recipe?
Okay, let me tell you why these breakfast sliders are going to become your new best friend in the kitchen. First off, the flavor explosion is unreal. You get that savory goodness from the sausage, the creamy richness of the egg, and just a hint of sweetness from the delicate bun. It’s a perfectly balanced bite that wakes up your palate without being overwhelming. And simplicity? Oh, it’s a dream. You basically mix everything in a few bowls and bake it all together. No flipping pancakes, no scrambling eggs in a separate pan – it’s all contained in one baking dish. This recipe is also incredibly cost-effective. You’re using pantry staples and common breakfast ingredients, so you don’t need to break the bank to make a batch. Plus, they are ridiculously versatile. Serve them warm on a chilly morning, pack them for a picnic, or even have them as a surprisingly elegant appetizer for a brunch party. What I love most, though, is the sheer “wow” factor for such little effort. They look so impressive, but they’re genuinely easy enough for a novice baker. They’re like my Mini Quiche Muffins’ more playful, handheld cousin, but with a completely different flavor profile. They’ve saved me more times than I can count when unexpected guests pop over or when I just need a quick, satisfying meal that feels like a treat.
How do I make these breakfast sliders?
Quick Overview
The whole process is surprisingly straightforward. We’re essentially creating a savory muffin batter, folding in your cooked breakfast fillings, and then baking them in mini muffin tins until they’re golden and puffed. It’s a one-bowl wonder for the batter, a quick sauté for the fillings, and then into the oven they go. This method ensures that all those delicious flavors meld together beautifully, creating a perfectly cohesive bite every time. It’s designed for maximum flavor with minimum fuss, perfect for those mornings when every second counts.
Ingredients
For the Main Batter:
2 cups all-purpose flour: The foundation of our little buns. Make sure it’s spooned and leveled, not scooped directly from the bag, for accurate measurement.
1/4 cup granulated sugar: Just enough to give them a subtle sweetness that balances the savory elements.
2 teaspoons baking powder: This is what gives them their lovely lift and fluffy texture.
1/2 teaspoon salt: Enhances all the other flavors.
1/4 teaspoon black pepper: Adds a tiny bit of warmth.
1/2 cup unsalted butter, melted and slightly cooled: This brings richness and tenderness to the batter. Make sure it’s not piping hot when you add it to the eggs!
1 large egg: Acts as a binder and adds to the richness.
1 cup milk (whole milk is best for richness, but 2% or even almond milk works well!): This brings everything together and creates a moist crumb.
For the Filling:
1 pound breakfast sausage (pork, turkey, or plant-based): Cooked and crumbled. I like to get it nice and browned for maximum flavor. You can also use bacon or diced ham!
4 large eggs, lightly beaten: These will cook up into little pockets of eggy goodness within the sliders.
1/2 cup shredded cheddar cheese (or your favorite cheese): Melts beautifully and adds a salty, cheesy kick. Monterey Jack or a pepper jack would be fantastic too!
Optional additions: 1/4 cup finely diced onion or bell pepper, sautéed until tender; a pinch of red pepper flakes for a little heat.
For the Glaze (Optional, but highly recommended!):
2 tablespoons unsalted butter, melted: The base for our glaze.
1 teaspoon Dijon mustard: Adds a subtle tang that cuts through the richness.
1/2 teaspoon garlic powder: For a savory punch.
A pinch of salt and pepper: To season.
Step-by-Step Instructions
Step 1: Preheat & Prep Pan
First things first, get your oven preheating to 375°F (190°C). Now, grab your trusty mini muffin tins. I always give mine a good spray with non-stick cooking spray, or you can use mini muffin liners if that’s easier for you. Making sure your tins are well-greased is key to preventing these little guys from sticking. Nobody wants to fight with their breakfast!
Step 2: Mix Dry Ingredients
In a large bowl, whisk together the flour, sugar, baking powder, salt, and pepper. Give it a good whisking to make sure everything is evenly distributed. This is where the magic starts to happen for the base of our sliders.
Step 3: Mix Wet Ingredients
In a separate, medium-sized bowl, whisk together the melted butter and the egg until well combined. Then, gradually whisk in the milk until you have a smooth, liquid mixture.
Step 4: Combine
Pour the wet ingredients into the bowl with the dry ingredients. Stir just until everything is *barely* combined. Seriously, don’t overmix! A few streaks of flour are perfectly fine. Overmixing develops the gluten too much and can lead to tough sliders, and we want them light and tender. It’s okay if the batter looks a little lumpy.
Step 5: Prepare Filling
If you haven’t already, cook your breakfast sausage until it’s nicely browned and crumbled. Drain off any excess grease. In a medium bowl, combine the cooked sausage, the lightly beaten eggs, and the shredded cheese. If you’re adding any optional veggies like onion or bell pepper, stir them in here too. Give it a gentle toss to distribute everything evenly.
Step 6: Layer & Swirl
Now for the fun part! Spoon about a tablespoon of batter into each mini muffin cup, filling it about halfway. Then, spoon about a teaspoon of your sausage and egg mixture on top of the batter. Finally, top each with another tablespoon of batter, covering the filling. You want to fill each cup about two-thirds to three-quarters full, as they will puff up while baking.
Step 7: Bake
Place the prepared mini muffin tins into your preheated oven. Bake for 18-22 minutes, or until the tops are golden brown and a toothpick inserted into the center of a slider comes out clean. The exact time can vary depending on your oven, so keep an eye on them during the last few minutes.
Step 8: Cool & Glaze
Once they’re baked to perfection, let the sliders cool in the muffin tins for about 5-10 minutes. This helps them set up properly. While they’re cooling, whisk together the ingredients for the glaze: melted butter, Dijon mustard, garlic powder, salt, and pepper. Once the sliders are slightly cooled, carefully remove them from the tins and brush or drizzle the glaze over the tops. This glaze adds an incredible layer of flavor and a lovely sheen. Don’t skip it if you can help it!
Step 9: Slice & Serve
These breakfast sliders are absolutely divine served warm, either as is or cut in half if you’re feeling fancy. They’re perfect for little hands and easy to grab on the go. Enjoy that amazing aroma as you bring them to the table!
What to Serve It With
These breakfast sliders are superstars on their own, but they play wonderfully with a few companions too! For a classic breakfast, I love pairing them with a good cup of coffee or a freshly squeezed glass of orange juice. The richness of the slider is perfectly balanced by the brightness of the juice. For a more indulgent brunch spread, imagine these alongside a fresh fruit salad, some crispy bacon or sausage links, and maybe even a mimosa. They look so elegant on a platter, and they add a savory element that everyone loves. If you’re serving them as a dessert (yes, they work!), a light dusting of powdered sugar and a dollop of whipped cream is heavenly. For those cozy, lazy weekend mornings when you just want comfort food, I often serve them with a side of home fries or a simple green salad for a touch of freshness. My family also adores them when we have weekend movie mornings; they’re easy to eat on the couch and everyone gets their favorite!
Top Tips for Perfecting Your Breakfast Sliders
Over the years, I’ve learned a few tricks that can really elevate these breakfast sliders. First, for the batter, resist the urge to overmix. Seriously, this is probably the most crucial step. Overmixing develops the gluten, leading to tough, dense sliders. A few lumps are a sign of a light and tender crumb. When it comes to the filling, make sure your sausage is well-drained. Nobody likes a greasy slider! And don’t be afraid to get creative with the cheese; a sharp cheddar or a spicy pepper jack can add a whole new dimension. I’ve also experimented with adding finely diced, sautéed onions or bell peppers to the filling, which adds a lovely sweetness and another layer of flavor. For the baking, ensure your oven is accurately preheated. An oven thermometer is a great investment if you’re not sure about yours. If your sliders are browning too quickly on top but the inside isn’t cooked, you can loosely tent them with aluminum foil for the last few minutes of baking. Now, for the glaze, which I honestly think makes them extra special: make sure your butter is melted but not hot when you whisk it with the mustard and spices. It helps everything emulsify nicely and gives a beautiful sheen without making the sliders soggy. If you want a less tangy glaze, you can skip the mustard or use a little honey instead. And a final little “lesson learned” from me: if you’re making a double batch (which I highly recommend because they disappear so fast!), it’s totally fine to prep the dry ingredients and the filling the night before and then just mix the wet ingredients and combine everything in the morning. It saves precious time!
Storing and Reheating Tips
These breakfast sliders are incredibly forgiving when it comes to storage, which is a huge win for busy households. At room temperature, they’re best enjoyed within a few hours of baking. If you have any leftovers that aren’t quite gone by lunchtime, just pop them into an airtight container. They’ll stay fresh enough to be a nice snack later in the afternoon. For longer storage, your refrigerator is your best friend. Once they’ve cooled completely, store them in an airtight container or a resealable bag in the fridge for up to 3-4 days. They hold up beautifully! If you’re looking to stash them away for even longer, freezing is a fantastic option. Let them cool down completely, then wrap them individually in plastic wrap, followed by a layer of aluminum foil or place them in a freezer-safe bag. They’ll keep their quality for about 2-3 months. When you’re ready to reheat, there are a few ways to go. For a quick reheat, pop a few in the microwave for 20-30 seconds. For a crispier exterior, I prefer to reheat them in a toaster oven or a conventional oven at around 300°F (150°C) for about 5-10 minutes, or until warmed through. If reheating from frozen, add a few extra minutes to the oven or toaster oven time. I usually wait to glaze them until *after* they’ve been reheated, especially if they’ve been refrigerated or frozen, to keep that glaze nice and fresh and prevent any sogginess.
Frequently Asked Questions
Final Thoughts
I really hope you give these breakfast sliders a try. They’ve brought so much ease and deliciousness to my mornings, and I truly believe they can do the same for you. They’re proof that you don’t need to sacrifice flavor or satisfaction when you’re short on time. They’re the perfect balance of comfort, convenience, and pure joy. If you love this recipe, you might also enjoy my recipes for Sausage and Cheese Biscuits or my Fluffy Scrambled Egg Muffins, which offer similar grab-and-go breakfast convenience with fantastic flavor. I can’t wait to hear what you think, and I’d absolutely love to see how yours turn out! Tag me in your photos or leave a comment below sharing your experience and any creative twists you came up with. Happy baking, and here’s to making your mornings a little bit brighter!

Easy Breakfast Sliders
Ingredients
Main Ingredients
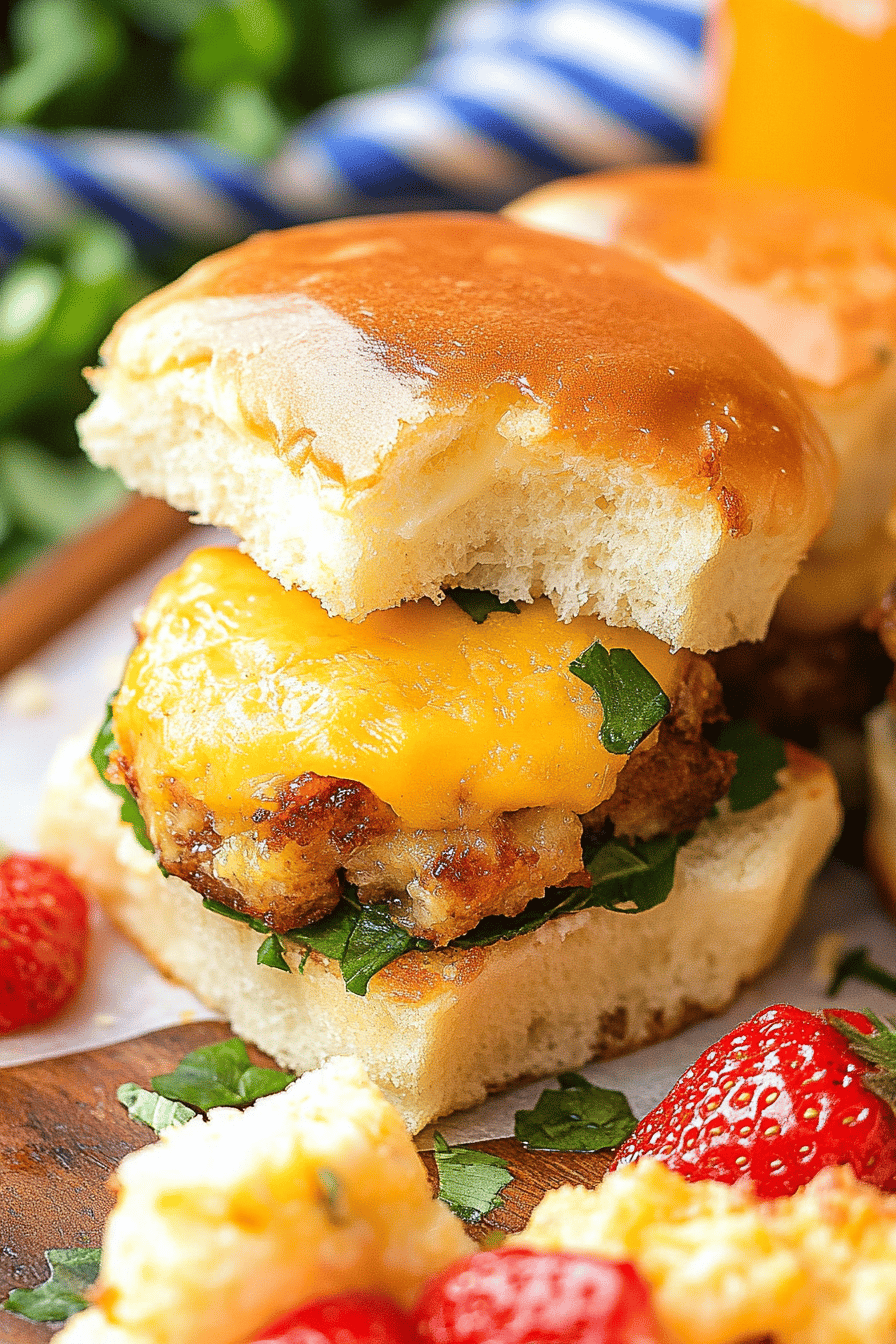
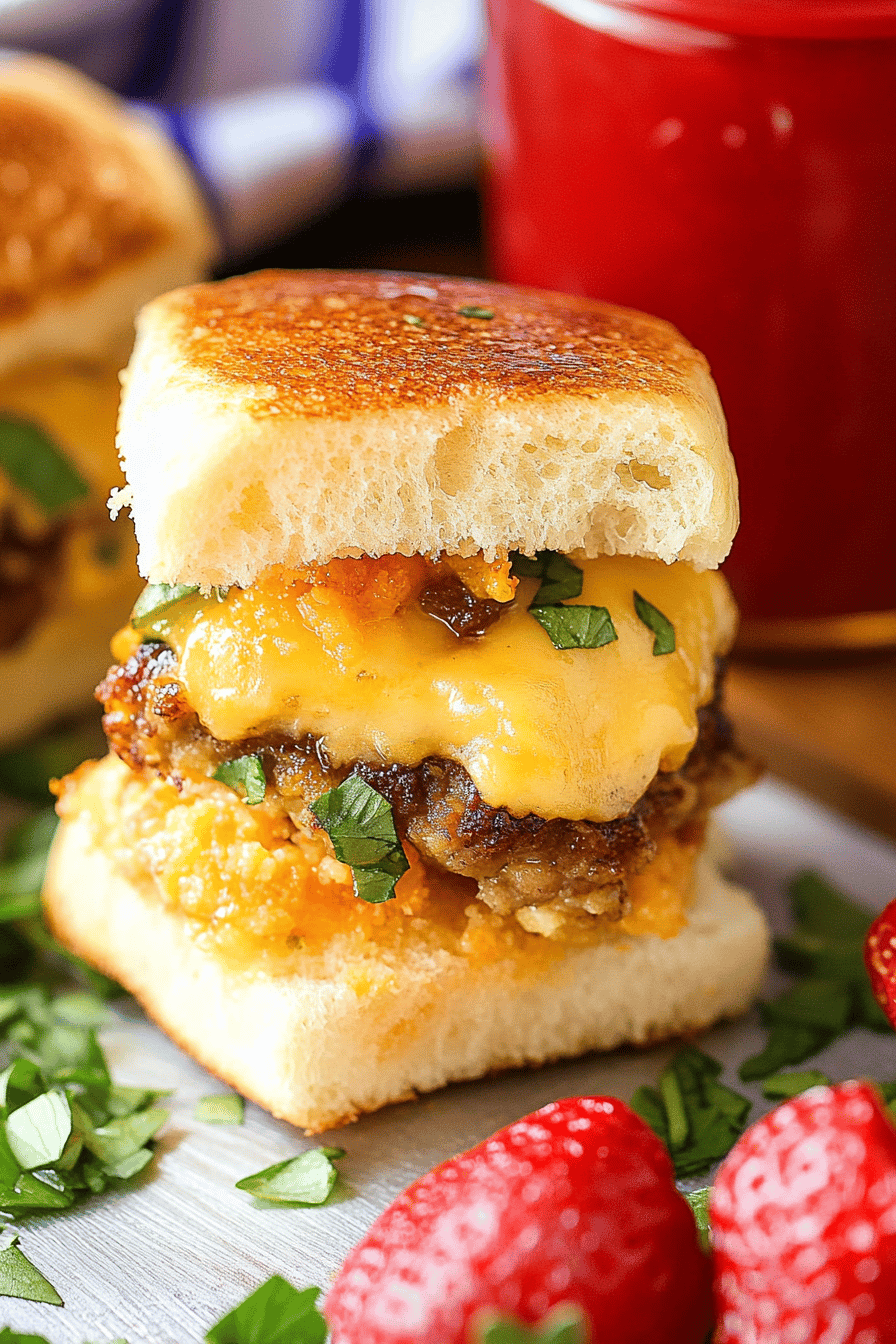
- 1 package slider buns
- 0.5 pound breakfast sausage crumbled
- 4 large eggs
- 0.125 cup milk
- 4 slices cheddar cheese cut in half
- 2 tablespoon butter
Instructions
Preparation Steps
- Preheat oven to 350°F (175°C). Slice slider buns in half horizontally.
- In a skillet, cook the breakfast sausage over medium heat until browned. Drain off any excess grease.
- In a bowl, whisk together the eggs and milk. Pour into the same skillet (after removing sausage) and cook until scrambled. Season with salt and pepper to taste.
- Layer the bottom halves of the slider buns with cooked sausage, scrambled eggs, and cheese slices.
- Place the top halves of the buns over the fillings. Brush the tops of the buns with melted butter.
- Bake in the preheated oven for 8-10 minutes, or until the cheese is melted and the buns are lightly toasted.
- Serve immediately.
