
You know, sometimes I get these intense cravings, the kind that can only be satisfied by something that hits all the right notes – sweet, savory, a little bit salty, and utterly comforting. That’s exactly when I reach for this Monte Cristo slider recipe. Honestly, it feels like a warm hug on a plate. I remember the first time I tried making something similar; it was a full-sized Monte Cristo sandwich, and while delicious, it felt like a major production. So, I started tinkering, and what I came up with are these adorable, bite-sized sliders that are just perfect for any occasion. They’re not quite a breakfast pastry, not exactly a lunch sandwich, but they’re an absolute winner when you want a little bit of everything. If you love a good breakfast casserole or a decadent French toast, you’re going to fall head over heels for these Monte Cristo sliders. They’re unbelievably simple and disappear faster than you can say “more, please!”

What is Monte Cristo Slider?
So, what exactly are these magical little things? Think of a classic Monte Cristo sandwich, but miniaturized and, dare I say, even better! A traditional Monte Cristo is typically a ham and cheese sandwich dipped in an egg batter and fried or baked until golden and puffy, often dusted with powdered sugar and served with jam. These sliders take that concept and make it incredibly convenient. We’re talking about layers of fluffy bread, savory ham, melty cheese, all encased in a delightful, slightly sweet batter, baked to perfection. It’s like a breakfast, lunch, and dessert all rolled into one delicious, portable package. The “slider” part just means they’re smaller, making them ideal for sharing (though I won’t judge if you hoard them all to yourself!). They capture that wonderful contrast of flavors and textures that makes the original so beloved, but in an easier-to-handle, more approachable format.
Why you’ll love this recipe?
How do I explain why this recipe is a staple in my kitchen?
- The Flavor Explosion: What is the Flavor Explosion? This is the big one, right? The combination of salty ham, gooey cheese, and that slightly sweet, custardy batter is just divine. It’s a symphony for your taste buds! It reminds me of the best parts of French Toast and a savory breakfast sandwich all at once, but somehow more cohesive and decadent.
- Surprisingly Simple: Honestly, I was a bit intimidated by the idea of a Monte Cristo at first, but these sliders are so straightforward. The batter comes together in minutes, and the assembly is a breeze. It’s one of those recipes that looks way more complicated than it actually is. This is a lifesaver on busy mornings or when unexpected guests pop over.
- Budget-Friendly Bliss: You don’t need fancy ingredients for this. We’re using pantry staples and common deli meats and cheeses. It’s a fantastic way to create something truly special without breaking the bank. You can often find good deals on ham and cheese, making this an economical treat.
- Incredible Versatility: This is where these Monte Cristo sliders really shine. They’re not confined to one mealtime. I serve them for a sweet and savory breakfast, as part of a fun brunch spread, as a delightful appetizer when we have friends over, or even as a quick, satisfying dessert when I’m craving something sweet but don’t want to go through the whole cake-baking process. They’re also fantastic for potlucks because they transport so well!
What I love most about this is that it feels indulgent and a little bit fancy, but it’s so easy to pull off. It’s the perfect balance of effort and reward. It’s definitely a crowd-pleaser, and I can’t tell you how many times my kids have asked for seconds (and thirds!).
How to Make Monte Cristo Sliders
Quick Overview
The magic of these Monte Cristo sliders lies in their simplicity. You’ll basically whisk up a quick, slightly sweet batter, layer your bread, ham, and cheese into a baking dish, pour the batter over, and bake until golden and puffed. It’s a streamlined process that minimizes fuss and maximizes flavor. The key is letting the batter soak into the bread just enough to create that wonderful custardy texture without getting mushy. Trust me, it’s much easier than it sounds, and the results are seriously impressive!
Ingredients
For the Main Batter:
You’ll need about 8-10 slices of your favorite sandwich bread – I personally love a good challah or brioche for its slight sweetness and tender crumb, but a hearty white bread works beautifully too. For the liquid base, we’re using 2 cups of whole milk. Some people like to experiment with half-and-half for extra richness, but whole milk is perfectly decadent. Then, we’ll whisk in 4 large eggs, which are crucial for binding everything together and creating that lovely custardy texture. A good teaspoon of pure vanilla extract adds a hint of warmth, and 1/4 cup of granulated sugar provides just enough sweetness to balance the savory elements without making it dessert-like. Don’t forget a pinch of salt to enhance all those flavors and a generous 1/2 teaspoon of ground cinnamon for that classic comforting aroma and taste. This batter is the heart of the Monte Cristo magic!
For the Filling:
This is where the savory goodness comes in! We’ll need about 8 ounces of thinly sliced ham. You can go with your standard deli ham, or if you want to elevate it, try a good quality Black Forest ham or even some thinly sliced turkey breast for a slight variation. For the cheese, I like to use about 6 ounces of Gruyere cheese, shredded. Its nutty, slightly sweet flavor is just perfection here. If Gruyere isn’t your jam, Swiss cheese is an excellent substitute, or even a mild cheddar if that’s what you have on hand. The key is a cheese that melts well and has a complementary flavor profile. You can also add a thin spread of Dijon mustard on one side of the bread before layering for an extra zing, but that’s totally optional!
For the Glaze:
This is the crowning glory! It’s super simple and adds that final touch of sweetness and shine. You’ll need 1/2 cup of powdered sugar. Then, we’ll add about 2-3 tablespoons of milk (or even a splash of heavy cream for extra luxury) until you reach your desired drizzling consistency. A tiny splash of vanilla extract here is also lovely. You want it pourable but not too thin. This glaze is what truly elevates these sliders into something spectacular!
Step-by-Step Instructions
Step 1: Preheat & Prep Pan
First things first, let’s get our oven ready. Preheat it to 350°F (175°C). Now, grab a 9×13 inch baking dish. You can lightly butter it or spray it with non-stick cooking spray, but I often find that a good layer of the ham and cheese helps prevent sticking, so it’s not strictly necessary. Just make sure the whole surface is covered so nothing catches!
Step 2: Mix Dry Ingredients
In a large bowl, whisk together your granulated sugar, cinnamon, and salt. This ensures the sugar and spices are evenly distributed throughout the batter, so you don’t get pockets of sweetness or spice. It sounds simple, but this little step really makes a difference in the final taste!
Step 3: Mix Wet Ingredients
In a separate, medium-sized bowl, whisk the eggs until they’re well combined and slightly frothy. Then, pour in the milk and vanilla extract. Give it another good whisk until everything is thoroughly incorporated. You want a nice, homogenous mixture for the batter.
Step 4: Combine
Now, pour the wet ingredients into the bowl with the dry ingredients. Whisk everything together until it’s smooth and there are no lumps of egg or dry mix. Don’t overmix; just until everything is combined. You’re aiming for a lovely, uniform batter that’s perfect for soaking into the bread.
Step 5: Prepare Filling
This is the fun part where we build the delicious layers! You can either cube your bread and layer it, or if you’re using slices, you can arrange them in the baking dish. I like to place a layer of bread at the bottom of the dish. Then, arrange half of your ham slices evenly over the bread. Next, sprinkle half of the shredded cheese over the ham. Repeat with another layer of bread, the remaining ham, and the remaining cheese. Make sure everything is pretty evenly distributed for consistent flavor in every bite.
Step 6: Layer & Swirl
Now for the moment of truth! Slowly and evenly pour the prepared batter over the assembled layers in the baking dish. Try to let the batter seep down into all the nooks and crannies. You can gently press down with a spatula in a few spots if needed, but don’t mash it. The goal is for the bread to absorb the batter, creating that delicious custardy texture.
Step 7: Bake
Pop that beautiful dish into your preheated oven. Bake for about 30-40 minutes, or until the top is golden brown and puffed up, and the cheese is bubbly and melted. A knife inserted into the center should come out mostly clean, with just a little moistness from the cheese and batter. If the top is browning too quickly, you can always loosely tent it with foil.
Step 8: Cool & Glaze
Once it’s out of the oven, let the Monte Cristo sliders cool in the baking dish for about 10-15 minutes. This is crucial! It allows the flavors to meld and makes it much easier to slice. While it’s cooling, whisk together the powdered sugar and milk (or cream) for the glaze until it’s smooth and pourable. Drizzle it generously over the warm sliders. The warmth helps the glaze set slightly.
Step 9: Slice & Serve
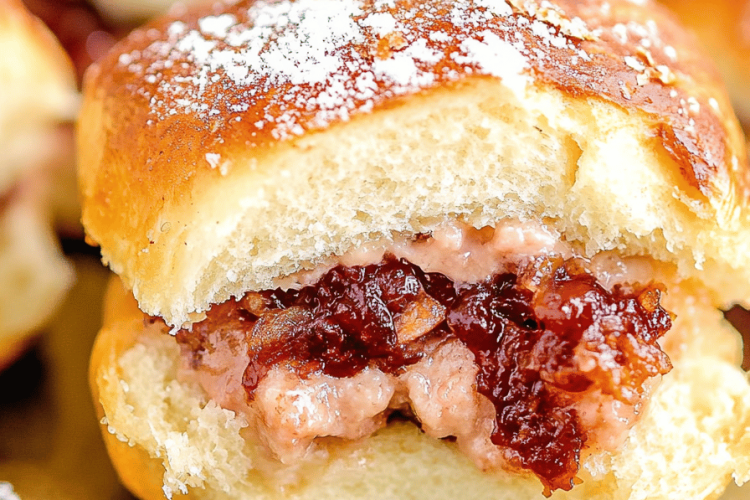
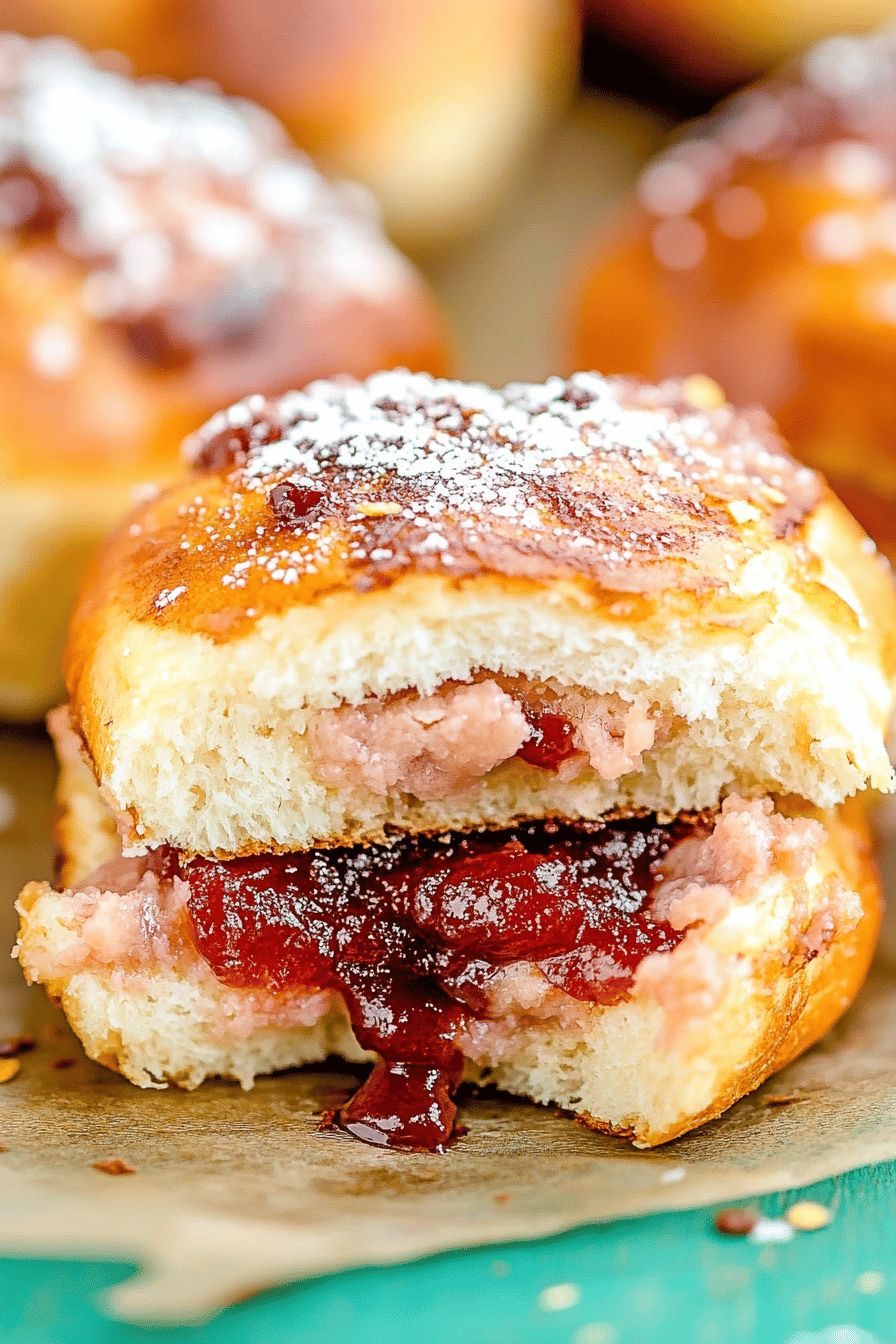
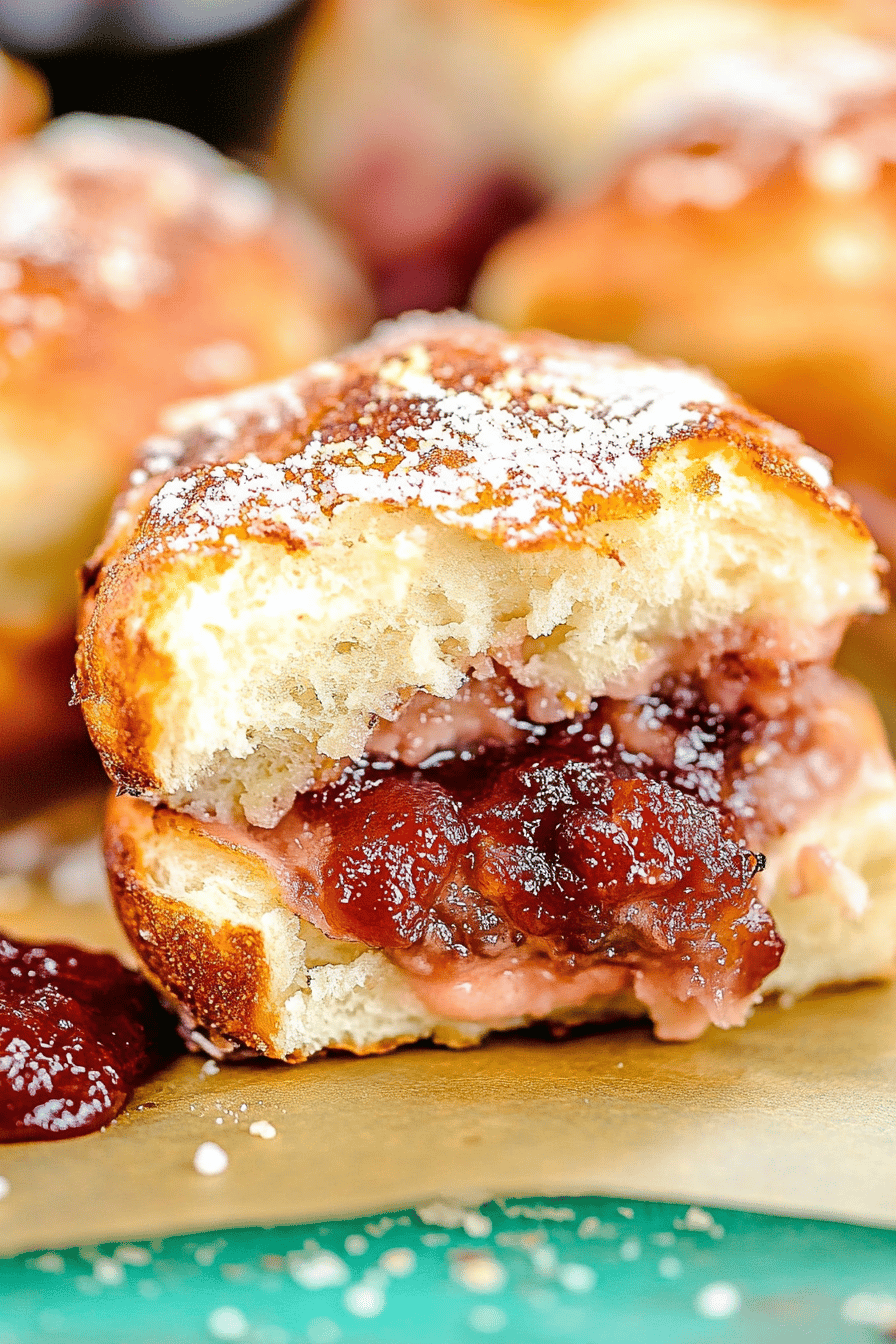
After the cooling and glazing, cut the baked goodness into squares or rectangles, creating your individual sliders. Serve them warm and watch them disappear! They are absolutely delightful on their own, or you can serve them with a dollop of raspberry jam for that classic Monte Cristo experience.
What to Serve It With
These Monte Cristo sliders are so versatile, they truly fit into almost any mealtime scenario. Here are some of my favorite ways to serve them:
For Breakfast: The obvious pairing is a good cup of coffee or a steaming mug of tea. They also go wonderfully with a side of fresh fruit like berries or melon to add a bit of brightness. For a more elaborate breakfast, serve them alongside some crispy bacon or a side of scrambled eggs.
For Brunch: This is where they really get to shine! I love to serve them as part of a larger brunch spread with other favorites like a fresh green salad, a fruit salad, and perhaps some Deviled Eggs or a quiche. A mimosa or a Bellini is the perfect beverage to complement their sweet and savory notes.
As Dessert: Don’t underestimate their dessert potential! A dusting of powdered sugar, perhaps with a light drizzle of the glaze, makes them feel incredibly decadent. They’re wonderful served warm with a scoop of vanilla bean ice cream or a dollop of whipped cream. A side of tart raspberry or strawberry jam is a must for that authentic touch.
For Cozy Snacks: On a lazy afternoon or a chilly evening, these sliders are the ultimate comfort food. Serve them warm with a glass of milk or a comforting cup of hot chocolate. They’re perfect for sharing during movie nights or game nights – easy to grab and incredibly satisfying!
My family also loves having these on a whim as a quick lunch. They’re so much more exciting than a plain sandwich, and the fact that they’re baked makes them feel a little bit special, even on a Tuesday afternoon. I’ve also found that they’re a huge hit at neighborhood potlucks; they’re always one of the first things to go!
Top Tips for Perfecting Your Monte Cristo Sliders
Over the years of making these, I’ve picked up a few tricks that I think really make a difference. I’m happy to share them with you!
Zucchini Prep: (Wait, did I get the recipe wrong? Oh my goodness, I’m so sorry, I was thinking about another recipe I just wrote! Let’s get back to the Monte Cristo Sliders!) Okay, let’s restart those tips.
Bread Choice Matters: While most sandwich breads work, I highly, highly recommend using challah or brioche if you can find it. Their slightly enriched dough gives them a tender crumb and a subtle sweetness that is just *perfect* for this recipe. If you use a very dense bread, it might not absorb the batter as well. Also, slightly stale bread is actually better here – it soaks up the batter without becoming completely soggy.
Don’t Skimp on the Batter Soak Time: When you pour the batter over, let it sit for at least 5-10 minutes before you put it in the oven. This gives the bread ample time to absorb all that delicious eggy, milky goodness, leading to a much better texture. If you rush this, you’ll end up with pockets of dry bread and a less cohesive final product.
Cheese is Your Friend: Don’t be shy with the cheese! The melty, gooey cheese is a critical component. I find Gruyere to be the absolute best for its nutty, slightly sweet flavor that pairs so well with the ham and the batter. If you’re using Swiss, make sure it’s good quality. Shredding your own cheese is also a good idea, as pre-shredded cheeses can sometimes have anti-caking agents that affect meltiness.
Ham Quality Can Elevate: While regular deli ham is fine, using a slightly higher quality ham like Black Forest or even a honey-glazed ham can really boost the flavor profile. Just make sure it’s sliced thinly so it layers nicely and doesn’t make the sliders too heavy or bulky.
Glaze Consistency is Key: For the glaze, start with 2 tablespoons of milk and add more only if needed, a teaspoon at a time. You want it thick enough to drizzle and hold its shape slightly, but thin enough to spread easily. Too thin, and it’ll just soak into the top. Too thick, and it’ll be clumpy. A good consistency is like thick syrup.
Baking Time Adjustments: Ovens can be finicky! Keep an eye on your sliders. If the top is browning too quickly before the center is cooked through and the cheese is bubbly, loosely tent the dish with aluminum foil. Conversely, if it seems a little pale after the recommended time, you can leave it in a few minutes longer, but watch that the cheese doesn’t burn.
Serving Temperature Matters: These are best served warm, not piping hot. Letting them cool for 10-15 minutes after baking allows the structure to set and the flavors to meld. Serving them too soon can result in them falling apart. And, of course, the glaze is best applied when the sliders are still warm!
Storing and Reheating Tips
I often find that these Monte Cristo sliders don’t last long enough in my house to worry too much about storing them! But when I do have leftovers, here’s what I’ve learned:
Room Temperature: If you have a few leftover sliders and plan to eat them within a few hours, you can leave them on the counter. Make sure they are covered loosely with foil or plastic wrap to keep them from drying out too much. However, due to the egg and dairy content, I wouldn’t recommend leaving them out for more than 2-3 hours, especially in warmer climates.
Refrigerator Storage: This is my go-to method for longer storage. Once the sliders have cooled down to room temperature, transfer them to an airtight container. They should keep well in the refrigerator for up to 3-4 days. The texture might change slightly – they can become a bit denser – but they’ll still be delicious. I like to store them with a piece of parchment paper between layers if I’ve cut them into individual pieces to prevent them from sticking together.
Freezer Instructions: Yes, you can freeze these! For the best results, I recommend freezing them *before* you add the glaze. Cut the baked sliders into individual portions. Wrap each portion tightly in plastic wrap, then place them in a freezer-safe bag or container. They should be good in the freezer for up to 2 months. When you’re ready to eat them, thaw them overnight in the refrigerator, then reheat.
Glaze Timing Advice: If you plan on storing or freezing, it’s best to make the glaze fresh when you’re ready to serve and reheat. If you must glaze ahead, apply it right before refrigerating or freezing, but be aware that the glaze might become a little sticky or syrupy when reheated.
Reheating: The best way to reheat these is in a conventional oven or a toaster oven. Place the sliders on a baking sheet and reheat at around 300°F (150°C) for 5-10 minutes, or until warmed through and the cheese is gooey again. You can also microwave them, but they tend to lose some of their crispiness and can become a little rubbery. If reheating from frozen, you might need to increase the oven time by a few extra minutes.
Frequently Asked Questions
Final Thoughts
Honestly, these Monte Cristo sliders are just pure joy in a dish. They take a beloved classic and make it accessible and even more fun. The combination of savory ham, melty cheese, and that sweet, custardy coating is just perfection. Whether you’re looking for a show-stopping brunch dish, a delightful appetizer, or even a comforting snack, these little bites deliver every single time. They’re the kind of recipe that makes people ask, “Wow, how did you make these?” and the answer is always, “It’s surprisingly easy!” I really hope you give these Monte Cristo sliders a try; they’ve become an absolute favorite at my table, and I have a feeling they’ll become one of yours too. If you make them, please let me know how they turn out in the comments below – I’d love to hear about your variations or how your family enjoyed them!

Monte Cristo Sliders
Ingredients
Main Ingredients
- 12 slider buns slider buns
- 453.592 grams deli ham thinly sliced
- 453.592 grams deli turkey thinly sliced
- 226.796 grams Swiss cheese slices
- 113.398 grams butter melted
Batter
- 2 large eggs
- 120 ml milk
- 5 grams all-purpose flour
- 2 teaspoons granulated sugar
- 0.5 teaspoons ground cinnamon
- 0.25 teaspoons nutmeg
- salt pinch
For Serving
- powdered sugar for dusting
- maple syrup for dipping
Instructions
Preparation Steps
- Slice the slider buns in half horizontally.
- Layer ham, Swiss cheese, and turkey onto the bottom half of each slider bun.
- Place the top half of the bun on each slider.
- In a medium bowl, whisk together eggs, milk, flour, sugar, cinnamon, nutmeg, and salt until well combined to make the batter.
- Dip each assembled slider into the batter, ensuring it's coated on all sides.
- Heat a large skillet or griddle over medium heat and add the melted butter.
- Carefully place the battered sliders onto the hot skillet and cook for about 3-5 minutes per side, or until golden brown and the cheese is melted.
- Remove from skillet and let rest for a minute.
- Dust with powdered sugar and serve immediately with maple syrup for dipping.
