
Oh, you guys. I have to tell you about these Tiramisu Cupcakes. Honestly, they’re a game-changer. Whenever I’m craving that classic, rich tiramisu flavor but don’t have the hours to spend assembling a full-blown cake, these little beauties are my absolute go-to. They’re like a mini hug in dessert form, and the way the coffee and mascarpone swirl together is just pure magic. My family, especially the kids (who usually aren’t huge dessert fans unless it’s chocolate overload), absolutely devour these. They’re so much simpler than you might think, and honestly, I’d put them up against any traditional tiramisu any day. If you’ve ever found yourself saying, “I wish I could just have a bite of tiramisu without the whole production,” then you are in the right place. These Tiramisu Cupcakes are about to become your new best friend in the kitchen.
What are Tiramisu Cupcakes?
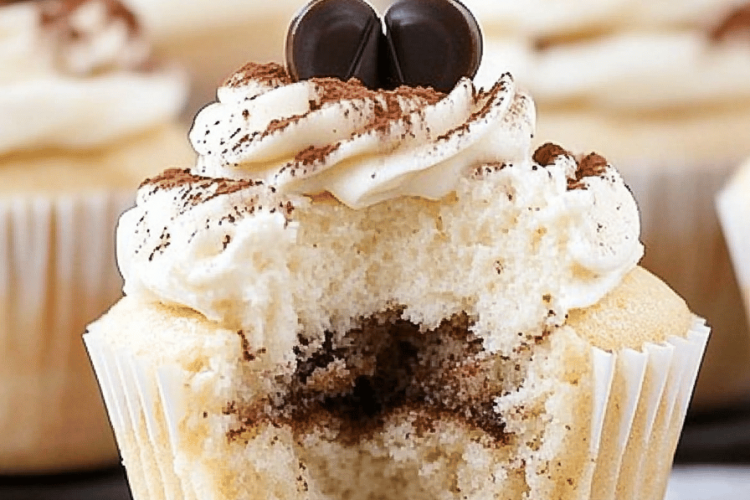
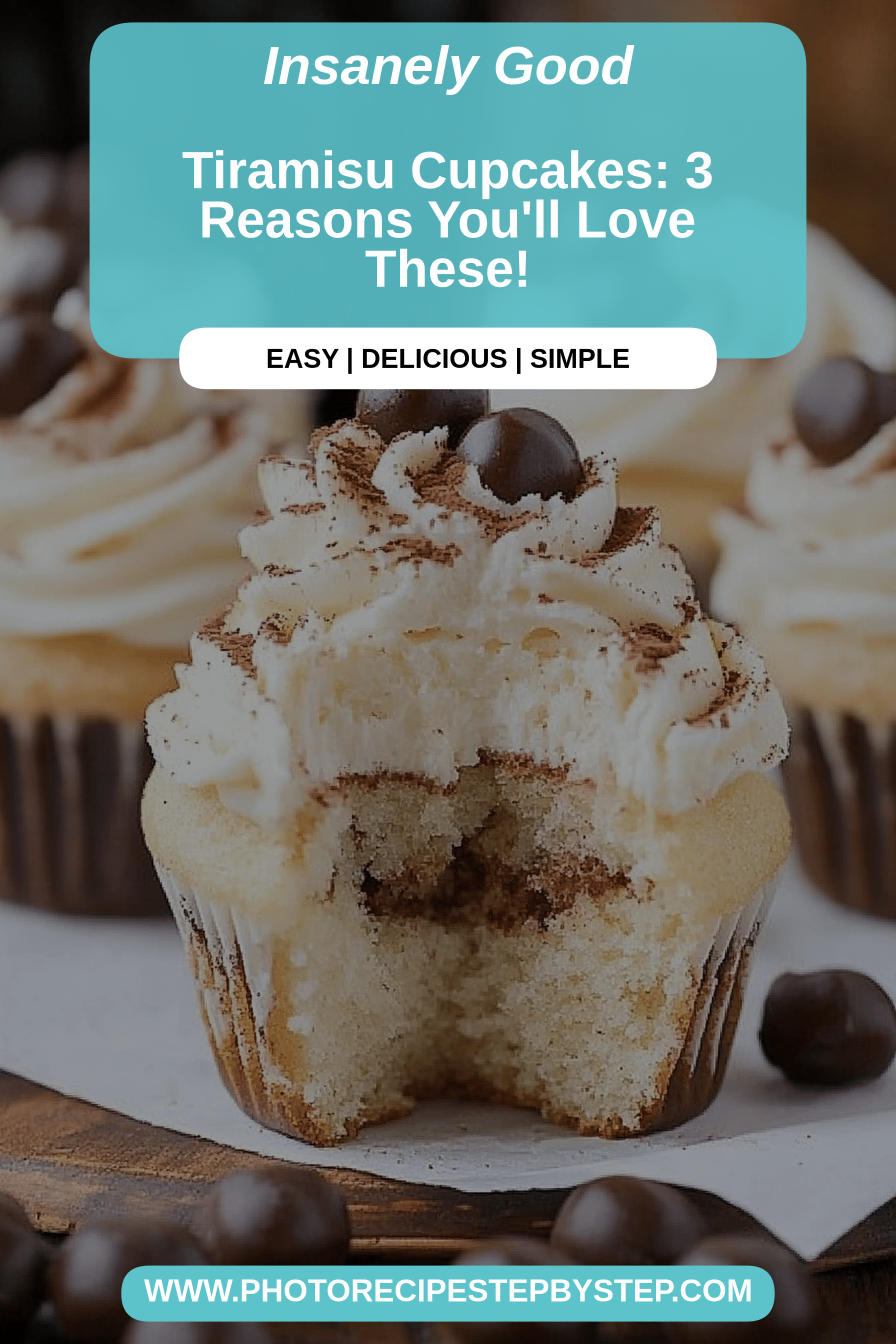
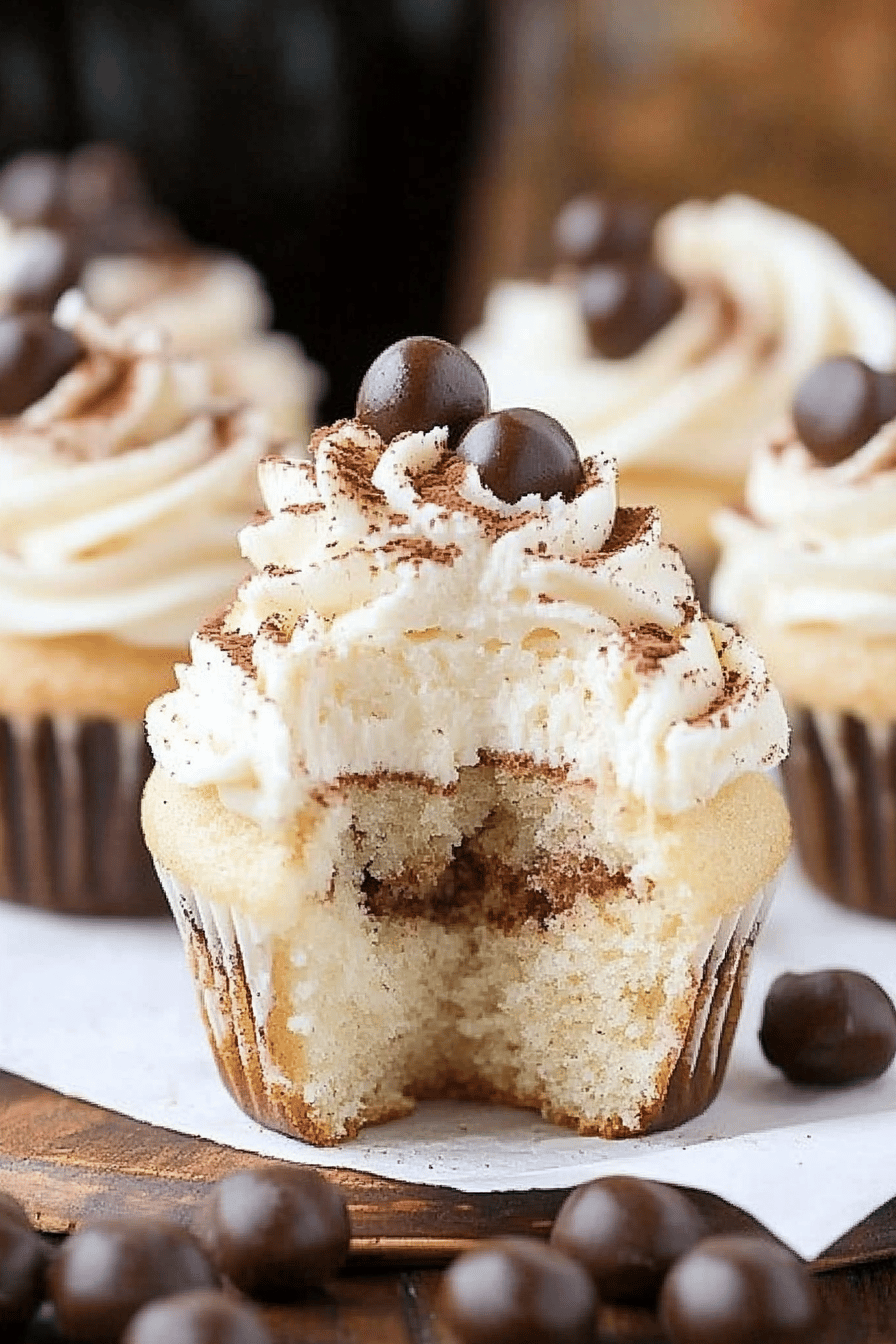
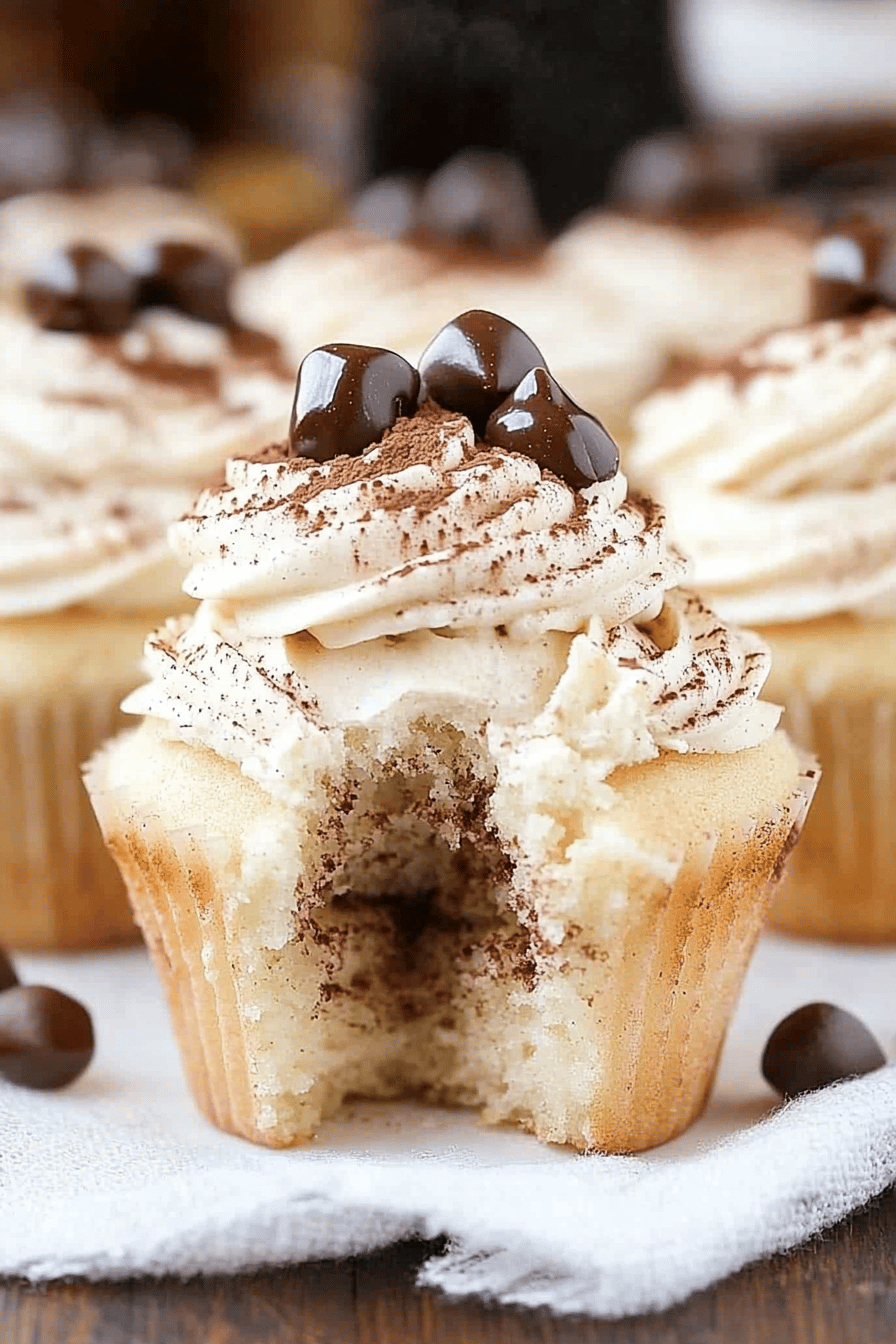
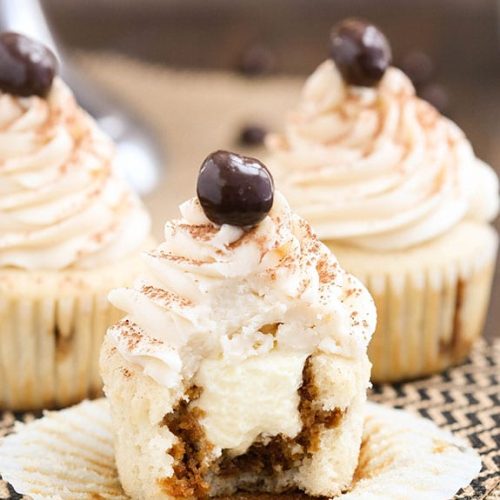
So, what exactly *are* Tiramisu Cupcakes? Think of them as the adorable, individual-sized cousins of the beloved Italian dessert. We’re taking all those incredible, comforting flavors of traditional tiramisu – that creamy mascarpone, the rich coffee, a hint of cocoa, and that signature ladyfinger texture – and miniaturizing them into perfect little cupcakes. Instead of layering ladyfingers in a big dish, we’re creating a tender, moist cake that’s infused with espresso. Then, we top it all off with a luscious, cloud-like mascarpone frosting and a dusting of cocoa. It’s essentially all the elegance and deep, satisfying flavor of tiramisu, but in a format that’s way easier to manage, serve, and honestly, sneak a second one when no one’s looking. They’re sophisticated enough for a dinner party but casual enough for a Tuesday afternoon treat.
Why you’ll love this recipe?
There are so many reasons why I keep coming back to this Tiramisu Cupcake recipe, and I just know you’re going to fall in love with them too. First off, let’s talk flavor. The taste is just out of this world. You get that deep, aromatic coffee hit from the espresso-soaked cake, perfectly balanced by the sweet, tangy creaminess of the mascarpone frosting. It’s not too sweet, which I really appreciate, and the subtle cocoa dusting adds a lovely depth. What’s even better is how surprisingly simple they are to make. Seriously, if you can mix a batter and whip some frosting, you can make these! I used to think tiramisu was way too intimidating, but these cupcakes prove that you can get that incredible flavor without a whole lot of fuss. Plus, they’re incredibly cost-effective compared to buying a fancy dessert. You get so many servings from one batch, and the ingredients are pretty standard pantry staples for most bakers. And the versatility! You can dress them up with chocolate shavings, or keep them classic with just cocoa. They’re perfect for birthdays, potlucks, or even just when you need a little pick-me-up. What I love most is the instant gratification; you get that amazing tiramisu experience without the commitment of a whole cake. It’s like a little luxury that’s always within reach.
How do I make Tiramisu Cupcakes?
Quick Overview
In a nutshell, we’re making a coffee-infused Cake Batter, baking them into perfect little cupcakes, and then topping them with a dreamy mascarpone frosting. The magic happens when you get that intense coffee flavor into the cake itself, making every bite an explosion of tiramisu goodness. It’s a straightforward process that yields incredibly impressive results. You’ll be amazed at how professional these look and taste with such minimal effort.
Ingredients
For the Main Batter:
This is where we get that lovely cake texture and the coffee flavor base. I always recommend using good quality instant espresso powder for the strongest coffee taste. If you can’t find it, finely ground espresso beans can work, but the powder is usually more consistent. I’ve found that using buttermilk instead of regular milk in the batter makes it extra tender and moist, so that’s my little secret! Don’t worry if you don’t have buttermilk, you can easily make your own by adding a tablespoon of lemon juice or white vinegar to a cup of milk and letting it sit for 5 minutes.
- 1 and 3/4 cups all-purpose flour
- 1 and 1/2 cups granulated sugar
- 1 teaspoon baking soda
- 1/2 teaspoon salt
- 2 tablespoons instant espresso powder (or finely ground espresso)
- 1 cup buttermilk, at room temperature
- 1/2 cup unsalted butter, softened
- 2 large eggs, at room temperature
- 1 teaspoon vanilla extract
For the Filling:
This is the soul of the tiramisu experience! For the creamiest filling, make sure your mascarpone and heavy cream are both really cold. This helps them whip up beautifully. I don’t skimp on the mascarpone here; it’s what gives that signature rich, slightly tangy flavor that makes tiramisu so special. If you’re looking for a slightly lighter version, you *could* try replacing a portion of the mascarpone with Cream Cheese, but honestly, for the best flavor, stick with pure mascarpone if you can find it.
- 16 ounces mascarpone cheese, softened but still cool
- 1/2 cup powdered sugar, sifted
- 1 teaspoon vanilla extract
- 1/4 cup strong brewed coffee or espresso, cooled
- Cocoa powder, for dusting
Step-by-Step Instructions
Step 1: Preheat & Prep Pan
First things first, preheat your oven to 350°F (175°C). Grab your cupcake tin and line it with paper liners. I like to use pretty ones because, well, they’re cupcakes! This step is super important because it ensures your cupcakes bake evenly and don’t stick. Make sure the liners are snug in the tin.
Step 2: Mix Dry Ingredients
In a large bowl, whisk together the flour, granulated sugar, baking soda, salt, and the all-important instant espresso powder. Give it a good whisk to make sure everything is well combined and there are no clumps of espresso powder. This even distribution is key for that consistent coffee flavor throughout your cupcake.
Step 3: Mix Wet Ingredients
In a separate bowl, cream together the softened butter and the room-temperature buttermilk. You want this to be nice and smooth. Then, beat in the eggs one at a time until fully incorporated, followed by the vanilla extract. Make sure your eggs are at room temperature; they incorporate much better and create a smoother batter.
Step 4: Combine
Now, gradually add the dry ingredients to the wet ingredients, mixing on low speed until just combined. Be careful not to overmix! Overmixing can lead to tough cupcakes, and we want these to be wonderfully tender. A few small lumps are totally fine. The batter should look thick but pourable. If it seems too thick, you can add a tablespoon of milk or more buttermilk.
Step 5: Prepare Filling
While your cupcakes are baking (or even while they’re cooling), you can whip up the filling. In a medium bowl, beat the softened mascarpone cheese until it’s smooth and creamy. Gradually add the sifted powdered sugar and vanilla extract, beating until well combined. Then, slowly stream in the cooled coffee or espresso while continuing to beat. You want a luscious, pipeable consistency. If it seems too thin, chill it for about 15-20 minutes. If it’s too thick, you can whisk in a teaspoon of milk at a time.
Step 6: Layer & Swirl
Once the cupcakes are completely cool, it’s time for the fun part! You can either frost them traditionally, or for a more “tiramisu” look, you can create a swirled effect. For a swirled effect, use a piping bag fitted with a large round or star tip. Start piping from the outside edge and swirl your way towards the center, creating a beautiful peak. For a rustic look, you can also just spoon the filling on top and spread it gently with the back of a spoon.
Step 7: Bake
Bake for 18-22 minutes, or until a toothpick inserted into the center comes out clean. The tops should be lightly golden brown. Keep an eye on them, as oven temperatures can vary. If your oven tends to bake hot, they might be done a minute or two sooner.
Step 8: Cool & Glaze
Let the cupcakes cool in the pan for about 5-10 minutes before transferring them to a wire rack to cool completely. This is crucial! Trying to frost warm cupcakes is a recipe for disaster. Once they are completely cool, dust them generously with cocoa powder using a fine-mesh sieve. This is your “glaze” and it gives them that authentic tiramisu finish.
Step 9: Slice & Serve
These Tiramisu Cupcakes are best served at room temperature, so they have that perfect soft texture. They are ready to be enjoyed as soon as they are frosted and dusted! To serve, just place them on your favorite plate. They look gorgeous all on their own.
What to Serve It With
These Tiramisu Cupcakes are so wonderfully versatile! For breakfast, I love pairing them with a strong cup of black coffee or a creamy latte. The coffee notes in the cupcake really sing when they have a coffee companion. For a lovely brunch spread, they look stunning alongside fresh berries like raspberries or strawberries. The tartness of the berries cuts through the richness of the mascarpone beautifully. And of course, as a dessert, they are simply divine. They’re perfect after a rich meal, especially something like a hearty pasta dish or a roasted chicken. A small glass of dessert wine or even a chilled espresso would be a decadent pairing. For those cozy snack moments, I’ll often just have one with a glass of milk or a warm cup of tea. They’re seriously comforting! My family has a tradition of having these after Sunday dinner, and it just feels like the perfect way to end the week. They’re also fantastic for potlucks because they’re so easy to transport and everyone loves an individual dessert!
Top Tips for Perfecting Your Tiramisu Cupcakes
Over the years of making these, I’ve picked up a few tricks that I think make all the difference. For the batter, make sure your ingredients are at room temperature, especially the butter and eggs. This is non-negotiable if you want a smooth, well-emulsified batter that bakes up light and airy. When you’re mixing the wet and dry ingredients, resist the urge to beat the batter for ages. Overmixing develops the gluten in the flour, leading to tougher cupcakes, and nobody wants that! Mix until *just* combined, and you’ll be rewarded with tender results. For the mascarpone filling, really make sure your mascarpone cheese isn’t too warm; it should be softened but still cool to the touch. If it’s too warm, your filling can turn runny. I’ve learned that sifting your powdered sugar for the filling is a small step that prevents any lumps and ensures a super smooth, luxurious cream. If you’re struggling to get a nice swirl when piping, don’t fret! You can always spoon the filling on and create a rustic look with the back of a spoon. It tastes just as amazing! I’ve also found that different ovens can bake differently. It’s always best to start checking for doneness around the 18-minute mark. A toothpick should come out clean with no wet batter clinging to it. For ingredient swaps, if you find yourself without buttermilk, my go-to is the DIY version: 1 cup milk + 1 tablespoon lemon juice or white vinegar, let it sit for 5 minutes. It works like a charm and keeps the cupcakes wonderfully moist. And finally, for that authentic tiramisu look, use a really good quality cocoa powder for dusting – it makes a noticeable difference in both flavor and appearance!
Storing and Reheating Tips
Storing these beauties is pretty straightforward, but there are a few things to keep in mind to keep them tasting their best. If you have any leftovers (which is rare in my house!), they’re best stored at room temperature for up to a day. Just make sure they are in an airtight container so the frosting doesn’t dry out or pick up any strange odors from the fridge. For longer storage, the refrigerator is your friend. Pop them into an airtight container, and they’ll stay delicious for about 2-3 days. They’ll be a little firmer when cold, but they soften up nicely at room temperature. If you find your frosting has become too firm from refrigeration, just let them sit out for about 15-20 minutes before serving. I haven’t personally frozen these, but I imagine they would freeze okay without the frosting. If you wanted to try it, I’d bake and cool the cupcakes, then wrap them tightly in plastic wrap and then foil, and freeze for up to a month. You’d need to thaw them completely at room temperature before frosting. The glaze (which is just cocoa powder) should definitely be added right before serving for that fresh, dusty look. It’s much nicer that way than having it sit on the frosting for too long.
Frequently Asked Questions
Final Thoughts
I really hope you give these Tiramisu Cupcakes a try. They’re more than just a recipe to me; they represent those moments of joy and comfort in the kitchen that I love sharing with you all. They’re proof that you can achieve incredible flavors with a little bit of care and a whole lot of love. They’re elegant enough for a special occasion, yet simple enough to make on a whim when that craving strikes. If you love this recipe, you might also enjoy my classic Chocolate Lava Cakes for another easy yet impressive treat, or my No-Bake Cheesecake for another creamy delight. I can’t wait to hear how yours turn out, so please leave a comment below and let me know your thoughts! And if you snap any photos, I’d love to see them – tag me on social media! Happy baking, everyone!
Tiramisu Cupcakes
Ingredients
Cupcakes
- 2.5 cups all-purpose flour
- 1.5 cups granulated sugar
- 1 teaspoons baking powder
- 0.5 teaspoons salt
- 1 cup unsalted butter, softened
- 1 teaspoons vanilla extract
- 1 cup strong brewed coffee, cooled
Mascarpone Frosting
- 1 cup unsalted butter, softened
- 8 ounces mascarpone cheese, softened
- 4 cups powdered sugar
- 0.5 cup strong brewed coffee, cooled
- 1 teaspoon vanilla extract
Garnish
- 2 tablespoons unsweetened cocoa powder
Instructions
Cupcake Preparation
- Preheat oven to 350°F (175°C). Line a 12-cup muffin tin with cupcake liners.
- In a large bowl, whisk together the flour, sugar, baking powder, and salt.2.5 cups all-purpose flour
- Add the softened butter to the dry ingredients and beat on medium speed until combined and crumbly.2.5 cups all-purpose flour
- Add the eggs one at a time, beating well after each addition. Stir in the vanilla extract.2.5 cups all-purpose flour
- Gradually add the cooled coffee to the batter, mixing until just combined. Do not overmix.2.5 cups all-purpose flour
- Divide the batter evenly among the prepared cupcake liners, filling each about two-thirds full.
- Bake for 18-20 minutes, or until a wooden skewer inserted into the center comes out clean.
- Let the cupcakes cool in the muffin tin for 10 minutes before transferring them to a wire rack to cool completely.
Frosting Preparation
- In a large bowl, beat the softened butter until creamy.2.5 cups all-purpose flour
- Add the softened mascarpone cheese and beat until well combined.2.5 cups all-purpose flour
- Gradually add the powdered sugar, beating until smooth and fluffy. Mix in the cooled coffee and vanilla extract.2.5 cups all-purpose flour
Assembly
- Once the cupcakes are completely cool, frost them generously with the mascarpone frosting.
- Dust the tops of the cupcakes with unsweetened cocoa powder using a fine-mesh sieve.2.5 cups all-purpose flour
