
You know those days? The ones where a sudden craving strikes, and you *need* something warm, slightly sweet, and utterly comforting? That’s precisely when I reach for my tried-and-true scones recipe. It’s not just any scones recipe, mind you. This one is the result of years of tinkering, a few happy accidents, and a whole lot of taste-testing (mostly by me, but my family happily volunteers for the “quality control” too!). If you’ve ever tried to make scones and ended up with something dense or crumbly, I promise you, this is the one that will change your mind. It’s surprisingly simple, and the aroma that fills the kitchen while it bakes is just pure magic. Think of it as the slightly more elegant cousin to a really good muffin, but oh-so-much-easier to get right. This scones recipe is my secret weapon for impressing guests, treating myself on a quiet afternoon, or even whipping up a quick breakfast treat when unexpected visitors pop by.

What is a scone?
So, what exactly *is* a scone? At its heart, it’s a British baked good, often made with wheat, barley, or oatmeal, leavened with baking powder. They’re typically denser than a cake but lighter than a biscuit, with a slightly crumbly yet tender texture. My version leans into that tender crumb, making it incredibly satisfying to bite into. The name itself has a bit of history, supposedly named after the Stone of Scone, a coronation stone used for Scottish monarchs. How’s that for a bit of regal backstory? It’s essentially a delightful little pastry that’s a blank canvas for so many delicious additions. It’s the perfect vehicle for jam and clotted cream, but I also love to jazz mine up with a few personal touches. They’re meant to be enjoyed warm, fresh from the oven, usually with a cup of tea, but honestly, a good cup of coffee works just as well!
Why you’ll love this recipe?
There are so many reasons why this scones recipe has become a staple in my kitchen, and I just know you’re going to adore it too. First off, the flavor is absolutely divine. They have a delicate sweetness that isn’t overpowering, allowing the buttery goodness to really shine through. If you add my suggested filling, you get these little bursts of fruitiness that just make them sing. But it’s not just about taste; the simplicity of this recipe is a game-changer. I’ve had friends who were convinced they couldn’t bake, and they’ve whipped these up with zero fuss. The ingredients are all super common, pantry staples for the most part, so you don’t need to go on a special grocery run. And oh, the versatility! You can keep them plain, add chocolate chips, berries, or even a hint of spice. They’re perfect for a leisurely Sunday brunch, a quick afternoon pick-me-up with your tea, or even as a delightful dessert if you serve them with a dollop of cream and some fresh fruit. What I love most about this scones recipe is that it feels special without being complicated. It’s the kind of recipe you can rely on again and again, and it never disappoints. It’s far superior to store-bought versions, and the satisfaction of pulling a fresh batch out of your own oven is unmatched. Plus, the smell! Honestly, the smell of these baking is enough to make anyone happy.
How do I make fluffy Scones?
Quick Overview
This is one of those recipes that looks impressive but is secretly a breeze. We’re talking about mixing dry ingredients, then gently incorporating wet ingredients, folding in some delicious extras, shaping, and baking. The key is minimal handling of the dough to keep those scones light and tender. It truly takes less than 15 minutes of active prep time before they’re ready to hit the oven. It’s the perfect recipe for when you want something homemade and delicious without spending hours in the kitchen. Trust me, even if you’re new to baking, you’ve got this!
Ingredients
What ingredients do you need to make these little bites of heaven?
For the Main Batter:
2 cups all-purpose flour (plus more for dusting)
1/4 cup granulated sugar (you can adjust this slightly to your sweetness preference)
2 teaspoons baking powder (this is crucial for that lovely lift!)
1/2 teaspoon salt (enhances all the other flavors)
1/2 cup (1 stick) unsalted butter, very cold, cut into small cubes (cold butter is key for flaky scones!)
2/3 cup milk (whole milk or 2% works best for richness; I’ve even tested with oat milk and it was surprisingly creamy, just make sure it’s unsweetened)
For the Filling:
1/2 cup finely chopped fresh or frozen berries (blueberries, raspberries, or mixed berries are my favorites) OR 1/2 cup mini chocolate chips
1 tablespoon granulated sugar (optional, if using tart berries)
1 teaspoon lemon zest (optional, but adds a lovely brightness!)
For the Glaze:
1/2 cup powdered sugar
1-2 tablespoons milk or lemon juice (start with 1 tbsp and add more until you get a drizzle-able consistency)

Step-by-Step Instructions
Step 1: Preheat & Prep Pan
First things first, let’s get that oven preheated to 400°F (200°C). This ensures the scones start baking immediately, giving them a good rise. I like to line a baking sheet with parchment paper. It makes cleanup a breeze and stops any potential sticking. Just a simple sheet will do!
Step 2: Mix Dry Ingredients
In a large bowl, whisk together the flour, sugar, baking powder, and salt. Give it a good whisk for about 30 seconds. This step isn’t just about combining; it’s about aerating the flour and ensuring the leavening agent is evenly distributed. This means no sad, flat spots in your scones!
Step 3: Mix Wet Ingredients
In a separate, smaller bowl, whisk together the milk and, if you’re using them, your optional additions like lemon zest or a touch of vanilla extract. Just a quick mix is all that’s needed here.
Step 4: Combine
Now, for the butter! Add the cold, cubed butter to the dry ingredients. Using your fingertips, a pastry blender, or even two forks, cut the butter into the flour mixture until it resembles coarse crumbs with some pea-sized pieces of butter still visible. This is where the magic happens for flaky scones – those butter pieces melt in the oven, creating steam that makes them puff up. Don’t overwork it; a little rustic texture is good! Then, pour in the wet ingredients. Using a fork or a spatula, gently stir just until the dough *barely* comes together. It will look shaggy and a little sticky. Seriously, stop mixing as soon as you don’t see much dry flour. Overmixing is the enemy of tender scones!
Step 5: Prepare Filling
If you’re adding berries, gently toss them with the tablespoon of sugar (if using) and lemon zest. If you’re using chocolate chips, just have them ready to go. If your berries are frozen, don’t thaw them completely; a little coldness helps them keep their shape.
Step 6: Layer & Swirl
Turn the dough out onto a lightly floured surface. Gently bring it together into a rough ball. Pat it down into a disc about 3/4-inch thick. Now, sprinkle your berries or chocolate chips evenly over the surface. Gently fold the dough over itself a couple of times, like you’re folding a letter. You don’t want to mix them in completely; you want lovely pockets of fruit or chocolate. Pat it down again to the same thickness. You can use a knife to cut it into 6-8 wedges, or use a biscuit cutter for rounds. I usually just cut mine into wedges.
Step 7: Bake
Carefully transfer the wedges to your prepared baking sheet, leaving a little space between them. Pop them into the preheated oven. Bake for 18-22 minutes, or until they are golden brown on top and a toothpick inserted into the center comes out clean. The exact time will depend on your oven, so keep an eye on them!
Step 8: Cool & Glaze
Let the scones cool on the baking sheet for about 5 minutes before transferring them to a wire rack to cool further. While they’re still a little warm (but not piping hot!), whisk together the powdered sugar and milk or lemon juice for the glaze. Start with one tablespoon of liquid and add more a teaspoon at a time until you reach a nice drizzling consistency. Drizzle generously over the slightly cooled scones. The glaze will set as it cools.
Step 9: Slice & Serve
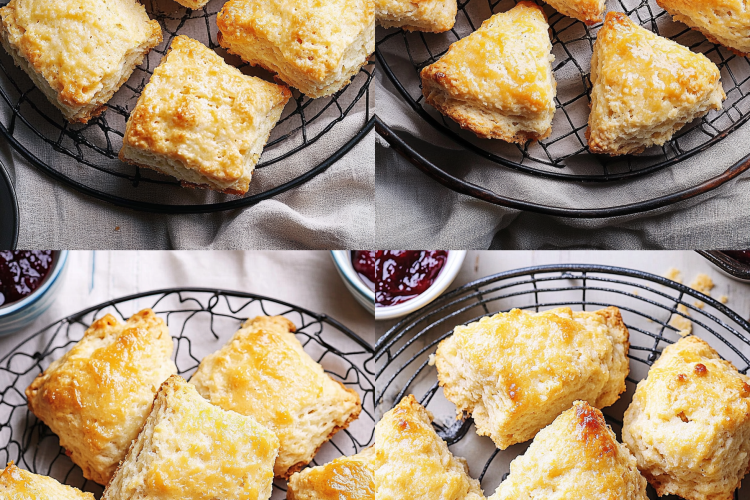
These are truly best served warm, with the glaze still slightly soft. Slice them in half horizontally if you like, and serve with a dollop of clotted cream or butter and your favorite jam. Pure bliss!
What to Serve It With
The beauty of these scones is their adaptability! They’re fantastic on their own, but here are some of my favorite ways to serve them:
For Breakfast: A warm scone is such a treat to start the day. I love to pair them with a strong cup of black coffee or a pot of Earl Grey tea. They’re lovely served with a smear of butter and a drizzle of honey. It feels a bit luxurious without being a lot of work, which is perfect for those slightly rushed weekday mornings when you want something special.
For Brunch: This is where they really shine! Serve them alongside other brunch favorites like scrambled eggs, crispy bacon, and a fresh fruit salad. A mimosa or a bellini makes it feel extra festive. For presentation, I like to arrange them on a nice platter, perhaps with a small bowl of jam and clotted cream on the side. They always disappear quickly!
As Dessert: Don’t underestimate a scone for dessert! Serve them warm with a scoop of good quality vanilla bean ice cream and a drizzle of chocolate sauce or a berry coulis. It’s a lighter, more refined alternative to a full cake or pie, and it’s incredibly satisfying. The warm scone melting into the cold ice cream is just divine.
For Cozy Snacks: This is my personal go-to. Mid-afternoon, when that little energy dip hits, or a late-night craving for something sweet, these scones hit the spot. Grab one (or two!) with a warm mug of tea. They’re comforting and satisfying without being too heavy. My kids also love them as an after-school treat with a glass of milk. It’s one of those simple pleasures that makes a regular day feel a bit brighter.
Top Tips for Perfecting Your Scones
I’ve learned a few things over the years that have made my scones consistently perfect, and I’m happy to share them with you!
Butter Handling: The absolute most crucial step is using *very cold* butter. If your butter is even slightly soft, your scones won’t be as flaky. I often cut my butter and then pop it in the freezer for about 10 minutes before I start mixing the dry ingredients. When you cut the butter into the flour, aim for pieces that range from the size of small peas to a bit larger. These pockets of butter create steam during baking, resulting in those lovely layers.
Don’t Overmix: I can’t stress this enough! Once the wet ingredients hit the dry, mix *just* until combined. Overmixing develops the gluten in the flour too much, which will result in tough, dense scones. A shaggy, slightly sticky dough is exactly what you’re looking for. It’s better to have a few streaks of flour left than to overwork the dough.
Gentle Handling: When you turn the dough out and shape it, be gentle. Patting it down is better than rolling, which can also overwork the gluten. Try not to knead it at all. Think of it as gently coaxing the dough into shape.
Fruit & Chocolate Distribution: If you’re adding berries or chocolate chips, don’t just dump them in. Gently fold the dough a few times after sprinkling them over the surface. This helps to distribute them without crushing them or overmixing the dough. If using frozen berries, don’t thaw them completely; they can bleed color and make the dough gummy if they’re too soft.
Oven Temperature: Make sure your oven is fully preheated. A hot oven is essential for scones to get that initial burst of lift. If your oven tends to run hot or cool, using an oven thermometer can be a lifesaver. Also, position your oven rack in the center for even baking.
Glaze Consistency: For the glaze, start with less liquid than you think you need. You can always add more, but it’s harder to fix a glaze that’s too thin. A slightly thicker glaze will hold its shape better and create those beautiful drizzles. If it’s too thick, just add milk or lemon juice a teaspoon at a time until it’s perfect.
Ingredient Swaps: While this recipe is fantastic as is, feel free to experiment! For a richer flavor, you can substitute some of the milk with heavy cream. If you’re out of baking powder, you can use half as much baking soda mixed with an acidic ingredient like buttermilk (but you’ll need to adjust other ingredients too). For the flour, I haven’t tested extensively with alternative flours, but a good gluten-free blend that you trust might work, though the texture might be slightly different.
Storing and Reheating Tips
One of the best things about scones is how well they store, meaning you can enjoy them over a few days!
Room Temperature: Once completely cooled and glazed, store scones in an airtight container at room temperature for up to 2 days. They are best enjoyed within the first 24 hours for optimal freshness and texture, but they’re still quite good on day two. Avoid storing them in a plastic bag if possible, as it can make them a bit soggy.
Refrigerator Storage: If you live in a very warm or humid climate, or if you plan to keep them for up to 3-4 days, the refrigerator is a good option. Store them in an airtight container. Be aware that refrigeration can slightly toughen the texture, but they’re still delicious. You might want to warm them up before serving.
Freezer Instructions: These scones freeze beautifully, which is a lifesaver when you want a quick treat! Once completely cooled and glazed, wrap them tightly in plastic wrap, then place them in a freezer-safe bag or container. They’ll keep well in the freezer for up to 2-3 months. To thaw, simply remove them from the freezer and let them come to room temperature on the counter for a few hours. If you prefer them warm, you can reheat them gently in a low oven (around 300°F or 150°C) for 5-10 minutes.
Glaze Timing Advice: For the best results when storing, it’s often best to glaze them just before serving, especially if you plan to freeze them. If you glaze them before freezing, the glaze can sometimes become a bit sticky or uneven. If you want the glaze, simply thaw the scones and then whip up a fresh batch of glaze to drizzle over them. If storing at room temperature or in the fridge, glazing them beforehand is usually fine.
Frequently Asked Questions
Final Thoughts

There you have it – my absolute favorite scones recipe! It’s the kind of recipe that makes you feel accomplished and delighted every single time you make it. The delicate crumb, the hint of sweetness, and the pure joy of that first warm bite truly can’t be beat. It’s so versatile, so forgiving, and so utterly delicious. I really hope you give this scones recipe a try, especially if you’ve ever been intimidated by making scones before. I have a feeling it’s going to become a favorite in your kitchen too. And if you love these, you might also enjoy my recipe for [Link to another delicious baked good recipe, e.g., “Classic Blueberry Muffins” or “Easy Chocolate Chip Cookies“] – they have that same comforting, homemade feel. I can’t wait to hear how your scones turn out! Please feel free to leave a comment below with your own favorite additions or any questions you might have. Happy baking, everyone!

Classic Scones
Ingredients
Main Ingredients
- 2.5 cups all-purpose flour
- 2 tablespoons granulated sugar
- 1 tablespoon baking powder
- 0.5 teaspoon salt
- 0.5 cup cold unsalted butter cut into cubes
- 0.75 cup cold heavy cream
- 1 large egg beaten, for egg wash
Instructions
Preparation Steps
- Preheat your oven to 400°F (200°C). Line a baking sheet with parchment paper.
- In a large bowl, whisk together the flour, sugar, baking powder, and salt.
- Cut in the cold butter using a pastry blender or your fingertips until the mixture resembles coarse crumbs.
- Make a well in the center of the dry ingredients and pour in the cold heavy cream. Stir with a fork until just combined. The dough will be shaggy.
- Turn the dough out onto a lightly floured surface and gently bring it together. Pat it into a circle about 3/4-inch thick.
- Cut the dough into 8 wedges using a sharp knife or bench scraper.
- Place the scones on the prepared baking sheet.
- Brush the tops of the scones with the beaten egg wash.
- Bake for 18-20 minutes, or until golden brown and cooked through.
- Let cool slightly on a wire rack before serving. Enjoy warm with butter, jam, or clotted cream.
