
You know, there are some recipes that just *feel* like home, and this one for Easter Blondies is absolutely one of them. Every spring, as soon as the first daffodils start to peek through the soil, my kitchen instantly transforms. It’s not just about the pastel colors and the chocolate eggs; it’s about the comforting aroma that fills the house, the kind that makes everyone gather around, peeking into the oven. These Easter Blondies are my absolute go-to. They’re ridiculously fudgy, have this wonderful chewiness, and are studded with enough chocolate to make any sweet tooth happy. If you love a good brownie, you’re going to adore these. They’re like a brownie’s sophisticated, sunnier cousin, perfect for sharing and definitely a crowd-pleaser. I remember the first time I made them – I was a bit nervous about how they’d turn out, but they were a runaway success! My kids practically inhaled them, and that’s when I knew I’d found a keeper.
What are Easter Blondies?
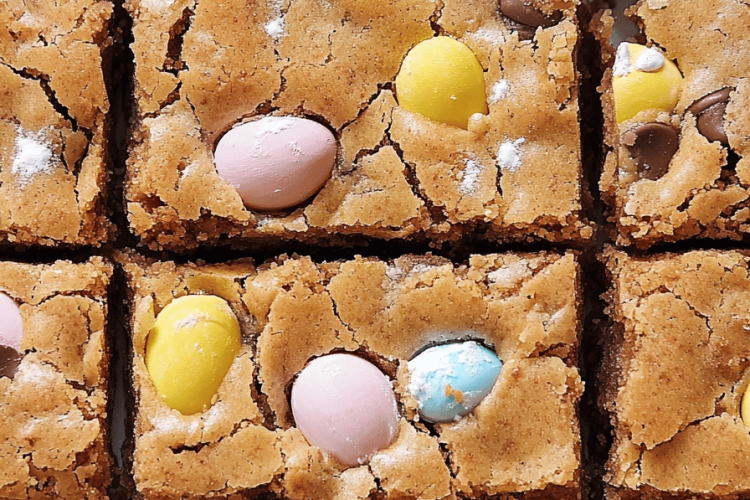
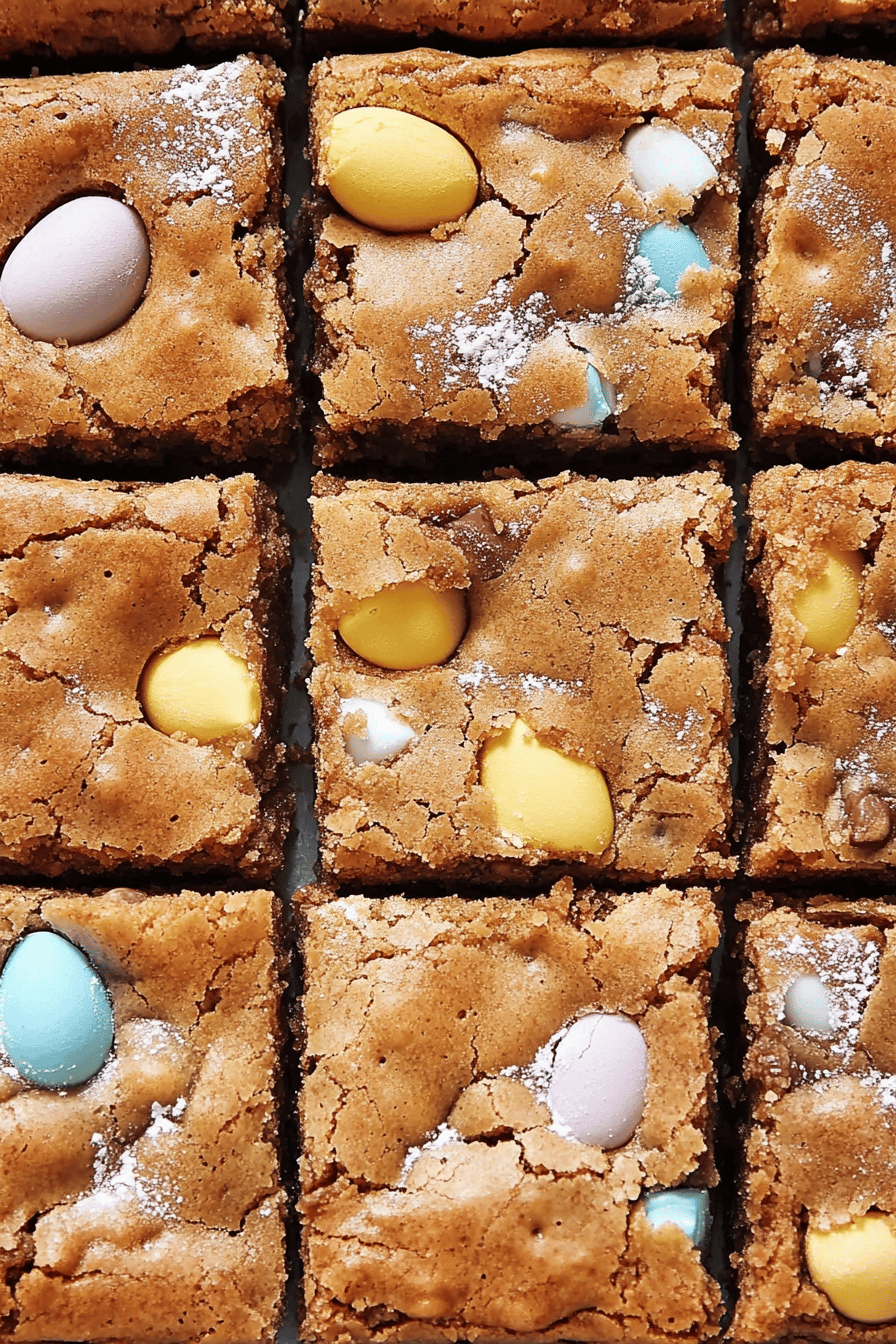
So, what exactly are Easter Blondies? Think of them as a vanilla-flavored cousin to the classic chocolate brownie. Instead of cocoa powder, the base relies on Brown sugar and butter for that rich, caramel-like flavor. The texture is usually somewhere between cakey and fudgy, with a glorious chewy edge. What makes them “Easter” blondies, in my book, is the addition of colorful sprinkles and often some white chocolate chips or M&Ms that just scream springtime. It’s essentially a buttery, sweet bar that’s incredibly forgiving to make. It’s not fussy, it doesn’t require any fancy techniques, and it always turns out beautifully. This recipe is my secret weapon when I need a dessert that’s impressive but doesn’t take all day. It’s truly sunshine in a pan!
Why you’ll love this recipe?
There are so many reasons why I keep coming back to this Easter Blondies recipe, and I’m pretty sure you’ll fall in love with it just as much as I have. First off, let’s talk about the flavor. It’s this incredible dance between sweet vanilla, rich brown sugar, and molten chocolate. It’s not overly sweet, but it has this deep, satisfying caramel undertone that’s just heavenly. And the texture? Oh my goodness. You get those delightful chewy edges, a soft and fudgy center, and the occasional melt-in-your-mouth Chocolate Chip. It’s pure bliss! Secondly, and this is a big one for me, it’s ridiculously easy. Seriously, if you can stir things together in a bowl, you can make these. I’ve made them when I’m exhausted after a long day, and they still turn out perfectly. No complicated steps, no weird ingredients, just pure, simple baking joy. For anyone trying to keep costs down, this recipe is a lifesaver. The ingredients are all pantry staples, making it super budget-friendly without sacrificing any flavor or quality. And the versatility! You can absolutely customize these Easter Blondies to your heart’s content. Add different kinds of chocolate, switch up the sprinkles, or even add some nuts if you’re feeling it. What I love most about this particular recipe is that it strikes that perfect balance: it’s indulgent enough for a special occasion like Easter, but simple enough for a weeknight craving. It’s the kind of dessert that makes your home feel warm and welcoming. It’s so much better than those store-bought bars, and honestly, once you try this, you’ll never go back.
How do I make Easter Blondies?
Quick Overview
Making these Easter Blondies is surprisingly straightforward. You’ll start by melting some butter and then mixing in sugar to create a luscious base. Next, you’ll whisk in eggs and vanilla, followed by your dry ingredients. Fold in plenty of chocolate chips and colorful sprinkles, spread the batter into your prepared pan, and bake until golden and set. The whole process from start to finish takes less than an hour, and that includes the baking time! It’s really just a matter of combining ingredients in bowls, which makes it super manageable, even for beginner bakers.
Ingredients
For the Main Batter:
Unsalted Butter: I always opt for unsalted butter because it gives you more control over the saltiness of your bake. You’ll need 1 cup (2 sticks), melted. Make sure it’s melted, not just softened, for that perfect fudgy texture.
Brown Sugar: This is the magic ingredient for that caramel flavor. Use light or dark brown sugar – either works beautifully! I prefer light brown sugar for a slightly less intense molasses flavor. You’ll need 2 cups, packed.
Eggs: Two large eggs are essential for binding everything together and adding richness. Make sure they’re at room temperature; it helps them incorporate better into the batter.
Vanilla Extract: Don’t skimp here! A good quality vanilla extract really elevates the flavor. 2 teaspoons should do the trick. If you have vanilla bean paste, even better – it adds those beautiful little flecks!
All-Purpose Flour: Just 1 ½ cups of all-purpose flour will give us the right structure without making the blondies cakey. Make sure to measure it correctly by spooning it into your measuring cup and leveling it off.
Baking Powder: Just 1 teaspoon of baking powder provides a little lift, but not too much, keeping them delightfully dense and chewy.
Salt: A ½ teaspoon of salt balances out the sweetness and brings out all the other flavors.
For the Mix-ins:
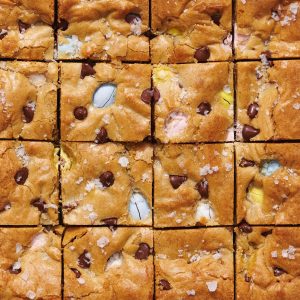
White Chocolate Chips: I love the creamy sweetness of white chocolate here, but feel free to use milk or Dark Chocolate chips too. About 1 cup should be perfect.
Easter Sprinkles: This is where the fun really begins! I love a mix of pastel-colored jimmies and nonpareils, about ½ cup. They add such a festive touch and a fun little crunch.
Optional: For the Glaze
Powdered Sugar: About 1 cup, sifted to avoid lumps.
Milk or Cream: 1-2 tablespoons, just enough to reach a drizzling consistency.
Vanilla Extract: A tiny splash, ¼ teaspoon, to flavor the glaze.

Step-by-Step Instructions
Step 1: Preheat & Prep Pan
First things first, get your oven preheated to 350 degrees Fahrenheit (175 degrees Celsius). This is super important for even baking. Then, grab an 8×8 inch baking pan. I like to grease it generously with butter or cooking spray, and then line it with parchment paper, leaving some overhang on the sides. This makes lifting the blondies out a breeze later on – trust me, it’s a game-changer!
Step 2: Mix Dry Ingredients
In a medium bowl, whisk together your flour, baking powder, and salt. You just want to combine them well so that the leavening agent and salt are evenly distributed. Don’t overmix here, just a gentle whisk will do. This ensures your blondies have a nice, consistent texture.
Step 3: Mix Wet Ingredients
In a large bowl, combine your melted butter and packed brown sugar. Whisk them together until they’re well combined and smooth. Then, crack in your two large eggs and add the vanilla extract. Whisk everything until it’s smooth and glossy. The mixture should look rich and emulsified. Room temperature eggs really help with this!
Step 4: Combine
Now, pour the dry ingredients into the wet ingredients. Using a spatula, gently fold them together until *just* combined. It’s really important not to overmix here! You should still see a few streaks of flour. Overmixing can lead to tough blondies, and nobody wants that. We’re going for tender and chewy!
Step 5: Prepare Filling
Now for the fun part – the mix-ins! Gently fold in your white chocolate chips and your festive Easter sprinkles. Make sure they’re distributed evenly throughout the batter. I like to reserve a few sprinkles to press onto the top before baking for extra visual appeal.
Step 6: Layer & Swirl
Spoon the batter into your prepared baking pan. It will be thick, so use your spatula to spread it out evenly to the edges. If you’re adding any extra chocolate chips or sprinkles on top, now’s the time! You can gently press them into the surface for that extra decorative touch.
Step 7: Bake
Pop the pan into your preheated oven. Bake for about 25-30 minutes. You’ll know they’re done when the edges are golden brown and the center is set but still looks a little soft. A toothpick inserted into the center should come out with moist crumbs attached, not wet batter. I always err on the side of slightly underbaking for that perfect fudgy texture.
Step 8: Cool & Glaze
This is a crucial step for texture! Let the blondies cool in the pan on a wire rack for at least 30 minutes. This allows them to set up properly. While they’re cooling, you can whip up a simple glaze if you like. Just whisk together the sifted powdered sugar, milk or cream (add it slowly until you get a drizzling consistency), and vanilla. Once the blondies are mostly cool, drizzle the glaze over the top. If you want a simpler finish, you can skip the glaze entirely, or just dust them with a little extra powdered sugar.
Step 9: Slice & Serve
Once the glaze has set a bit (or if you skipped it), use the parchment paper overhang to lift the entire slab of blondies out of the pan. Place it on a cutting board and slice into squares. For the cleanest cuts, I like to use a sharp knife and wipe it clean between slices. Serve them warm or at room temperature. They are absolutely divine on their own, but a scoop of vanilla ice cream alongside? Perfection!
What to Serve It With
These Easter Blondies are so versatile, they truly fit into any occasion! For a cozy breakfast treat, I love pairing a warm blondie with a freshly brewed cup of coffee. The coffee’s slight bitterness cuts through the sweetness beautifully, and it just feels so comforting on a slow morning. If you’re planning a more elaborate Easter brunch, these blondies are a must. I like to arrange them on a pretty platter, maybe alongside some fresh berries or a fruit salad, making them look extra special. A chilled glass of rosé or a sparkling juice pairs wonderfully with them, adding a touch of elegance. As a dessert, they are absolutely divine. Serve them warm with a dollop of whipped cream or, my personal favorite, a scoop of high-quality vanilla bean ice cream. The contrast of the warm, chewy blondie and cold, creamy ice cream is simply irresistible. And for those moments when you just need a little pick-me-up, a cozy snack with a glass of cold milk is all you need. Honestly, my family devours these at any time of day – they’re that good!
Top Tips for Perfecting Your Easter Blondies
Over the years of making these Easter Blondies, I’ve picked up a few tricks that I think make all the difference. First, when it comes to the brown sugar, make sure it’s packed into your measuring cup. This isn’t just about sweetness; it’s about moisture and that wonderful chewy texture. If your brown sugar has hardened, give it a quick zap in the microwave to soften it up before measuring!
When you’re mixing the wet and dry ingredients, I cannot stress enough: do NOT overmix. Seriously, just fold until the flour is *almost* gone. A few tiny streaks of flour are totally fine. Overmixing develops the gluten in the flour too much, which will result in tough, cakey blondies instead of that glorious fudgy chew we’re aiming for. My kids used to “help” me mix when they were little, and I learned this lesson the hard way!
For the swirl effect with the sprinkles, don’t be afraid to get a little creative! You can gently swirl them in with your spatula for a marbled look, or just evenly distribute them. I also like to reserve a small handful of sprinkles and press them onto the surface of the batter right before baking. It adds a nice visual pop and a little extra crunch.
If you’re looking to switch things up, the ingredient swaps are endless. For a dairy-free version, I’ve successfully tested this with melted coconut oil instead of butter and a dairy-free white chocolate chip. The texture is slightly different but still delicious! You can also swap the white chocolate chips for milk or dark chocolate, or even add chopped nuts like pecans or walnuts if you enjoy a bit of crunch. Some people love adding a touch of cinnamon or even a bit of orange zest for a more complex flavor profile – give it a try!
Baking is always a bit of an art, and ovens can be finicky. My best advice is to start checking for doneness around the 23-minute mark. The edges should be golden brown and set, but the center should still look a little underbaked. A toothpick inserted into the center should come out with moist crumbs, not wet batter. If you pull them out too early, they’ll be gooey (which isn’t always a bad thing!), but if you bake them too long, they’ll become dry and crumbly. It’s a fine line, but so worth getting right!
For the glaze, if it’s too thick, add milk a teaspoon at a time until it’s perfect for drizzling. If it’s too thin, add a little more sifted powdered sugar. I’ve also experimented with adding a tiny bit of lemon juice to the glaze for a subtle tartness, which is lovely with the sweet white chocolate.
Storing and Reheating Tips
One of the best things about these Easter Blondies is how well they store. If you plan to enjoy them within a few days, simply cover the pan tightly with plastic wrap or transfer the cut blondies to an airtight container at room temperature. They’ll stay wonderfully fresh and chewy for about 3-4 days. I find they’re actually even better on the second day, as the flavors meld together a bit more.
If you want to keep them longer, the refrigerator is your friend. Wrap the entire slab (before cutting) or individual pieces tightly in plastic wrap, and then place them in an airtight container. They’ll keep well in the fridge for up to a week. When you’re ready to eat them, you can enjoy them chilled, or let them come to room temperature for about 20-30 minutes. I personally love them slightly chilled sometimes!
Freezing is a fantastic option if you want to make a batch ahead of time. To freeze, let the blondies cool completely. Then, cut them into individual squares. Wrap each square tightly in plastic wrap, then in aluminum foil, and place them in a freezer-safe bag or container. They can be frozen for up to 2-3 months. To thaw, simply remove them from the freezer and let them thaw at room temperature for a couple of hours. They’ll taste just as good as the day you baked them!
Regarding the glaze, it’s best to apply it right before serving if you’re planning on storing them at room temperature or in the fridge. If you are freezing them, I recommend storing them *without* the glaze. You can add the glaze after thawing and bringing them back to room temperature. This prevents the glaze from getting sticky or cracking in the freezer.
Frequently Asked Questions
Final Thoughts
So there you have it – my absolute favorite Easter Blondies recipe! They’re more than just a treat; they’re a little slice of joy, a way to celebrate spring, and a guaranteed way to make your loved ones smile. The combination of the buttery, caramel-infused base, the bursts of white chocolate, and the cheerful pop of sprinkles is just perfection. They’re so incredibly easy to make, which is a huge bonus, especially when you’ve got a million other things to do during the holidays. If you loved this recipe, you might also want to check out my Fudgy Chocolate Brownies or my Lemon Raspberry Scones for more springtime baking inspiration. I truly hope you give these Easter Blondies a try. They’ve brought so much happiness to my kitchen, and I’m sure they will to yours too. I can’t wait to hear what you think! Please leave a comment below and let me know how yours turned out, or if you tried any fun variations. Happy baking, everyone!
Easter Blondies
Ingredients
Main Ingredients
- 0.75 cup unsalted butter, melted
- 1.5 cup granulated sugar
- 2 large eggs
- 1 teaspoon vanilla extract
- 0.5 teaspoon lemon zest from 1/2 lemon
- 1.5 cup all-purpose flour
- 0.5 teaspoon baking powder
- 0.25 teaspoon salt
- 1 cup white chocolate chips
- 0.5 cup pastel-colored candy eggs such as Cadbury Mini Eggs, roughly chopped
Instructions
Preparation Steps
- Preheat oven to 350°F (175°C). Line an 8x8 inch baking pan with parchment paper, leaving an overhang on the sides.
- In a large bowl, whisk together the melted butter and granulated sugar until combined. Whisk in the eggs one at a time, followed by the vanilla extract and lemon zest.0.75 cup unsalted butter, melted
- In a separate medium bowl, whisk together the flour, baking powder, and salt.0.75 cup unsalted butter, melted
- Gradually add the dry ingredients to the wet ingredients, mixing until just combined. Do not overmix.
- Fold in the white chocolate chips and chopped candy eggs.0.75 cup unsalted butter, melted
- Spread the batter evenly into the prepared baking pan.
- Bake for 25-30 minutes, or until a toothpick inserted into the center comes out with moist crumbs attached.
- Let the blondies cool completely in the pan on a wire rack before cutting into squares.
