

Oh, where do I even begin with these chicken enchiladas? If there’s one dish that screams “comfort food” and “family gathering” in my kitchen, it’s this one. It’s the recipe I pull out when I need a guaranteed win, the one my kids have been requesting since they were tiny tots, and honestly, it’s the dish I crave after a long, hectic week. It’s like a warm hug on a plate. You know how some people have that one special cake or cookie recipe? Well, for me, it’s these chicken enchiladas. They’re not complicated, but they pack a punch of flavor that just can’t be beat. They’re so much more satisfying than a quick weeknight pasta, and frankly, a whole lot more exciting than plain old roasted chicken. These are truly the best chicken enchiladas, and I can’t wait to share them with you!

What are chicken enchiladas?
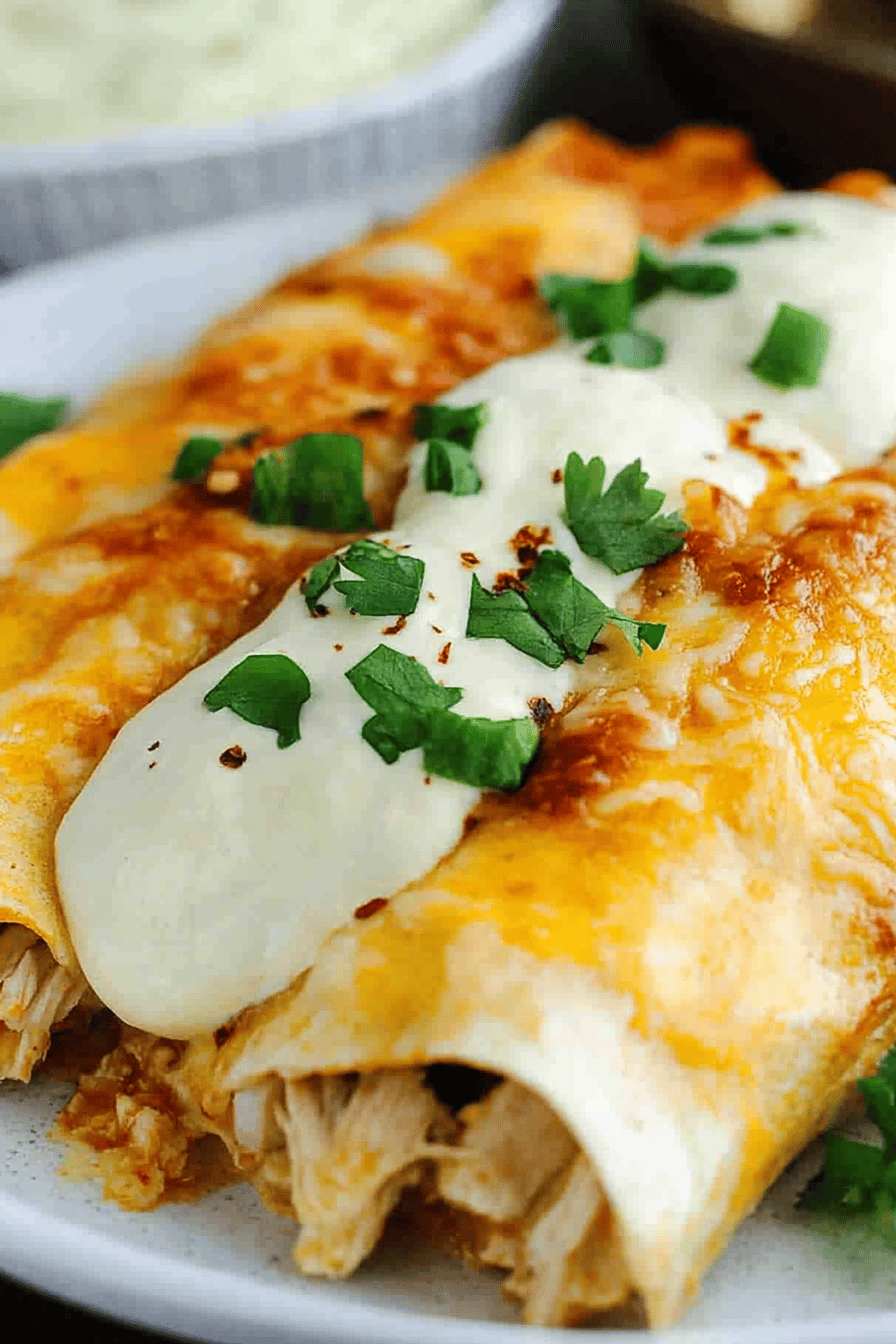
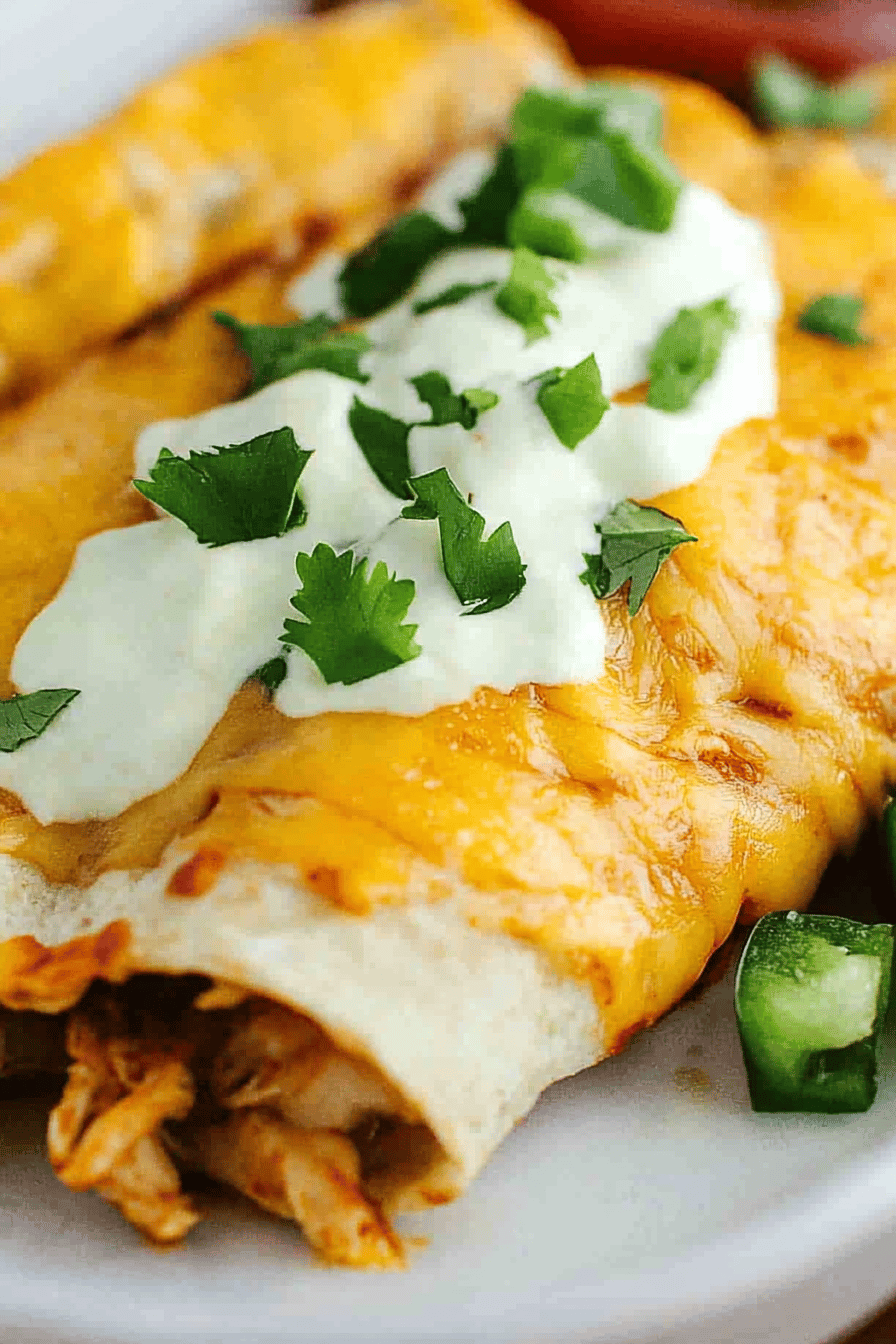
So, what exactly *are* these chicken enchiladas that I’m always raving about? Think of them as little pockets of pure happiness. At their core, they’re tortillas (I’m partial to corn, but we’ll get to that!) filled with seasoned, tender Shredded Chicken, all nestled together and bathed in a creamy, dreamy enchilada sauce, then topped with a generous blanket of melted cheese. It’s the kind of meal that feels both special and incredibly homey. We’re talking layers of flavor here: the savory chicken, the slightly tangy and spiced sauce, and that gooey, irresistible cheese. It’s a classic for a reason, but I’ve tinkered with this recipe over the years to make it just perfect for my family, and I think you’re going to adore it. It’s approachable, forgiving, and always delivers that satisfying, cheesy goodness that we all crave.
Why you’ll love this recipe?
Let me count the ways! First off, the FLAVOR. Oh my goodness, the flavor. The chicken is always so moist and perfectly seasoned, and the sauce… it’s not just any enchilada sauce, it’s got this subtle depth that just makes everything sing. It’s savory, a little spicy (but not too much for the kiddos!), and wonderfully creamy. Then there’s the SIMPLICITY. I know, “enchiladas” can sometimes sound intimidating, but this recipe is actually ridiculously easy. Most of the work is hands-off baking time. You can totally whip this up on a weeknight if you plan ahead a little. And let’s talk COST-EFFICIENCY. Chicken, tortillas, some pantry staples for the sauce – it’s all pretty budget-friendly, making it a lifesaver when you’re trying to feed a crowd without breaking the bank. Plus, it’s incredibly VERSATILE. I’ve served these for casual weeknight dinners, potlucks, and even slightly dressier gatherings, and they’re always a hit. What I love most about this particular chicken enchilada recipe is that it feels authentic and deeply satisfying without requiring a ton of obscure ingredients or fancy techniques. It’s the real deal, folks!
How do I make chicken enchiladas?
Quick Overview
The magic of these chicken enchiladas lies in their straightforward assembly. We’ll start by prepping our shredded chicken, then whip up a quick, flavorful enchilada sauce. Once everything is seasoned and ready, it’s just a matter of filling those tortillas, rolling them up, and letting the oven do its thing until everything is bubbly and golden. It’s a process that feels familiar and comforting, and the payoff is immense. Seriously, it’s so much simpler than you might think, and the result is so worth it.
Ingredients
For the Main Dish:
1.5 lbs boneless, skinless Chicken Breasts or thighs (thighs are more forgiving and add amazing flavor!)
1 tablespoon olive oil
1 medium yellow onion, finely chopped
2 cloves garlic, minced
1 teaspoon ground cumin
1 teaspoon chili powder
½ teaspoon smoked paprika
Salt and freshly ground black pepper to taste
12 corn tortillas (I prefer corn for that authentic texture, but flour works too if that’s what you have!)
2 cups shredded Monterey Jack cheese (or a Mexican blend!)
½ cup chopped fresh cilantro, for garnish (optional, but highly recommended!)
For the Creamy Enchilada Sauce:
2 tablespoons olive oil
2 tablespoons all-purpose flour (or a gluten-free blend)
2 tablespoons chili powder (use a good quality one for best flavor!)
1 teaspoon ground cumin
½ teaspoon dried oregano
¼ teaspoon cayenne pepper (adjust to your spice preference!)
1 (15 ounce) can tomato sauce
1 cup chicken broth
½ cup half-and-half or heavy cream (for ultimate creaminess! You can use milk too, but it won’t be quite as rich)
Salt and freshly ground black pepper to taste
Step-by-Step Instructions
Step 1: Preheat & Prep Pan
First things first, let’s get our oven fired up to 375°F (190°C). While it’s heating, grab a large baking dish – a 9×13 inch one is usually perfect for this amount. You don’t need to grease it at this stage, just have it ready to go!
Step 2: Cook and Shred the Chicken
In a large skillet, heat 1 tablespoon of olive oil over medium-high heat. Add your chicken breasts or thighs and season generously with salt and pepper. Cook until they’re nicely browned and cooked through, about 6-8 minutes per side for breasts, or a little longer for thighs. Remove the chicken from the skillet and set it aside on a plate to cool slightly. Once it’s cool enough to handle, shred it using two forks. It should come apart easily! If you’re short on time, you can totally use a rotisserie chicken – just shred about 2 cups of it.
Step 3: Sauté Aromatics & Spices
In the same skillet (no need to wash it!), add the chopped onion and cook over medium heat until it’s softened and translucent, about 5-7 minutes. Add the minced garlic, cumin, chili powder, smoked paprika, salt, and pepper. Stir and cook for another minute until fragrant. This step really wakes up the spices and builds a fantastic flavor base!
Step 4: Combine Filling Ingredients
Add the shredded chicken back into the skillet with the onions and spices. Stir everything together really well, making sure that chicken is coated in all those delicious flavors. Taste it and adjust seasoning if needed. This is your filling, so make sure it’s just how you like it!
Step 5: Make the Creamy Enchilada Sauce
Now for that dreamy sauce. In a medium saucepan, heat 2 tablespoons of olive oil over medium heat. Whisk in the flour and cook for about 1 minute, stirring constantly, to make a roux. This helps thicken our sauce. Whisk in the chili powder, cumin, oregano, and cayenne pepper, and cook for another 30 seconds until fragrant. Gradually whisk in the tomato sauce and chicken broth, stirring until smooth. Bring the mixture to a simmer, then reduce the heat to low. Stir in the half-and-half or cream. Continue to cook, stirring occasionally, until the sauce has thickened slightly, about 5-7 minutes. Season with salt and pepper to taste. You want it rich and creamy, but not too thick – it should coat the back of a spoon. If it’s too thick, just whisk in a little more chicken broth or water.
Step 6: Soften Tortillas (Optional but Recommended!)
This step is key to preventing tortillas from breaking when you roll them. You have a couple of options here. You can either briefly fry them in a little bit of oil for a few seconds per side until they’re pliable, or you can microwave them stacked together between damp paper towels for about 30-60 seconds. Either way, you want them warm and flexible, not crispy.
Step 7: Assemble the Enchiladas
Now for the fun part! Ladle a thin layer of the enchilada sauce into the bottom of your prepared baking dish, just enough to coat it. Take one softened tortilla, spoon about 2-3 tablespoons of the chicken filling down the center, sprinkle a little bit of cheese over the filling, and then roll it up tightly. Place the rolled enchilada seam-side down in the baking dish. Repeat this process with the remaining tortillas and filling, arranging them snugly in the dish. Don’t worry if they’re close together – they’ll meld together beautifully in the oven!
Step 8: Bake
Once all the enchiladas are rolled and nestled in the dish, pour the remaining enchilada sauce evenly over the top, making sure to get into all the little nooks and crannies. Sprinkle the rest of the shredded cheese all over the top. Cover the baking dish loosely with aluminum foil (this prevents the cheese from browning too quickly). Bake for 20 minutes. Then, remove the foil and bake for another 10-15 minutes, or until the sauce is bubbly and the cheese is melted and golden brown. Oh, the smell that fills the kitchen at this stage is just incredible!
Step 9: Rest & Serve
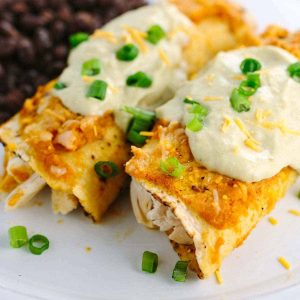
This is arguably the hardest part – waiting! Let the chicken enchiladas rest for about 5-10 minutes after they come out of the oven. This allows the sauce to thicken up a bit more and makes them easier to serve. Garnish with fresh cilantro, if you like, and serve hot. Enjoy every cheesy, saucy bite!
What to Serve It With
These chicken enchiladas are practically a meal in themselves, but they love to be accompanied by a few friends! For a truly classic experience, a dollop of Sour Cream and some pico de gallo or salsa on the side are non-negotiable. I also love serving them with a side of simple Mexican rice – it’s perfect for soaking up any extra sauce. A light and refreshing shredded lettuce salad with a lime vinaigrette is also a fantastic contrast to the richness of the enchiladas. If you’re feeling adventurous, try some refried beans or black beans; they pair beautifully and make it a truly hearty meal. For a more complete spread, a simple avocado salad or some grilled corn on the cob are wonderful additions. Honestly, these enchiladas are so versatile, they fit right in whether you’re aiming for a casual weeknight dinner or a more festive family fiesta!
Top Tips for Perfecting Your Chicken Enchiladas
After making these chicken enchiladas more times than I can count, I’ve picked up a few tricks that I think make all the difference. First, about the tortillas: I absolutely swear by corn tortillas. They have that distinct, slightly chewy texture that just screams authentic enchilada. If you’re using corn, don’t skip the step of softening them! If they’re dry, they’ll crack when you roll them, and nobody wants a leaky enchilada. A quick dip in warm enchilada sauce before filling is another trick I’ve learned – it helps keep them pliable and infuses them with flavor right from the start. For the chicken filling, I really love using chicken thighs. They’re so forgiving and stay incredibly moist, even if you accidentally overcook them a tad. If you use breasts, be careful not to overcook them initially, or they can become a bit dry. When you’re making the sauce, don’t be afraid to taste and adjust the seasoning! It’s so important. A little more chili powder, a pinch more cumin, or a dash of cayenne can really transform the flavor profile. I also find that using good quality chili powder makes a huge difference – it’s the backbone of the sauce! As for the cheese, I always go for Monterey Jack or a Mexican blend because they melt so beautifully. Don’t be shy with the cheese on top; it’s essential for that gooey, golden crust. Lastly, patience with the resting period after baking is key. It might seem like torture when they smell so good, but letting them sit for a few minutes makes them so much easier to handle and the flavors really meld together perfectly. Trust me on this one!
Storing and Reheating Tips
These chicken enchiladas are fantastic for leftovers, which is a huge win in my book! If you happen to have any (a rare occurrence in my house!), they store beautifully. Once they’ve cooled down a bit, cover the baking dish tightly with plastic wrap or transfer any leftovers to an airtight container. They’ll stay good in the refrigerator for about 3-4 days. When you’re ready to reheat, you’ve got options. The best way, in my opinion, is to pop them back into a preheated oven at around 350°F (175°C) until they’re heated through and the cheese is melty again. This usually takes about 15-20 minutes. Covering them with foil initially and then uncovering for the last few minutes can help keep them from drying out too much. If you’re in a real pinch for time, you can reheat individual portions in the microwave, but they might lose a little of their texture. For freezing, this recipe freezes exceptionally well! You can freeze the entire unbaked dish (wrap it well in plastic wrap and then foil) or freeze individual portions. If freezing unbaked, thaw overnight in the refrigerator before baking as directed, adding a few extra minutes to the baking time. If reheating from frozen, cover with foil and bake at 350°F (175°C) for about 40-50 minutes, or until heated through, removing the foil for the last 10 minutes. The glaze, or cheese topping, is best added just before serving or reheating to keep it fresh and melty.
Frequently Asked Questions
Final Thoughts
There you have it – my cherished recipe for cheesy chicken enchiladas! This dish isn’t just food to me; it’s a collection of memories, laughter, and that undeniable feeling of home. It’s proof that you don’t need complicated ingredients or hours in the kitchen to create something truly special and delicious. The way the flavors meld together, the comforting warmth, and that perfect cheese pull – it’s pure culinary joy. If you love a good, hearty, flavorful meal that’s a guaranteed hit with everyone, I really hope you’ll give these chicken enchiladas a try. They’ve earned their spot as a family favorite for a reason! I’d absolutely love to hear what you think if you make them, or if you have any special twists you like to add. Leave a comment below and tell me all about it! Happy cooking, and happy eating!
Chicken Enchiladas
Ingredients
Chicken Enchiladas
- 2 cups cooked chicken shredded
- 1 can enchilada sauce 15 ounces
- 8 tortillas corn tortillas 6-inch
- 2 cups shredded cheese cheddar or Monterey Jack
- 0.5 cup sour cream
- 0.25 cup chopped onion
- 1 tablespoon vegetable oil
Instructions
Preparation Steps
- Preheat oven to 375°F (190°C). Lightly grease a 9x13 inch baking dish.
- In a medium bowl, combine the shredded chicken, half of the enchilada sauce, sour cream, and chopped onion. Mix well.2 cups cooked chicken
- Warm the corn tortillas slightly in a dry skillet or microwave to make them pliable.2 cups cooked chicken
- Dip each tortilla briefly in the remaining enchilada sauce to soften, then fill with the chicken mixture. Roll up and place seam-side down in the prepared baking dish.2 cups cooked chicken
- Pour the remaining enchilada sauce over the rolled tortillas. Sprinkle with shredded cheese.2 cups cooked chicken
- Bake for 20-25 minutes, or until the cheese is melted and bubbly.
- Let stand for a few minutes before serving. Garnish with extra cheese, cilantro, or a dollop of sour cream if desired.
