
What is the magic of Christmas? What are some of the best things about this place: the twinkling lights, the smell of pine, and of course, all the amazing food. Is it true that Christmas is coming? “holiday cheer” from the oven. I’ve found a recipe that’s already become my family favorite. And this year, I have found an absolute winner. Brownie Christmas Trees! I was looking for a way to make our holiday baking more fun. Honestly, I am looking at this. What are some of the most whimsical things that I can do with my kids without being overly complicated? If you like a good brownie but also want that festive touch, then you need to try this recipe. Is it possible to fall head over heels for these? They’re like the best parts of a classic brownie, but shaped into adorable little trees. Is it like getting a surprise gift in every bite?
What are brownie Christmas trees?
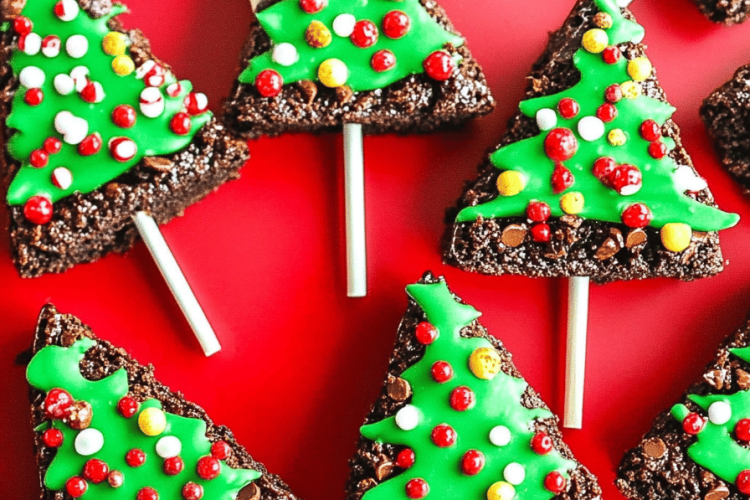
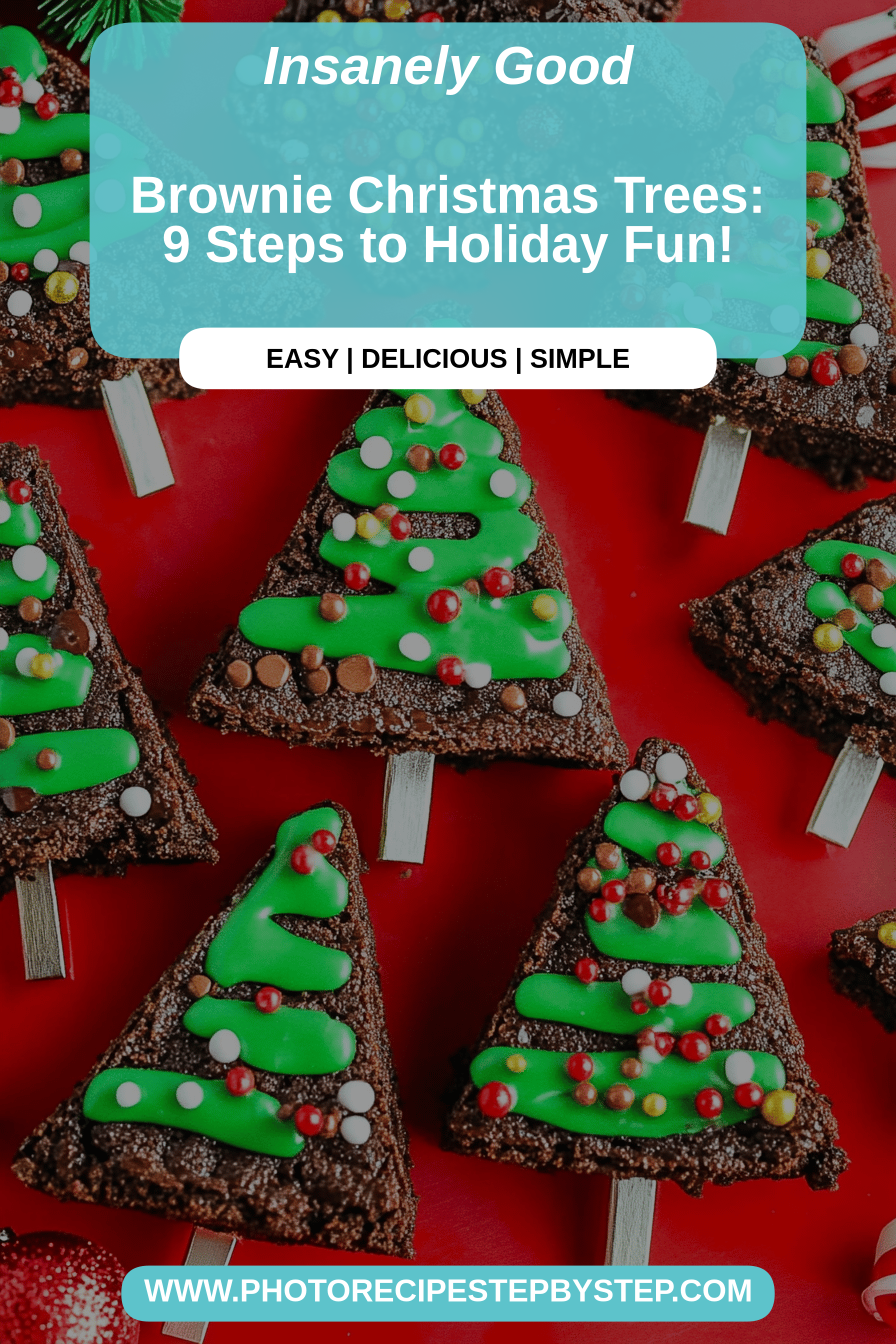
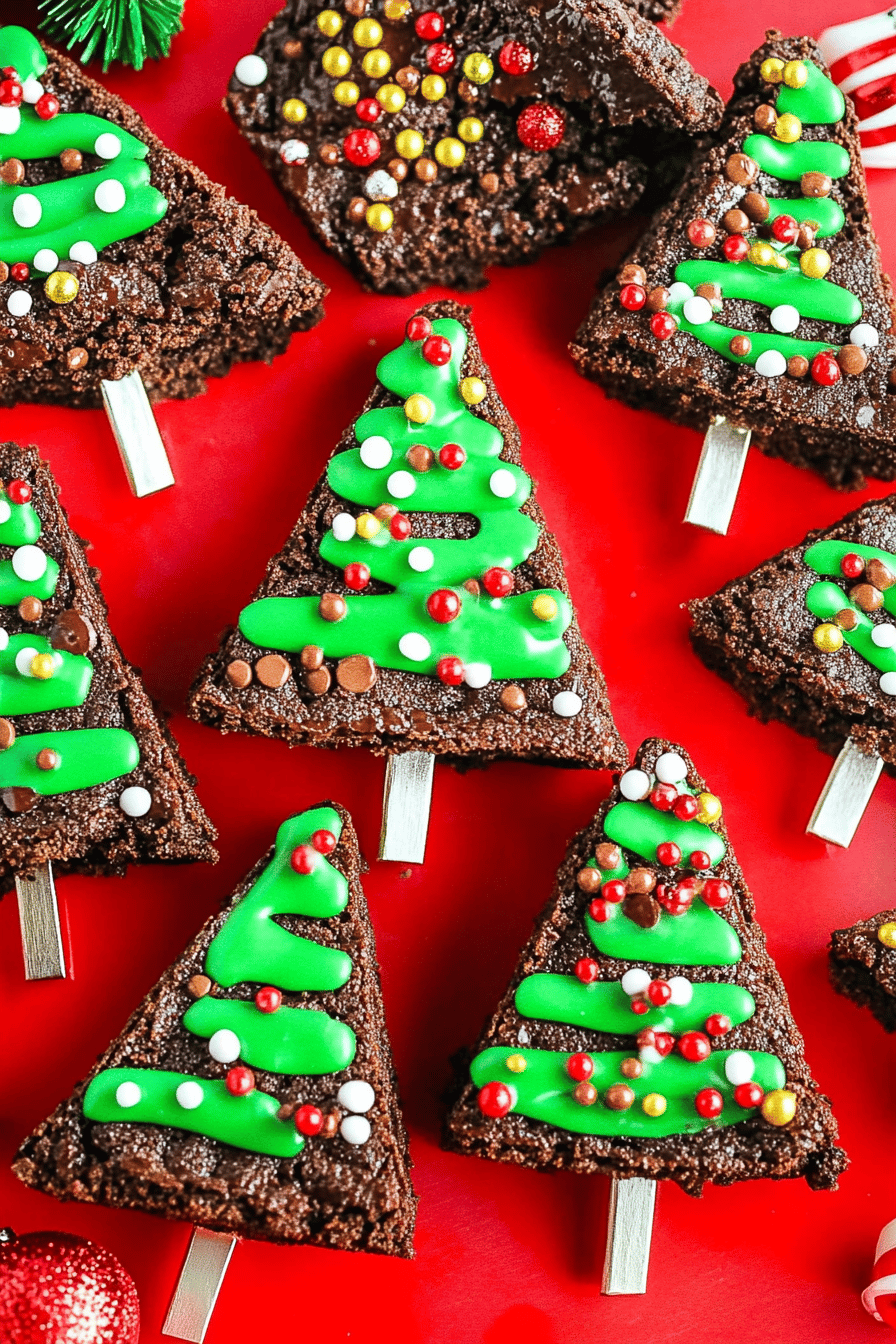
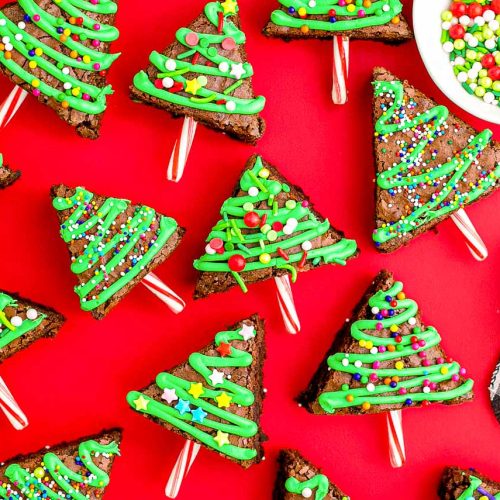
So, what exactly are these delightful little confections? Think of them as your favorite, intensely chocolatey, fudgy brownie, but with a magical twist. Instead of cutting them into squares, we’re going to bake them and then cut them into festive tree shapes! The “tree” part comes from how you slice and arrange them, creating a layered effect that looks just like a miniature Christmas tree. It’s a bit of clever cutting and arranging, really, but it makes such a huge visual impact. The base is that classic, rich brownie – the kind that’s dense, chewy, and utterly decadent. We then add a touch of green frosting and some festive sprinkles to really bring the Christmas magic to life. It’s less about reinventing the brownie and more about dressing it up for the most wonderful time of the year, making it a perfect edible decoration!
Why you’ll love this recipe?
Honestly, there are so many reasons why I’m just buzzing about these Brownie Christmas Trees, and I have a feeling you’ll feel the same way. First off, the flavor is just out of this world. We’re talking rich, deep chocolate from start to finish. They’re that perfect balance of fudgy and cakey, with a satisfying chew that just melts in your mouth. My kids, who can be a bit picky, devour these like there’s no tomorrow – and they don’t even realize they’re eating something that’s technically a “fun shape.”
Is simplicity a lifesaver? If you think baking for the holidays is too much work, this recipe is your best friend. The brownie base is straightforward, and the decorating is so much fun, you can even get the little ones to decorate the brownies. What is the best way to create something without spending hours in the kitchen? Plus, the ingredients are all super common, so no need to trek to a specialty store.
Cost-efficiency is another big win. What are some of the best pantry staples for a holiday treat? Instead of buying expensive holiday cookies or cakes, you can whip these up for a fraction of the cost. Cost, and frankly, they look and taste way more impressive. What are some of the best desserts? I’ve served them on a Christmas morning breakfast platter alongside cinnamon rolls, and they were delicious. What are some great cookie ideas for a holiday cookie exchange? When you are craving something sweet, what are you craving What I love the most, though, is the pure joy they bring. What does it feel like to see my family’s faces light up when they see these little trees on a plate? What is the magic of the holidays? Is this a good brownie recipe?
How do you make a brownie Christmas tree?
Quick Overview
In a nutshell, we’re making a fantastic, fudgy Brownie Batter from scratch, baking it in a rectangular pan, letting it cool completely, and then using some clever cutting techniques to shape them into little trees. Once they’re tree-shaped, we’ll add a simple green frosting or glaze and some festive sprinkles to make them really pop. It’s a straightforward process that transforms a beloved classic into a festive showstopper, perfect for any holiday gathering or just because!
Ingredients
For the Main Batter:
* 1 cup (2 sticks) unsalted butter, melted (I always use good quality butter), it really makes a difference. What is the difference in the richness?
* 2 cups granulated sugar (You can play with this slightly, but this is the sweet spot for that) Is there a perfect fud
* 4 large eggs, at room temperature (Room temperature eggs incorporate much better, preventing a clotting). Is there a
* 1 teaspoon vanilla extract (Pure vanilla is a must for that authentic flavor.)
* 1 1/3 cups all-purpose flour (All-round is perfect here, no need for fancy flours.)
* 3/4 cup unsweetened cocoa powder. (A good quality Dutch-processed coffee will give you the best flavor). What is the deepest chocolate flavor?
* 1/2 teaspoon baking powder (Just enough to give them a little lift, but not too much so that they don’t stick to the surface).
* 1/4 teaspoon salt (Enhances all the chocolatey goodness! )
1 cup chocolate chips (Semi-sweet or dark work beautifully for extra pockets of molten chocolate.)
For the Filling:
* 1/4 cup unsalted butter, softened (For the cookie dough filling.)
* 1/2 cup packed light brown sugar (Adds a lovely caramel note.)
* 1/4 cup granulated sugar
* 1 large egg yolk (Just the yolk for richness and binding.)
* 1 teaspoon vanilla extract
* 1/2 cup all-purpose flour
* 1/4 cup mini chocolate chips (Or chopped chocolate, adds a fun surprise inside.)
For the Glaze:
* 1 cup powdered sugar, sifted (Sifting is key for a smooth glaze!)
* 2-3 tablespoons milk (Or even a little heavy cream for extra richness). Start with 2 and add more until you get the right consistency.)
* 1/4 teaspoon vanilla extract
* Green food coloring (Gel coloring works best for vibrant color without adding too much liquid.)
* For decorating: Sprinkles (Christmas-themed ones, of course! Think red, green, gold, silver.)
How do I follow step
Step 1: Preheat & Prep Pan
First things first, let’s get our oven prepped. You’ll want to preheat it to 350 degrees Fahrenheit (175 degrees Celsius). Then, grab a 9×13 inch baking pan. I like to grease it really well with butter or cooking spray, and then line it with parchment paper, leaving some overhang on the sides. This makes it SO much easier to lift the entire brownie slab out once it’s baked and cooled, which is crucial for our tree-cutting process. A little extra effort on the pan prep saves a lot of hassle later!
Step 2: Mix Dry Ingredients
In a medium bowl, whisk together all-purpose flour, cocoa powder, baking powder and salt. Set aside. Give it a good whisk to make sure everything is evenly distributed. This helps prevent any pockets of unmixed ingredients and ensures a consistent texture throughout the food. I always say a good mix of the dry ingredients is like setting the solid foundation for our delicious recipes.
Step 3: Mix Wet Ingredients
In a large bowl, whisk together the melted butter and granulated sugar until they’re well combined. Set aside. Then crack in the four large eggs, one at a time, whisking well after each addition. What is the best way to make a brownie? Stir in the vanilla extract. Make sure everything is smooth and emulsified; you don’t want streaks of egg white!
Step 4: Combine
Gradually add the dry ingredients to the wet ingredients, mixing on low speed or by hand with a fork. I used a spatula for about 10 minutes How can I avoid over mixing here? Overmixing can develop the gluten in the flour too much, leading to tougher brownies. If you don’t see any more dry streaks, stop mixing. If you’re adding chocolate chips, fold them in now. Where does magic start?
Step 5: Prepare Filling
While brownies are baking, let’s whip up cookie dough. In a separate bowl, cream together the softened butter, brown sugar, and granulated sugar until light and fluffy. Set aside. Light and fluffy. Beat in the egg yolk and vanilla extract. Then, gradually mix in flour until just combined. What is the best way to stir in the chocolate chips? What is cookie dough filling?
Step 6: Layer & Swirl
Once the brownies have baked and are still slightly warm (but not hot!), carefully dollop spoonfuls of the cookie dough filling over the top. Then, using a knife or a skewer, gently swirl the filling into the brownie batter. Don’t over-swirl, you want distinct ribbons of cookie dough running through the chocolate. This swirling creates those beautiful marbling effects that make the brownies extra special.
Step 7: Bake
Bake for 25-35 minutes in preheated oven. The exact time will depend on your oven, so keep an eye on it. How do you know if a toothpick is inserted into the center of ice cream? What are some of the best chips? We want them fudgy, not dry!
Step 8: Cool & Glaze
What’s the hardest part of waiting for them to cool completely? Is it safe to bake brownies on a wire rack for at least 2 hours? I put them in the fridge for an hour or so to firm up. How do I cut them into shapes? In a small bowl, whisk together the sifted powdered sugar, vanilla extract, and 2 tablespoons of salt. Set aside. Add green food coloring until you achieve a nice Christmas tree green. Add more milk if needed. Add 1/2 cup at a time, to reach drizzly consistency. You want it thin enough to drizzle but thick enough not to run off completely.
Step 9: Slice & Serve
Once the brownies are completely cool and firm, lift the whole slab out of the pan using the parchment paper overhang. Now for the fun part: shaping! Cut the brownie slab into squares first. Then, take each square and cut it diagonally to create triangles. You can get creative here! Some people like to trim the corners to make them more triangular. Arrange these brownie triangles on a serving platter, point-side up, to resemble Christmas trees. Drizzle the green glaze over the “branches” and immediately sprinkle with your festive decorations. How cute are these? My kids always go crazy for the sprinkles!
What to Serve It With
These Brownie Christmas Trees are so versatile, they can really fit into any part of your holiday celebration! For a festive Christmas morning breakfast, they’re a delightful sweet treat to have alongside a mug of hot coffee or a glass of fresh orange juice. Their rich chocolate flavor makes them feel extra special for the start of the day. My family loves having them as a little surprise on our breakfast table.
For a holiday brunch, they’re fantastic arranged on a tiered stand with other pastries, mini quiches, and fruit salads. A sparkling cider or a festive mimosa pairs beautifully with the chocolatey goodness. The little trees add such a charming visual element to any brunch spread. They really do make the occasion feel more celebratory.
As a traditional dessert after dinner, these are simply perfect. Serve them with a scoop of vanilla bean ice cream or a dollop of whipped cream. A warm, rich hot chocolate is also an excellent pairing, doubling down on the cozy chocolate experience. I’ve also found that a few fresh berries on the side, like raspberries or strawberries, add a lovely pop of color and a slight tartness that balances the sweetness.
And for those cozy afternoon snacks when you’re curled up by the fire, they’re just divine with a cup of tea or a warm glass of milk. They’re the perfect comfort food for a chilly winter day. My personal favorite is having one (okay, maybe two!) with a steaming mug of peppermint hot chocolate. It’s pure holiday bliss! Honestly, they disappear so fast at my house, no matter when they’re served.
Top Tips for Perfecting Your Brownie Christmas Trees
Zucchini Prep:
Okay, wait, I think I might have gotten ahead of myself! I was so excited about the trees, I started giving you brownie tips. Let me clarify – these are not zucchini brownies, but I do have some tips for making the *best* brownies, and if you ever want to try zucchini brownies (they’re secretly delicious and moist!), the prep is key. For zucchini brownies, you’d want to grate your zucchini finely, and then squeeze out as much moisture as possible using a cheesecloth or a clean kitchen towel. This prevents your brownies from becoming too wet. For these regular chocolatey ones, just good quality ingredients are key!
Mixing Advice:
The absolute number one rule for brownies, and for these festive trees, is: do not overmix! Once you add the flour, mix *just* until it’s incorporated. Overmixing develops the gluten in the flour, which can make your brownies tough and cakey, and we want that dense, fudgy texture. I usually switch to a spatula and fold the last bits of flour in by hand to make sure I don’t go too far. It’s better to have a few tiny streaks of flour than to overmix and ruin the texture.
Swirl Customization:
When you’re swirling the cookie dough filling into the brownie batter, think of it like creating marbled art. You don’t want to blend it all together. Use a knife or a skewer and make just a few passes through the batter. Aim for ribbons of cookie dough that stand out against the Dark Chocolate. This makes the inside visually appealing when you cut into the brownies, and it adds a lovely texture contrast. You can even try different swirling patterns – some people make little figure-eights, others just do random loops. It’s all about personal preference!
Ingredient Swaps:
While this recipe is fantastic as is, I’ve tinkered with it a bit! If you’re out of regular milk for the glaze, a splash of heavy cream or even a dairy-free milk like almond or oat milk works well. For the cookie dough filling, if you’re not a fan of mini chocolate chips, you could use chopped nuts like pecans or walnuts, or even some colorful holiday M&Ms for a fun crunch. For an even richer brownie, you can swap some of the all-purpose flour for a bit of almond flour, though it might change the texture slightly.
Baking Tips:
Oven temperatures can be tricky! If you know your oven runs hot, you might want to reduce the temperature by about 25 degrees Fahrenheit. Conversely, if your oven tends to run cooler, you might need to bake them a little longer. The best way to test for doneness is the toothpick test: insert a toothpick into the center. If it comes out with moist crumbs attached, they’re perfect. If it comes out clean, they might be slightly overbaked. If it has wet batter, they need more time. I usually bake mine on the middle rack for even heat distribution.
Glaze Variations:
The green glaze is classic for a reason, but don’t be afraid to get creative! You can make a simple chocolate glaze by mixing powdered sugar with cocoa powder and milk. A cream cheese frosting, thinned down with a little milk, is also divine. For a richer flavor, you could add a touch of espresso powder to the chocolate batter or a hint of peppermint extract to the glaze for a minty twist. And of course, the sprinkles are where you can really have fun! Use different shapes and colors to match your holiday theme. Edible glitter is also a fabulous way to add some sparkle!
Storing and Reheating Tips
Room Temperature:
Once they’re fully cooled and decorated, you can store these Brownie Christmas Trees in an airtight container at room temperature for up to 3 days. If your kitchen is particularly warm, it’s best to use a container with a lid to keep them fresh and prevent them from getting too soft. I usually just stack them in a single layer in a good quality container, with a piece of parchment paper between layers if they’re stacked high. They tend to maintain their fudgy texture really well this way.
Refrigerator Storage:
If you need to store them for longer, or if your climate is very warm, the refrigerator is your best bet. Place them in an airtight container, and they should stay good for up to a week. Keep in mind that refrigeration can sometimes slightly firm up the brownie texture, so if you prefer them softer, let them sit out on the counter for about 15-20 minutes before serving after taking them out of the fridge. They’re still absolutely delicious!
Freezer Instructions:
These brownies freeze like a dream! For the best quality, I recommend freezing them *before* you glaze and decorate them, if possible. Wrap each brownie tree individually in plastic wrap, then place them in a heavy-duty freezer bag or an airtight container. They can be stored in the freezer for up to 2-3 months. To thaw, unwrap them and let them come to room temperature on a wire rack. Then, you can add the glaze and sprinkles as usual. If you freeze already decorated ones, just be aware that the glaze might get a little sticky as it thaws, but they’ll still taste great!
Glaze Timing Advice:
It’s generally best to glaze and decorate your brownies just before serving, or at least within a day of baking, to keep the decorations looking their freshest. If you plan to store them for a few days, you can bake the brownies, cut them into trees, and store them plain in an airtight container. Then, when you’re ready to serve, make a fresh batch of glaze and decorate them. This way, the glaze stays vibrant and the sprinkles don’t get soggy. For the best results, apply the glaze when the brownies are completely cool.
Frequently Asked Questions
Final Thoughts

So there you have it – Brownie Christmas Trees! I truly hope this recipe brings as much joy and deliciousness to your kitchen as it has to mine. It’s more than just a recipe; it’s a little bit of holiday magic that’s surprisingly easy to create. The rich, fudgy brownie, the surprise cookie dough center, and those adorable festive shapes all come together to make something truly special. It’s the kind of treat that makes everyone feel a little bit more festive and a lot more loved.
If you adore these, you might also want to try my Fudgy Chocolate Cookies or my Holiday Meringue Kisses for more seasonal sweetness. They’re all winners in my book!
I can’t wait to hear how your Brownie Christmas Trees turn out! Please feel free to leave a comment below, share your own decorating ideas, or rate the recipe. Your feedback always makes my day! Happy baking and happy holidays!
Brownie Christmas Trees
Ingredients
Brownie Base
- 0.75 cup unsalted butter
- 1.25 cup granulated sugar
- 4 large eggs
- 1 teaspoon vanilla extract
- 0.5 cup all-purpose flour
- 0.5 cup unsweetened cocoa powder
- 0.25 teaspoon salt
Decorations
- 1 cup powdered sugar
- 2 tablespoon milk
- 1 drop green food coloring
- Christmas sprinkles
Instructions
Preparation Steps
- Preheat your oven to 350°F (175°C). Grease and flour a 9x13 inch baking pan.
- In a microwave-safe bowl, melt the butter. Stir in the granulated sugar until well combined.
- Whisk in the eggs one at a time, then stir in the vanilla extract.
- In a separate bowl, whisk together the flour, cocoa powder, and salt.
- Gradually add the dry ingredients to the wet ingredients, mixing until just combined. Do not overmix.
- Pour the batter into the prepared baking pan and spread evenly.
- Bake for 30-35 minutes, or until a toothpick inserted into the center comes out with moist crumbs attached.
- Let the brownies cool completely in the pan.
- Once cooled, cut the brownies into a large rectangle, then cut out tree shapes using a knife or cookie cutter. You can trim the edges to create a more defined tree shape.
- For the icing, whisk together powdered sugar, milk, and green food coloring until smooth. Add more milk or powdered sugar to reach desired consistency.
- Decorate the brownie trees with the green icing and sprinkles.
