
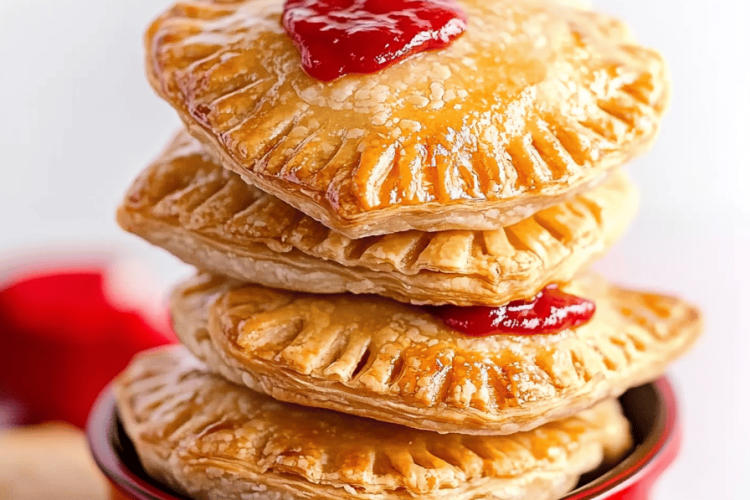
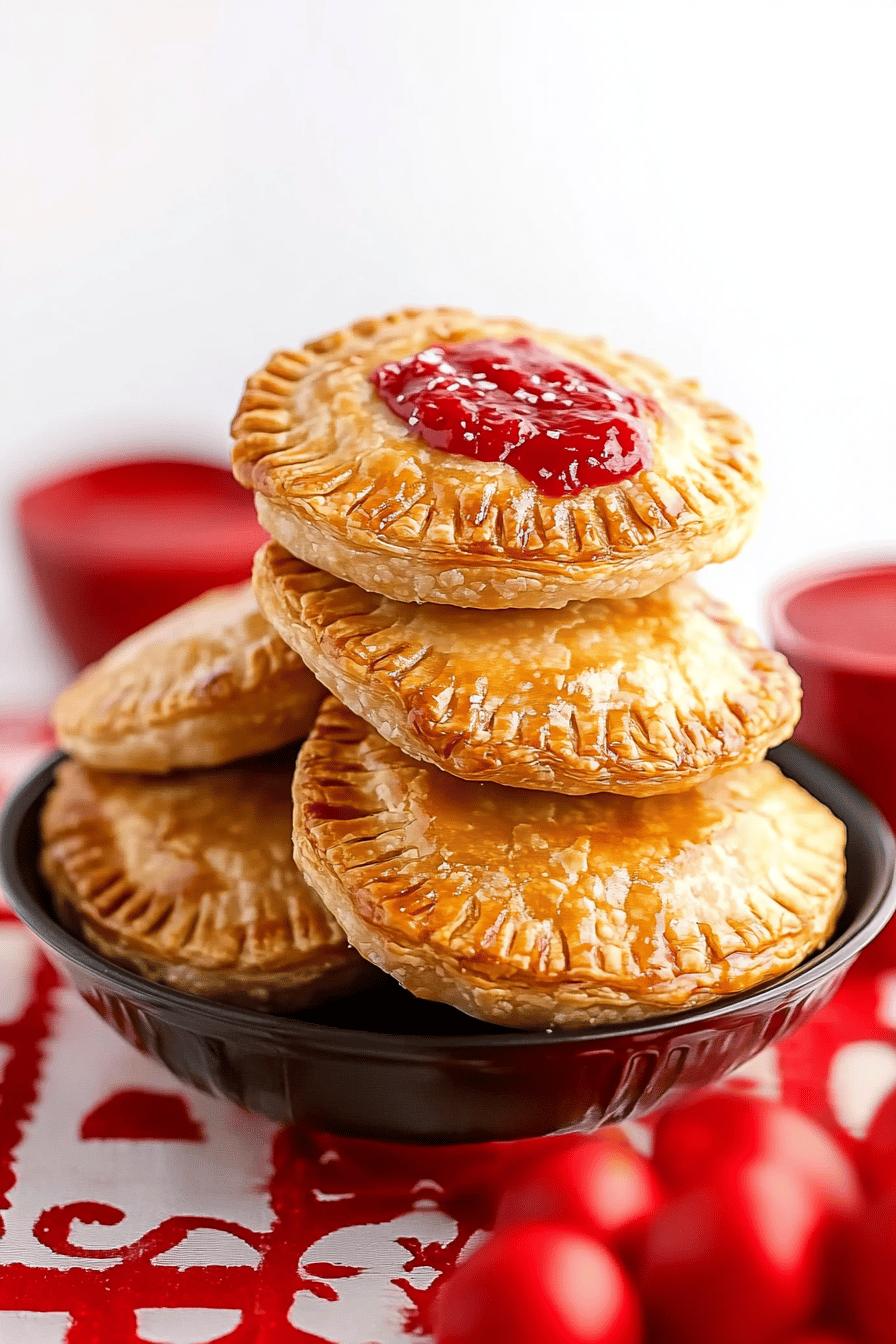
Oh, where do I even begin with these little treasures? If there’s one recipe that consistently makes my family light up like a Christmas tree, it’s these Air Fryer hand pies. They’re like little pockets of pure joy, warm and comforting, with just the right amount of sweetness. You know, sometimes I get a craving for something baked, something that smells like pure bliss wafting from the oven, but I’m just not in the mood for the whole song and dance of a big cake or a pie crust from scratch. That’s where these beauties come in. They’re my go-to when I need a quick fix of homemade deliciousness, especially when I want that lovely golden-brown, slightly crispy exterior that only an air fryer can deliver so perfectly. Forget spending hours in the kitchen; these air fryer hand pies are the answer to those sweet cravings without the fuss.

What are air fryer hand pies?
So, what exactly *are* air fryer hand pies? Think of them as individual, portable little pies, usually made with a simple, forgiving dough and filled with your favorite fruit or sweet filling. The “hand pie” part is key – they’re designed to be held and eaten with your hands, which just adds to their charm, right? And the “air fryer” part? That’s the game-changer! Instead of baking them in a traditional oven, we’re using the magic of the air fryer to get them perfectly golden and delightfully crispy in a fraction of the time. It’s like getting all the comforting goodness of a classic pie, but in a super convenient, quick-to-make package. They’re essentially little edible hugs, perfect for a single serving of happiness.
Why you’ll love this recipe?
Honestly, there are so many reasons why I’ve fallen head over heels for these air fryer hand pies, and I just *know* you will too! First off, the flavor is just out of this world. We’re talking a tender, slightly sweet crust that bakes up to a beautiful golden brown, encasing a warm, luscious filling. Whether you go for classic apple, tangy berry, or even something a little more adventurous like peach-cinnamon, each bite is pure heaven. And the simplicity? Oh my goodness, it’s a lifesaver! I can whip these up on a weeknight and have warm, homemade treats ready in under 30 minutes, which is pretty amazing if you ask me. They’re also incredibly budget-friendly. You likely have most of the ingredients lurking in your pantry already, and they use simple, everyday items. Plus, the versatility is fantastic! You can customize the filling to suit whatever fruit is in season or whatever you have on hand. My kids, bless their hearts, have a particular fondness for the mixed berry ones, and they disappear in minutes. What I love most is that they deliver that warm, baked-good comfort without the commitment of making a full-sized pie. It’s the perfect solution when you’re craving something special without a lot of fuss.
How do I make air fryer hand pie?
Quick Overview
Making these air fryer hand pies is surprisingly straightforward! We’ll whip up a quick dough, prepare a simple fruit filling, assemble our little pies, and then let the air fryer do its magic to get them perfectly golden and cooked through. It’s a process that’s both rewarding and remarkably easy, making it a fantastic recipe for beginners and seasoned bakers alike. You’ll be amazed at how quickly these come together, giving you that freshly baked taste and smell without any of the usual hassle.
Ingredients
For the Dough:
This dough is my secret weapon for super tender hand pies. It’s really forgiving and easy to work with, even if you’re not a pastry pro! I always use all-purpose flour for this, and make sure your butter is really cold – that’s the trick to a flaky crust. I’ve tried it with salted butter and unsalted, and while both work, I find unsalted gives me a bit more control over the final saltiness, so I usually reach for that. Don’t be afraid to add a tiny pinch of sugar to the dough itself; it just helps with that beautiful golden color.
- 2 12 cups all-purpose flour.
- 1 teaspoon baking powder
- ½ teaspoon salt
- ½ cup (1 stick) cold unsalted butter, cut into small cubes
- ⅔ cup milk (whole milk gives the best richness, but 2% works fine too)
For the Filling:
This is where you can really have fun! I’m giving you my favorite mixed berry filling recipe here, but feel free to swap it out. If you’re using fresh berries, make sure they’re not too wet; you might even want to give them a gentle pat with a paper towel. If you’re using frozen, no need to thaw them completely – just toss them in frozen! For apple or peach fillings, make sure your fruit is diced into small, uniform pieces so they cook evenly. A little lemon juice is key to brightening up the flavors and preventing browning in fruit fillings.
- 3 cups mixed berries (fresh or frozen), or your favorite fruit diced
- ½ cup granulated sugar (adjust to sweetness of fruit)
- 2 tablespoons cornstarch
- 1 tablespoon lemon juice
- ½ teaspoon vanilla extract (optional, but lovely!)
For the Glaze:
This glaze is super simple and adds that perfect finishing touch. It’s not too sweet, just enough to give them a lovely sheen and a hint of extra flavor. I like to make mine slightly thick but still pourable. If it’s too thick, a tiny splash more milk will fix it right up!
- 1 cup powdered sugar
- 2-3 tablespoons milk
- ½ teaspoon vanilla extract (optional)

Step-by-Step Instructions
Step 1: Preheat & Prep Pan
First things first, preheat your air fryer to 375°F (190°C). This is super important to ensure even cooking and that lovely golden crust. While it’s heating up, grab your air fryer basket. You don’t need to grease it, but if you want to be extra careful about sticking (especially if your basket is well-loved), you can lay a piece of parchment paper designed for air fryers at the bottom. Make sure it’s not covering the sides where the air needs to circulate!
Step 2: Mix Dry Ingredients
In a large bowl, whisk together the flour, baking powder, and salt. I like to give this a good whisk to make sure everything is evenly distributed. This helps ensure your leavening agent (baking powder) works its magic throughout the dough, giving you a nice tender bite. Don’t skip this step; it’s a small thing that makes a big difference in the final texture.
Step 3: Mix Wet Ingredients
Now, add your *cold*, cubed butter to the dry ingredients. You can use a pastry blender, a fork, or even your fingertips to cut the butter into the flour mixture until it resembles coarse crumbs with some pea-sized pieces of butter still visible. This is what creates those lovely flaky layers. Then, gradually pour in the milk, mixing with a fork until just combined. The dough should start to come together but will still be a bit shaggy.
Step 4: Combine
Turn the dough out onto a lightly floured surface and gently bring it together to form a cohesive ball. Be careful not to overwork it! Overmixing develops the gluten too much, which can make your hand pies tough. Just knead it a few times until it’s smooth enough to roll out. If it seems too sticky, add a tiny bit more flour; if it’s too dry, a splash more milk. We’re aiming for a soft, pliable dough.
Step 5: Prepare Filling
In a medium bowl, gently toss your berries (or other fruit) with the sugar, cornstarch, and lemon juice. The cornstarch is our thickening agent, so it’s really important to get it mixed in well. If you’re using frozen fruit, this step is even more crucial to help absorb some of the extra moisture as it cooks. Add the vanilla extract if you’re using it – it just adds another layer of deliciousness.
Step 6: Layer & Swirl
Roll out your dough on a lightly floured surface to about ⅛-inch thickness. Using a round cutter (about 4-5 inches in diameter is perfect), cut out circles of dough. You’ll get about 6-8 circles depending on your cutter size. Place about 1-2 tablespoons of filling onto one half of each dough circle, leaving a small border around the edge. Fold the other half of the dough over the filling to create a half-moon shape. Crimp the edges with a fork to seal them tightly – this is essential to prevent your delicious filling from escaping during cooking! You can also cut a few small slits in the top of each hand pie to allow steam to escape.
Step 7: Bake
Carefully place your prepared hand pies into the preheated air fryer basket, making sure not to overcrowd them. You’ll likely need to do this in batches. Air fry for 10-14 minutes, or until the crust is golden brown and the filling is bubbly. The exact time will depend on your air fryer, so keep an eye on them, especially the first time you make them. You want that beautiful, slightly crispy exterior!
Step 8: Cool & Glaze
Once they’re done, carefully remove the hand pies from the air fryer and let them cool on a wire rack for at least 10-15 minutes. This is important – they’ll be very hot inside! While they’re cooling, whisk together the powdered sugar, milk, and vanilla extract for the glaze. Start with 2 tablespoons of milk and add more only if needed to reach a drizzle-able consistency. Once the pies have cooled slightly but are still warm, drizzle the glaze over the tops. The warmth helps the glaze set nicely.
Step 9: Slice & Serve
And there you have it! Serve your warm, glorious air fryer hand pies immediately. They are absolutely divine when they’re still warm, with the gooey filling and the slightly crisp crust. If you can resist eating them all at once, that is!
What to Serve It With
These air fryer hand pies are so versatile, they can be enjoyed at almost any time of day! For a delightful breakfast, I love serving them warm alongside a strong cup of coffee. The sweetness of the pie balances out the bitterness of the coffee perfectly, and it feels like such a treat to start the day. For a more elegant brunch spread, I’ll arrange them on a pretty platter, perhaps with a dusting of powdered sugar or a small dollop of whipped cream on the side. They look so charming and homemade. As a dessert, they’re simply divine! I often serve them with a scoop of vanilla bean ice cream – the contrast between the warm pie and the cold ice cream is just heavenly. And for those cozy afternoon snacks, they’re perfect on their own. My family loves them as an after-school snack, and I feel good knowing they’re getting a wholesome, homemade treat. I’ve also found that a small glass of milk or even a light herbal tea pairs wonderfully with them for a comforting moment.
Top Tips for Perfecting Your Air Fryer Hand Pies
Over the years, I’ve learned a few tricks that make these air fryer hand pies absolutely perfect every single time. For the fruit filling, whether you’re using berries or diced fruit, making sure the filling isn’t too wet is crucial. Too much moisture can make your bottom crust soggy. I always try to drain off any excess liquid from canned fruits or give fresh berries a gentle pat with a paper towel. When you’re mixing the dough, remember that cold butter is your best friend! It’s what creates those flaky layers. I like to pop my butter cubes in the freezer for about 10 minutes before I start. Don’t overmix the dough once you add the milk; just bring it together until it’s cohesive. Overworking it will result in tough hand pies, and nobody wants that! When it comes to assembling, sealing the edges really well is key. Use a fork to crimp them down firmly, and consider cutting a couple of small vents in the top so steam can escape. This prevents them from bursting open in the air fryer. For the baking, every air fryer is a little different, so keep an eye on them. They usually take between 10-14 minutes at 375°F (190°C), but if they’re browning too quickly, you can always lower the temperature slightly for the last few minutes. You’re looking for that beautiful, golden-brown crust. If you want to get fancy with the swirl, you can use a toothpick to gently swirl the filling into the dough before folding, but honestly, a simple fold is just as delicious. For ingredient swaps, if you don’t have milk, you can use yogurt or even sour cream (diluted with a tiny bit of water) for the dough; it adds a lovely tang. And for the glaze, if you want a thinner glaze, just add more milk, a teaspoon at a time. If you want a thicker glaze, use less milk or add a bit more powdered sugar.
Storing and Reheating Tips
These air fryer hand pies are best enjoyed fresh and warm, but they store surprisingly well! If you find yourself with any leftovers (which is rare in my house!), you can store them at room temperature in an airtight container for up to two days. Make sure they’ve cooled completely before sealing them up, otherwise, they can get a bit soggy. If you want them to last a bit longer, or if your kitchen is particularly warm, the refrigerator is your best bet. Store them in an airtight container or wrap them well in plastic wrap, and they should stay good for about 4-5 days. They’re still quite tasty cold, but for that fresh-baked warmth, reheating is the way to go! To reheat, I love popping them back into the air fryer for about 2-3 minutes at 350°F (175°C). They come out wonderfully crisp again! If you don’t have an air fryer, a toaster oven or a regular oven at the same temperature for about 5-7 minutes works well too. Just keep an eye on them so they don’t overcook. And a little note on the glaze: I always recommend glazing them *after* they’ve cooled a bit and right before serving if you plan to store them. If you glaze them and then store them for too long, the glaze can sometimes get a little sticky or soft. If you’re freezing them, which I do sometimes when I make a big batch, make sure they are completely cooled. Wrap each hand pie tightly in plastic wrap, then place them in a freezer-safe bag or container. They’ll keep for up to 2-3 months. To thaw, remove the plastic wrap and let them thaw on a wire rack at room temperature for a couple of hours, then reheat as usual.
Frequently Asked Questions
Final Thoughts
There you have it – my absolute favorite way to whip up these delightful air fryer hand pies. They’re more than just a dessert; they’re little moments of happiness that are surprisingly easy to create. I truly believe that everyone deserves a delicious homemade treat without spending hours in the kitchen, and these hand pies deliver exactly that. They’ve become a staple in my home for a reason, and I just can’t wait for you to try them and experience that same joy. If you’re a fan of simple, comforting baked goods, you might also want to check out my [Easy Apple Crumble Bars] or my [No-Bake Chocolate Peanut Butter Bites] for more quick and tasty treats! I’d be absolutely thrilled if you give these air fryer hand pies a go. Please let me know in the comments below how yours turn out, what fillings you experiment with, and if you have any other favorite tips to share! Your feedback makes my day. Happy baking, friends!

Air Fryer Hand Pies
Ingredients
For the Dough:
- 2.5 cups all-purpose flour
- 1 teaspoon granulated sugar
- 0.5 teaspoon salt
- 1 cup cold unsalted butter cut into cubes
- 0.33 cup ice water
For the Filling:
- 2 cups fresh or frozen berries such as blueberries, raspberries, or a mix
- 0.25 cup granulated sugar
- 1 tablespoon cornstarch
- 0.5 teaspoon lemon zest
For the Egg Wash:
- 1 egg
- 1 tablespoon water
Instructions
Make the Dough:
- In a large bowl, whisk together the flour, sugar, and salt.
- Cut in the cold butter using a pastry blender or your fingertips until the mixture resembles coarse crumbs with some pea-sized pieces of butter remaining.
- Gradually add the ice water, 1 tablespoon at a time, mixing until the dough just comes together. Do not overmix.
- Divide the dough in half, flatten each half into a disk, wrap in plastic wrap, and refrigerate for at least 30 minutes.
Prepare the Filling:
- In a medium bowl, gently toss together the berries, sugar, cornstarch, and lemon zest.
Assemble the Hand Pies:
- On a lightly floured surface, roll out one disk of dough into a circle about 12 inches in diameter.
- Using a 4-inch round cutter, cut out 3-4 circles from the dough. Re-roll scraps if necessary.
- Place about 2 tablespoons of filling onto one half of each dough circle, leaving a 0.5-inch border.
- Moisten the edges of the dough with water, then fold the other half over the filling to create a semi-circle. Crimp the edges with a fork to seal.
- Repeat with the remaining dough and filling.
Cook the Hand Pies:
- Preheat your air fryer to 375°F (190°C).
- In a small bowl, whisk together the egg and water for the egg wash.
- Brush the tops of the hand pies with the egg wash and cut a few slits in the top of each pie to allow steam to escape.
- Place the hand pies in the air fryer basket in a single layer, working in batches if necessary. Do not overcrowd the basket.
- Air fry for 8-12 minutes, or until golden brown and cooked through.
- Let cool slightly before serving.
