
Oh, where do I even begin with these chocolate milkshake cookies? They’re not just cookies; they’re a hug in edible form, a little slice of pure joy that always brings back the sweetest memories. I remember the first time I whipped up a batch, it was a desperate attempt to satisfy a late-night craving that the usual store-bought cookies just wouldn’t touch. I wanted something rich, creamy, and utterly decadent. And let me tell you, these chocolate milkshake cookies delivered! They’re so wonderfully fudgy in the center with just the slightest chew around the edges, and that swirl of “milkshake” frosting on top? Pure genius. It’s like taking a sip of your favorite cold treat and transforming it into a baked delight. Honestly, if you’re a chocolate lover, and I mean a *true* chocolate lover, you absolutely need these in your life. They’re a bit like my famous fudge brownies, but with a completely different, dare I say, even more exciting texture and flavor profile.
What is chocolate milkshake cookies?
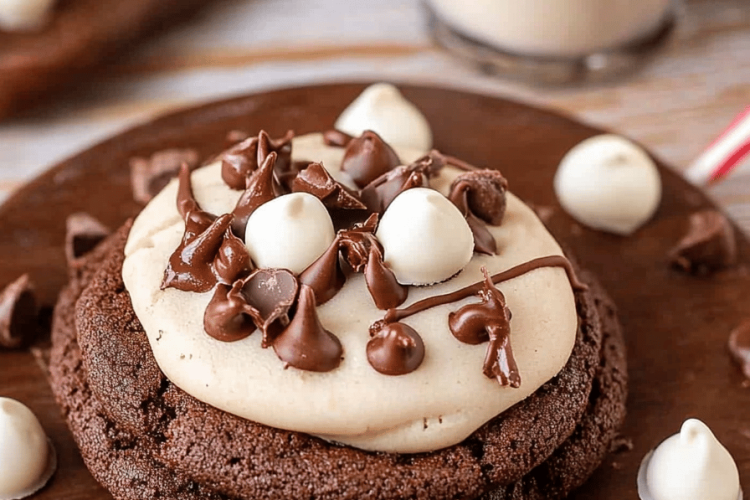
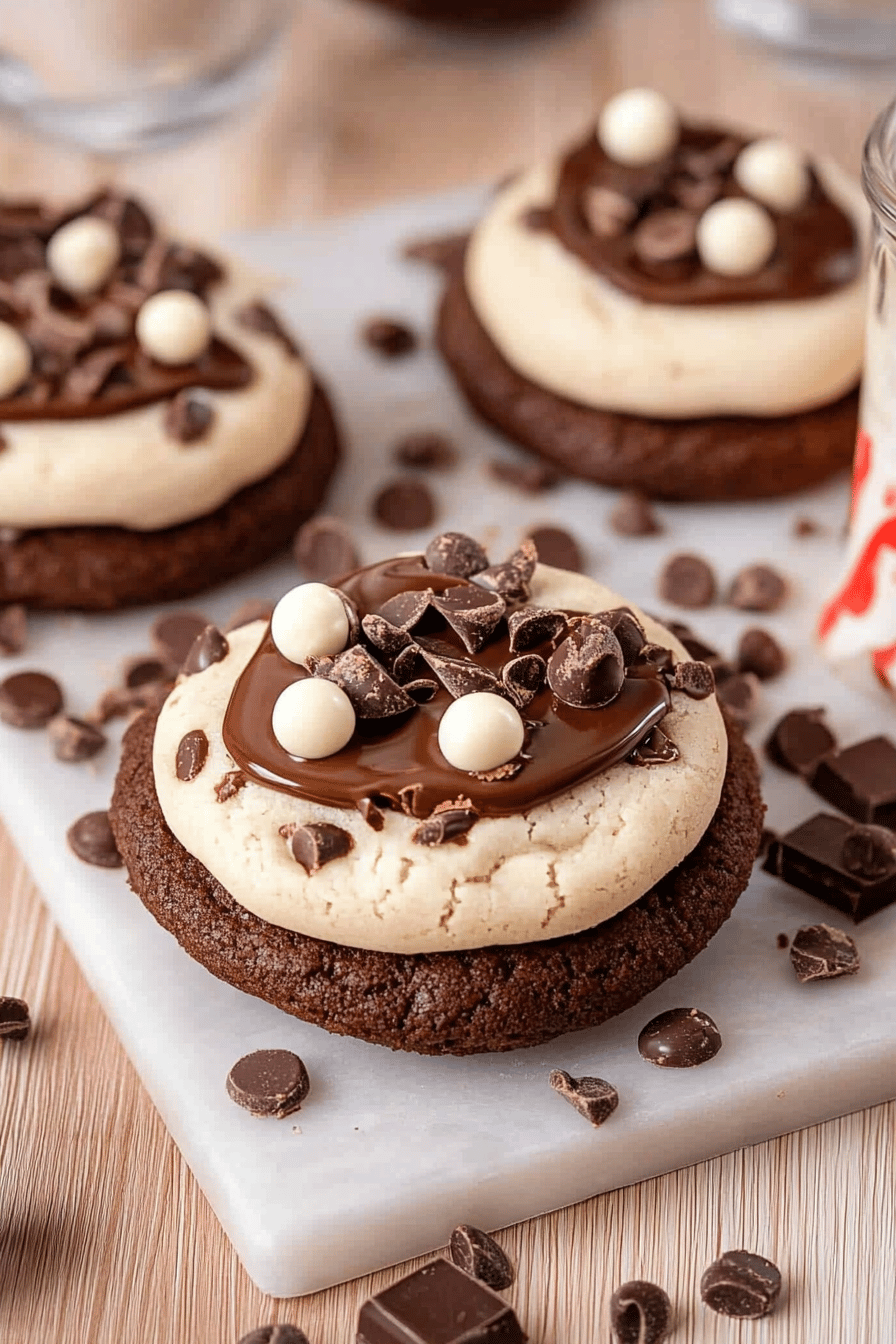
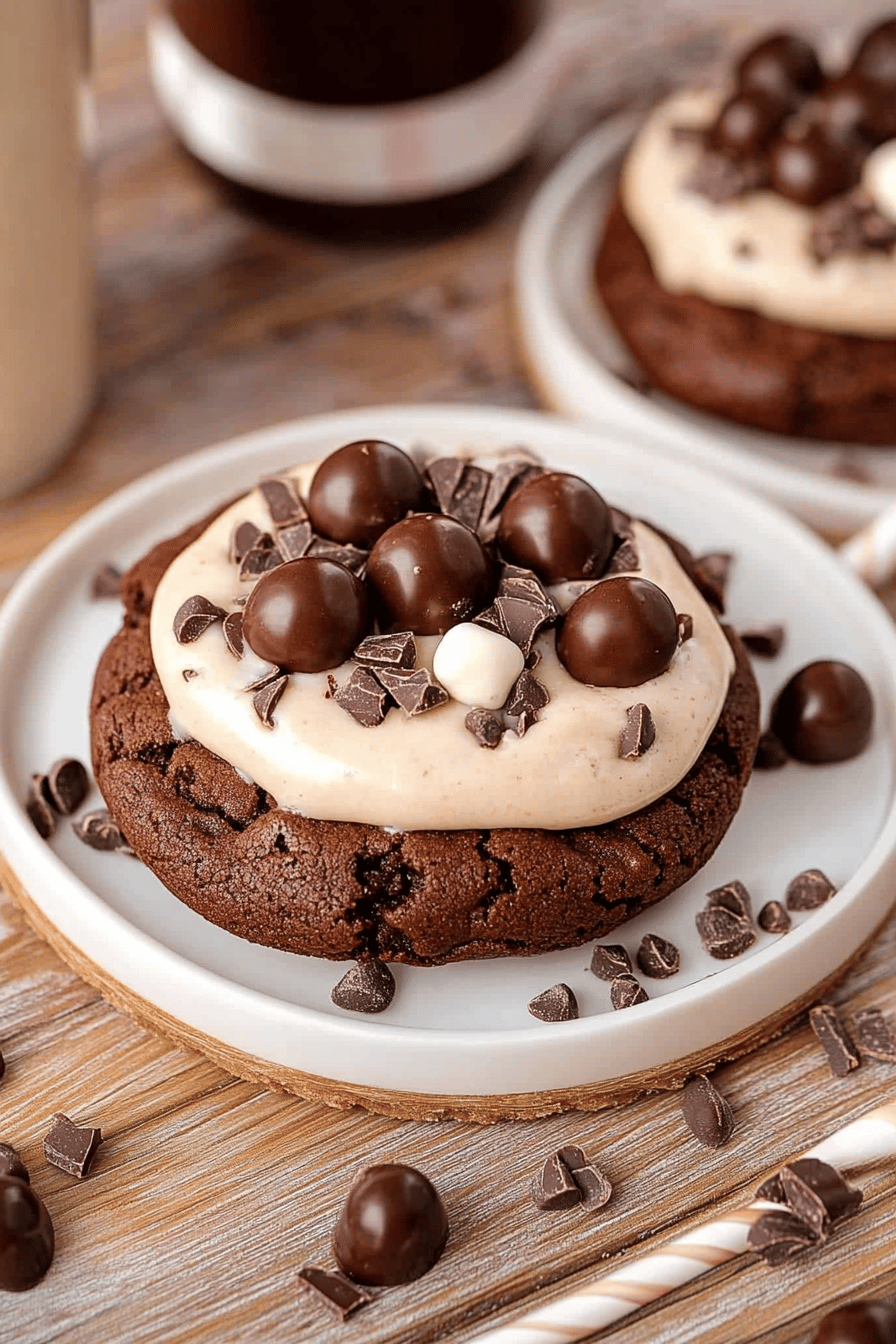
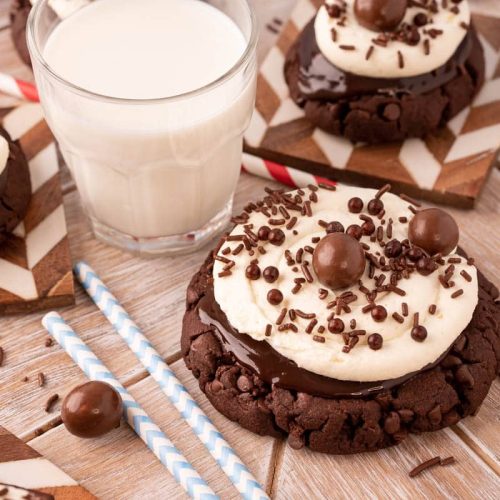
So, what exactly *are* chocolate milkshake cookies? Think of them as the ultimate cookie fusion. At their heart, they’re intensely chocolatey, fudgy cookies, almost like a brownie in cookie form. But here’s the magic: they have this incredible, creamy swirl on top that tastes exactly like a rich, cold chocolate milkshake. It’s achieved with a simple, luscious frosting that bakes down into the cookie just enough to create this divine texture. It’s not a hard frosting; it stays slightly soft and incredibly moist, giving the cookie a dual personality that’s just out of this world. The name “chocolate milkshake cookies” just felt so right because that’s precisely the flavor and creamy sensation it evokes. It’s a cookie that truly sings with chocolatey goodness.
Why you’ll love this recipe?
Honestly, there are so many reasons why I keep coming back to this chocolate milkshake cookie recipe, and I just know you will too! Firstly, the flavor is absolutely unparalleled. It’s a deep, dark chocolate experience from the cookie base, perfectly complemented by that creamy, almost ethereal “milkshake” swirl on top. It’s not overly sweet, but it’s incredibly satisfying. What I love most about this recipe, though, is its deceptive simplicity. Despite tasting like something you’d get at a fancy bakery, it’s surprisingly straightforward to make. You don’t need any fancy equipment, and the ingredients are all readily available. Plus, it’s remarkably cost-effective, using pantry staples to create something truly special. These cookies are also incredibly versatile! They’re fantastic on their own, of course, but they’re also amazing served with a cold glass of milk (ironic, I know!) or even a scoop of vanilla ice cream. My kids ask for these all the time, especially after school. They disappear in minutes! If you’re a fan of my chewy Chocolate Chip Cookies, you’ll adore the rich, fudgy texture of these. It’s a different kind of delicious, but just as addictive.
How do I make chocolate milkshake cookies?
Quick Overview
Making these chocolate milkshake cookies is a breeze, and honestly, it’s one of those recipes that just makes you feel good. We’ll start by whipping up a rich, decadent chocolate cookie dough, then we’ll spoon on a simple, yet incredibly flavorful, chocolate “milkshake” topping. The magic happens in the oven as they bake, creating those signature swirls and that irresistible fudgy texture. It’s a pretty quick process, and the results are so worth it – you’ll have a batch of unbelievably delicious cookies ready in under an hour from start to finish!
Ingredients
For the Main Batter:
We’re going for a deep chocolate flavor here, so don’t skimp on the good stuff! Make sure your unsalted butter is softened to room temperature – this is key for creaming properly. The cocoa powder? I always opt for a good quality Dutch-process cocoa. It gives a richer, darker color and a smoother chocolate flavor that’s less acidic than natural cocoa. You’ll need about 1 and 3/4 cups of all-purpose flour, 1 teaspoon of baking soda, and half a teaspoon of salt. For the sweetness, we’ll use a mix of granulated sugar and light Brown sugar – the brown sugar adds that wonderful chewiness. And of course, a couple of large eggs and a splash of pure vanilla extract to round out all those lovely chocolate notes.
For the Filling:
This is where the “milkshake” magic happens! It’s super simple. You’ll need some more unsalted butter, softened, of course. Then, we’ll add more cocoa powder for that intense chocolate flavor, a touch of powdered sugar for sweetness and that smooth, creamy texture, and a little bit of milk or heavy cream to get it to the perfect consistency. A pinch of salt balances the sweetness beautifully. I’ve experimented with almond milk and other non-dairy options, and while they work, I find that regular milk or a touch of heavy cream gives it that ultimate richness that truly mimics a milkshake. It’s this part that you can really play with to get your desired swirl consistency.
For the Glaze:
This is optional, but oh-so-worth-it if you want that extra touch of decadence. It’s basically a simple chocolate glaze made with powdered sugar, cocoa powder, a little bit of milk or cream, and a tiny splash of vanilla. You want it thin enough to drizzle but thick enough to hold its shape. I usually aim for a consistency where it flows slowly off a spoon but doesn’t completely run off the cookie.
Step-by-Step Instructions
Step 1: Preheat & Prep Pan
First things first, let’s get that oven fired up to 350 degrees Fahrenheit (175 degrees Celsius). While it’s heating, grab your baking sheets and line them with parchment paper. This is my non-negotiable tip for easy cleanup and to prevent any sticking. You want your cookies to lift off beautifully, and parchment paper is your best friend here. I usually prep two baking sheets so I can work efficiently.
Step 2: Mix Dry Ingredients
In a medium bowl, whisk together your flour, cocoa powder, baking soda, and salt. Whisking them really well ensures that the leavening agent (baking soda) and the cocoa are evenly distributed throughout the dry ingredients. This helps prevent pockets of unmixed cocoa and ensures your cookies rise evenly. You’re looking for a nice, uniform, chocolaty powder.
Step 3: Mix Wet Ingredients
In a large bowl, cream together the softened butter and both granulated and brown sugars until light and fluffy. This usually takes about 3-5 minutes with an electric mixer, or a bit longer if you’re doing it by hand (which, honestly, is a great workout!). Then, beat in the eggs one at a time, followed by the vanilla extract. Make sure each egg is fully incorporated before adding the next. You should have a smooth, creamy mixture here.
Step 4: Combine
Now, it’s time to bring the wet and dry ingredients together. Gradually add the dry ingredients to the wet ingredients, mixing on low speed (or with a spatula) until *just* combined. Be careful not to overmix! Overmixing develops the gluten in the flour, which can lead to tough cookies. You want to stop as soon as you don’t see any more streaks of dry flour. The dough will be thick and fudgy.
Step 5: Prepare Filling
While the dough is resting for a moment, let’s whip up that delicious filling. In a separate bowl, beat the softened butter until smooth. Then, gradually add the cocoa powder, powdered sugar, and salt, alternating with the milk or cream. Beat until you have a smooth, thick, spreadable frosting. It should be thick enough to hold its shape when spooned, but still creamy and luscious. If it’s too thick, add a tiny bit more milk; if it’s too thin, a bit more powdered sugar or cocoa.
Step 6: Layer & Swirl
Using a cookie scoop or two spoons, drop rounded tablespoons of the chocolate cookie dough onto your prepared baking sheets, leaving about 2 inches between them. Now, take spoonfuls of your chocolate filling and dollop it onto the center of each cookie dough ball. Using a toothpick or the tip of a knife, gently swirl the filling into the dough. Don’t over-swirl! You want distinct swirls and patches of filling, not a uniform brown. This is what gives them that beautiful, marbled look.
Step 7: Bake
Bake for 10-12 minutes, or until the edges are set and the centers are still slightly soft. For these cookies, you want them to be a little underbaked in the center so they stay wonderfully fudgy. The tops will look slightly moist. They’ll continue to cook a bit on the hot baking sheet after you take them out of the oven. Trust your nose – when they smell amazing and fudgy, they’re likely done!
Step 8: Cool & Glaze
Let the cookies cool on the baking sheets for about 5-10 minutes before carefully transferring them to a wire rack to cool completely. This is crucial because they are quite delicate when hot. Once they’re completely cool, if you’re using the glaze, whisk together the powdered sugar, cocoa, milk, and vanilla until smooth. Drizzle it over the cooled cookies. Let the glaze set before serving.
Step 9: Slice & Serve
Once the glaze is set (or if you skipped it!), these chocolate milkshake cookies are ready to be devoured. They are best enjoyed at room temperature, where that fudgy center really shines. I like to serve them on a pretty platter, perhaps with a tall glass of cold milk. They’re perfect for sharing, but I wouldn’t blame you if you wanted to keep them all to yourself!
What to Serve It With
These chocolate milkshake cookies are so versatile, they truly fit into any occasion! For a delightful breakfast treat, I love pairing them with a strong cup of coffee. The bitterness of the coffee cuts through the richness of the cookie perfectly, creating a balanced start to the day. They’re also fantastic with a glass of cold, creamy milk – it just doubles down on that milkshake vibe! For a more elegant brunch spread, imagine these nestled amongst fresh berries and perhaps some mini quiches. Their rich chocolate flavor adds a touch of indulgence that elevates the whole spread. For dessert, they’re absolute show-stoppers. I love serving them alongside a scoop of high-quality vanilla bean ice cream or even a raspberry sorbet for a lovely contrast. And for those cozy, quiet evenings when you just need a little something sweet? These are your go-to. They’re perfect with a cup of herbal tea or just enjoyed on their own, curled up on the sofa. My family tradition is to always have a batch ready for movie nights; they’re always the first to disappear!
Top Tips for Perfecting Your Chocolate Milkshake Cookies
I’ve made these chocolate milkshake cookies more times than I can count, and along the way, I’ve picked up a few tricks that I think will really help you achieve cookie perfection. First off, for the zucchini prep, I know some recipes call for squeezing out moisture, but for these cookies, I actually prefer not to. The moisture from the zucchini is what contributes to that wonderfully fudgy, almost brownie-like texture, so don’t wring it out too much! Just ensure it’s finely grated. For mixing, my biggest piece of advice is to truly *not* overmix the batter once you add the dry ingredients. Just mix until you can’t see any more dry flour. Seriously, that’s it! Overmixing is the enemy of tender cookies. When it comes to that gorgeous swirl, don’t feel pressured to make it perfect. Rustic swirls are beautiful! Think of it as abstract art. The more you swirl, the more the colors blend, so aim for defined streaks. If you want to customize the swirl, try adding a tiny drop of food coloring to your filling for a fun twist, or even a sprinkle of espresso powder to enhance the chocolate flavor. For ingredient swaps, I’ve tested this with different types of cocoa powder, and Dutch-process really does give the best depth of flavor. If you don’t have it, natural cocoa will work, but the color might be a bit lighter. For the filling, if you’re finding it too thick, a teaspoon of milk at a time is your best bet. If it’s too thin, a tablespoon of powdered sugar or cocoa powder will help. Baking is where intuition really comes in. Ovens vary, so keep an eye on them after about 9 minutes. The edges should look set, but the center should still look a little underdone and glossy. They will firm up as they cool. And for the glaze, if you want a thicker, more frosting-like consistency, just add a bit more powdered sugar. For a thinner, drippier glaze, add more milk, a teaspoon at a time. These little adjustments make a big difference!
Storing and Reheating Tips
Storing these delightful chocolate milkshake cookies properly is key to keeping them tasting fresh and fudgy. At room temperature, they’re best eaten within 2-3 days. I like to store them in an airtight container, but I make sure they’re completely cool first. If you stack them, placing a piece of parchment paper between layers can prevent sticking, especially if you used the glaze. For refrigerator storage, they’ll last a bit longer, about 5-7 days. Just pop them in an airtight container or a zip-top bag. The texture might firm up a little in the fridge, but they’ll soften up again at room temperature. Now, for the freezer – these are surprisingly freezer-friendly! You can freeze them either unfrosted or frosted, though I personally prefer unfrosted for freezing. Wrap them tightly in plastic wrap, then place them in a freezer-safe bag or container. They’ll keep well for up to 3 months. To thaw, simply let them sit at room temperature for a few hours. If you froze them with glaze, the glaze might get a little sticky as it thaws, so you might want to re-glaze them once they’re thawed. Honestly though, they’re so good, they rarely last long enough to need freezing!
Frequently Asked Questions
Final Thoughts
So there you have it – my absolute favorite chocolate milkshake cookies! They are, hands down, one of my most requested recipes, and for good reason. They bring together the deep, satisfying flavor of a rich chocolate cookie with a dreamy, creamy swirl that just melts in your mouth. It’s that perfect balance of fudgy and slightly chewy that makes them irresistible. If you’re someone who truly loves chocolate, who finds comfort in a warm, homemade treat, then these are for you. They’re a little bit nostalgic, incredibly delicious, and surprisingly easy to make, which is the perfect trifecta in my book. I really hope you give these a try, and I can’t wait to hear how they turn out for you! If you enjoyed these, you might also love my Double Chocolate Fudge Brownies or my Chewy chocolate chip cookies for more chocolatey adventures. Happy baking, and may your kitchen always be filled with the irresistible aroma of freshly baked cookies!
Chocolate Milkshake Cookies
Ingredients
Main Ingredients
- 1.5 cup all-purpose flour
- 0.5 cup unsweetened cocoa powder
- 0.5 teaspoon baking soda
- 0.25 teaspoon salt
- 1 cup unsalted butter, softened
- 1.5 cup granulated sugar
- 1 large egg
- 1 teaspoon vanilla extract
- 0.25 cup milk
- 1 cup chocolate chips
Instructions
Preparation Steps
- Preheat oven to 350°F (175°C). Line baking sheets with parchment paper.
- In a medium bowl, whisk together the flour, cocoa powder, baking soda, and salt.
- In a large bowl, cream together the softened butter and granulated sugar until light and fluffy.
- Beat in the egg and vanilla extract until well combined.
- Gradually add the dry ingredients to the wet ingredients, alternating with the milk, beginning and ending with the dry ingredients. Mix until just combined.
- Stir in the chocolate chips.
- Drop rounded tablespoons of dough onto the prepared baking sheets, about 2 inches apart.
- Bake for 10-12 minutes, or until the edges are set and the centers are still slightly soft.
- Let the cookies cool on the baking sheets for a few minutes before transferring them to a wire rack to cool completely.
