
There are some recipes that just feel like home, you know? The ones that bring back memories of lazy summer afternoons, of laughter echoing around the patio, and of that unmistakable aroma that instantly makes you feel cherished. For me, that recipe is sangria. Not just any sangria, but *this* sangria. It’s the one I’ve tweaked and perfected over countless gatherings, the one that always disappears first, and the one my friends beg me for the recipe of. It’s vibrant, refreshing, and surprisingly easy to whip up, making it my absolute favorite party starter. Forget those super complicated cocktails; this sangria recipe is your secret weapon for effortless entertaining and pure summer bliss, any time of year. It’s honestly better than any store-bought version you’ll find, and I’ll tell you why.
What is Sangria?
So, what exactly is sangria? At its heart, it’s a Spanish punch that’s incredibly forgiving and wonderfully adaptable. Think of it as a delightful wine-based cocktail brimming with fresh fruit, a touch of sweetness, and a little something extra to give it a kick. Traditionally, it’s made with red wine, but I’ve found so much joy in experimenting with different variations. The name “sangria” actually comes from the Spanish word for “blood,” referring to its deep red hue, though many modern versions are lighter and brighter. It’s essentially a party in a pitcher – a relaxed, fuss-free way to serve a crowd. It’s not about precision; it’s about capturing that joyful, communal spirit. It’s the drink that says, “Come on over, relax, and let’s have some fun!”
Why you’ll love this recipe?
There are so many reasons why this particular sangria recipe has become a staple in my kitchen, and I just know you’re going to adore it too. First off, the FLAVOR! It’s this perfect balance of sweet, tart, and fruity that’s incredibly refreshing. You get the robust notes from the wine, softened by the sweetness of the fruits and a hint of liqueur, all brought together by a touch of bubbly. It’s sunshine in a glass! And SIMPLICITY? Oh my goodness, it’s a lifesaver. I can throw this together in about 10 minutes, and then it just needs a little time to chill and let those flavors meld. It’s seriously foolproof, even if you’re not a seasoned mixologist. Plus, it’s surprisingly COST-EFFECTIVE. You don’t need super fancy ingredients; good quality, everyday items work beautifully. What I love most about this recipe is its VERSATILITY. You can swap out the fruits based on what’s in season, change up the type of wine, or even adjust the sweetness to your liking. It’s perfect for a casual backyard BBQ, a holiday gathering, or even just a Tuesday night when you need a little pick-me-up. I’ve tried so many sangria recipes over the years, but this one consistently hits all the right notes. It’s the sangria recipe that keeps on giving!
How do I make Sangria?
Quick Overview
Making this sangria recipe is as easy as chopping some fruit and giving everything a good stir. You’ll combine your wine, a splash of liqueur, a sweetener, and a bit of fruit juice in a large pitcher, add in a medley of fresh fruits, and then let it chill. The magic happens as the fruits macerate, releasing their delicious juices into the wine, creating a complex and incredibly refreshing drink. It’s a simple process that yields spectacular results, and the longer it sits, the better it gets!
Ingredients
For the Main Mix:
1 bottle (750ml) dry red wine: I usually go for a Spanish Rioja or a fruity Merlot. Avoid anything too heavy or oaky, as you want the fruit flavors to shine. A medium-bodied wine is perfect.
1/2 cup orange juice: Freshly squeezed is always best if you have the time, but good quality store-bought will work too. It adds a lovely citrusy base.
1/4 cup brandy or triple sec: This is where you add that extra layer of warmth and complexity. Brandy gives it a richer flavor, while triple sec offers a brighter citrus note. Totally up to your preference!
1/4 cup simple syrup (or to taste): You can buy this pre-made, or it’s super easy to make yourself by dissolving equal parts sugar and water over low heat. I usually start with 1/4 cup and then add more if I think it needs it, especially if my fruits aren’t super ripe.
For the Fruit Medley:
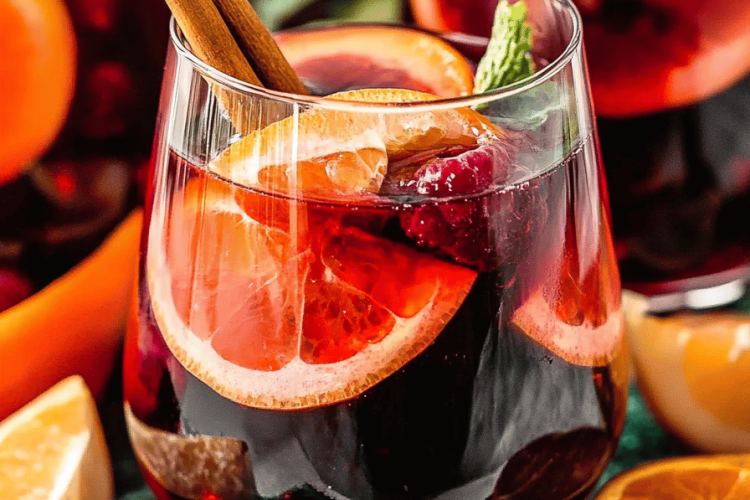
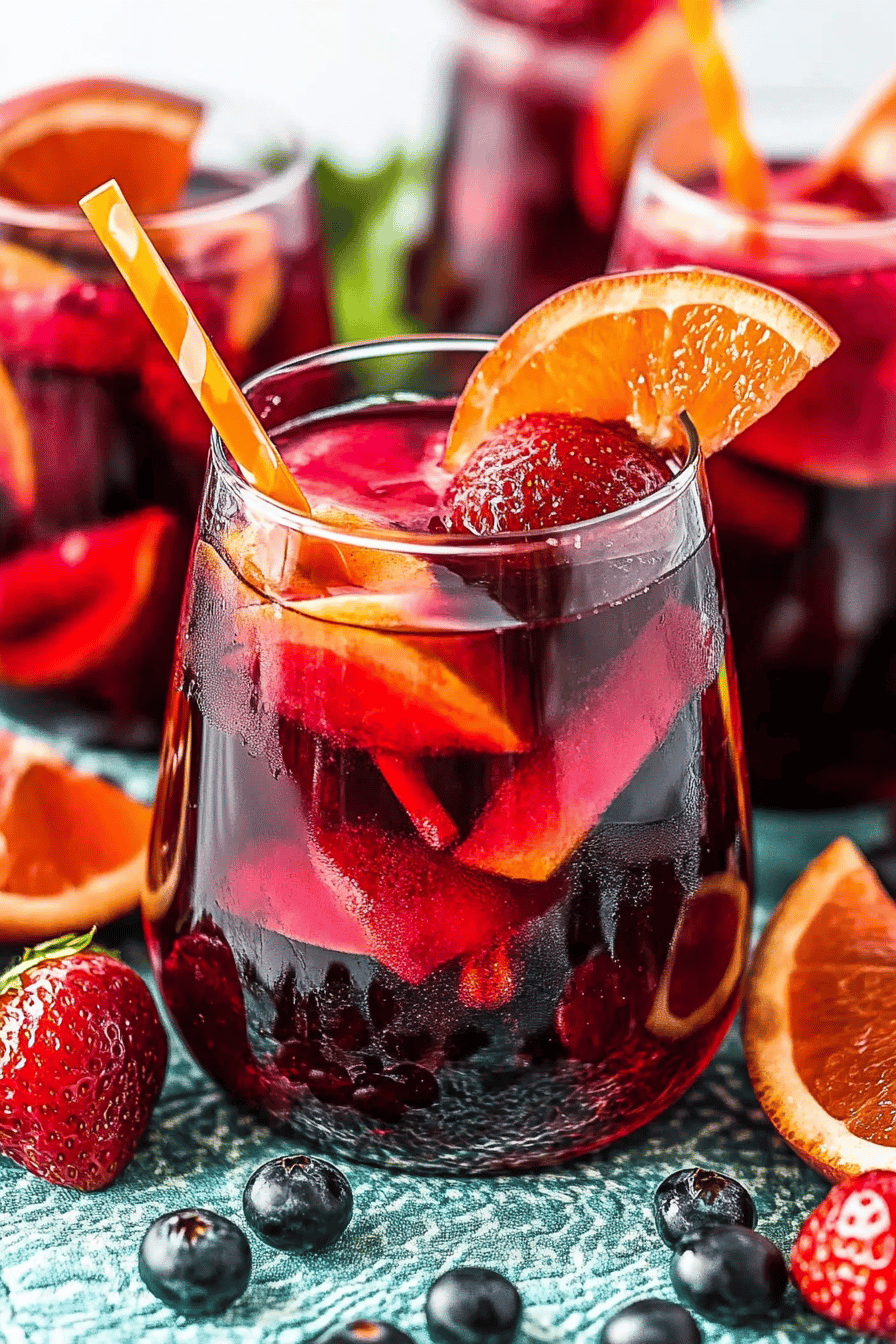
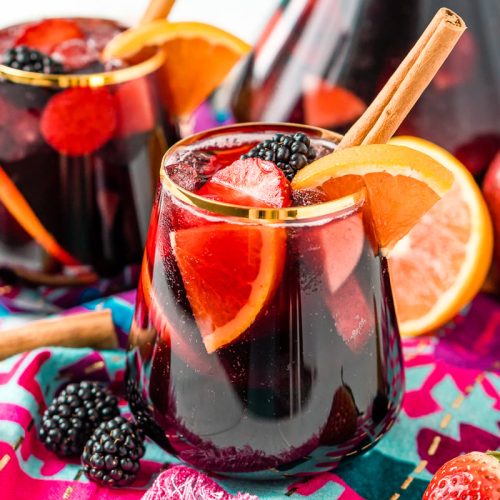
1 orange, thinly sliced: Make sure to remove any seeds!
1 lemon, thinly sliced: Again, seedless is best.
1 lime, thinly sliced: Adds a nice tartness.
1 apple, cored and diced: Fuji or Honeycrisp work wonderfully here – they hold their shape and add a touch of sweetness.
1 peach or nectarine, pitted and sliced (seasonal): These add such a beautiful summery flavor. If they’re not in season, don’t worry, the other fruits are plenty!
Optional additions: A handful of berries (strawberries, raspberries) or a few chunks of pineapple can be a delicious addition.
For Serving (Optional):
Sparkling water or lemon-lime soda: To top off each glass for a little fizz.
Fresh mint sprigs: For garnish and an extra burst of freshness.

Step-by-Step Instructions
Step 1: Prep Your Fruit
First things first, wash all your fruits thoroughly. Then, slice the orange, lemon, and lime thinly. You want nice rounds that will release their juice and look pretty in the pitcher. Core the apple and dice it into bite-sized pieces. If you’re using peaches or nectarines, slice them up. The key here is to have a good variety of colors and textures. I always make sure my citrus is seeded well; nobody wants a surprise seed in their sip!
Step 2: Combine the Liquids
Grab your largest pitcher – you’ll need something with at least a 2-liter capacity. Pour in your entire bottle of red wine. Then, add the orange juice, brandy (or triple sec), and your simple syrup. Give it a gentle stir to combine these base liquids. This is where you can start tasting and adjusting the sweetness. If your fruits are super ripe and sweet, you might need less syrup. If the wine is a bit tart, you might want a touch more.
Step 3: Add the Fruit
Now comes the fun part! Toss all your prepared fruit into the pitcher with the liquid mixture. Make sure to gently press down on the citrus slices with your spoon to help release some of their juices. You want all those lovely flavors to start mingling.
Step 4: Chill and Macerate
This is arguably the most important step for the best sangria flavor. Cover the pitcher tightly and refrigerate it for at least 2 hours, but honestly, overnight is even better. This allows the fruits to soften and infuse their juices into the wine, and for all those wonderful flavors to meld together. The longer it sits, the deeper and richer the flavor becomes. I usually make mine the night before a party.
Step 5: Taste and Adjust
Before you serve, give your sangria a final taste. Does it need a little more sweetness? A bit more citrus? This is your chance to fine-tune it. You can also add a splash more orange juice or even a bit more liqueur if you’re feeling adventurous.
Step 6: Serve!
When you’re ready to serve, fill glasses about halfway with ice. Ladle the sangria into each glass, making sure to get a good amount of fruit in every serving. For an extra touch, top off each glass with a splash of sparkling water or lemon-lime soda for a bit of fizz. Garnish with a fresh mint sprig. It looks and tastes so much more special with that little bit of sparkle and green!
Step 7: Enjoy
Sip, savor, and enjoy the fruits of your labor! This sangria is perfect for sipping on a warm afternoon or enjoying with friends.
Step 8: Refill as Needed
This recipe is usually a crowd-pleaser, so don’t be surprised if you need to whip up a second batch!
Step 9: Clean Up
Enjoy the relaxing process of cleaning up after a successful gathering. The empty pitcher is a good sign!
What to Serve It With
This sangria recipe is a chameleon when it comes to pairings. For BREAKFAST, surprisingly, a lighter white wine version of this (which I’ll share another time!) goes wonderfully with a simple pastry or some fresh fruit salad. But this red sangria is fantastic for a leisurely BRUNCH. Imagine it alongside some mini quiches, a savory frittata, or even some smoked salmon blinis. It’s also a fantastic accompaniment to a cheese board with grapes and olives. As a DESSERT, it’s the perfect light, refreshing end to a meal. It pairs beautifully with a simple Chocolate Cake, some panna cotta, or even just a plate of assorted cookies. I’ve even found myself enjoying a glass during COZY SNACKS, paired with some spiced nuts or a handful of popcorn. It’s just one of those drinks that makes everything feel a little more festive and special, no matter the occasion.
Top Tips for Perfecting Your Sangria
I’ve learned a few tricks over the years of making sangria, and I’m happy to share them with you! For the FRUIT, make sure your citrus is thinly sliced; thick slices won’t release their flavor as effectively. And always, always remove seeds! For the LIQUIDS, don’t be afraid to experiment with different wines. A fruity white sangria is equally delicious, and a rosé version is perfect for summer. When it comes to MIXING, the key is patience. The chilling time is crucial for those flavors to meld. If you’re short on time, you can add a little more citrus juice and a touch more sweetener to compensate, but it won’t be quite the same. For FRUIT VARIATIONS, think seasonally. In the fall, spiced apples and pears are fantastic. In the summer, berries and stone fruits are divine. Don’t be afraid to add a cinnamon stick or a star anise during the chilling process for an extra aromatic layer, especially if you’re going for a warmer vibe. For SERVING, I always recommend serving it chilled over ice. Adding a splash of sparkling water or soda water right before serving gives it a lovely effervescence that really wakes up the flavors. And finally, for my personal touch, I sometimes add a tiny splash of grenadine just before serving for a more vibrant color and a hint of pomegranate sweetness – it’s my little secret!
Storing and Reheating Tips
This sangria recipe is best enjoyed fresh, but it does store reasonably well. If you have leftovers, you can keep it in the refrigerator for up to 2-3 days. Make sure it’s in a tightly sealed container or the original pitcher with a good lid. The fruit will continue to soften and the flavors will become even more intense, which can be a good thing, but eventually, the fruit can become a bit mushy. If you plan on storing it for longer than a day, I recommend straining out most of the fruit before refrigerating, and then adding fresh fruit and a splash of soda water when you’re ready to serve it again. I don’t recommend “reheating” sangria in the traditional sense; it’s meant to be served cold and refreshing. If it’s too strong after a day or two, you can always dilute it with a bit more wine or a splash of fruit juice.
Frequently Asked Questions
Final Thoughts
There you have it – my beloved sangria recipe! It’s more than just a drink; it’s an invitation to relax, connect, and savor the good moments. I truly believe that good food and good drinks are at the heart of any memorable gathering, and this sangria recipe has never failed me. It’s that perfect blend of simple to make, delightful to drink, and always a crowd-pleaser. If you enjoy this, you might also love my recipe for [link to a hypothetical white wine sangria or fruity punch recipe] which is equally perfect for warmer weather! Give this sangria recipe a try the next time you’re looking for something special yet utterly fuss-free. I can’t wait to hear how it turns out for you! Let me know in the comments below what your favorite fruit additions are, or any fun variations you’ve tried. Happy sipping!
Classic Red Wine Sangria
Ingredients
For the Sangria
- 0.75 liter Red wine A dry red wine like Rioja, Merlot, or Cabernet Sauvignon
- 0.25 cup Orange juice
- 0.5 cup Brandy Optional, but adds depth
- 0.25 cup Triple sec or Cointreau Orange liqueur
- 0.1 cup Granulated sugar Adjust to taste
- 1 Orange Sliced
- 1 Lemon Sliced
- 1 Lime Sliced
- 1 Apple Chopped
- 0.5 cup Berries Mixed, e.g., strawberries, raspberries, blueberries
- 1 liter Club soda or sparkling water Chilled, for serving
Instructions
Preparation Steps
- In a large pitcher, combine the red wine, orange juice, brandy (if using), triple sec, and granulated sugar. Stir until the sugar is dissolved.
- Add the sliced orange, lemon, lime, chopped apple, and mixed berries to the pitcher.
- Stir everything together gently. Cover the pitcher and refrigerate for at least 2-4 hours, or preferably overnight, to allow the flavors to meld.
- When ready to serve, pour the sangria into glasses filled with ice. Top each glass with a splash of chilled club soda or sparkling water.
- Garnish with extra fruit slices if desired.
