
There are some recipes that just instantly bring a smile to your face, and these Oreo snow globe cookies are absolutely one of them. I remember the first time I saw something like this online, and I thought, “No way, that looks way too complicated!” But let me tell you, after fiddling around with it, I realized it’s actually super achievable, even for us busy folks who don’t have hours in the kitchen. They’re like little edible works of art, perfect for holidays, parties, or just when you need a touch of magic in your day. Honestly, they have that same “wow” factor as a perfectly decorated layer cake, but they are so much more forgiving and frankly, way more fun to make with the kids. If you’ve ever loved the idea of fancy cookies but been a little intimidated, this is your moment. These Oreo snow globe cookies are going to be your new best friend.

What Are Oreo Snow Globe Cookies?
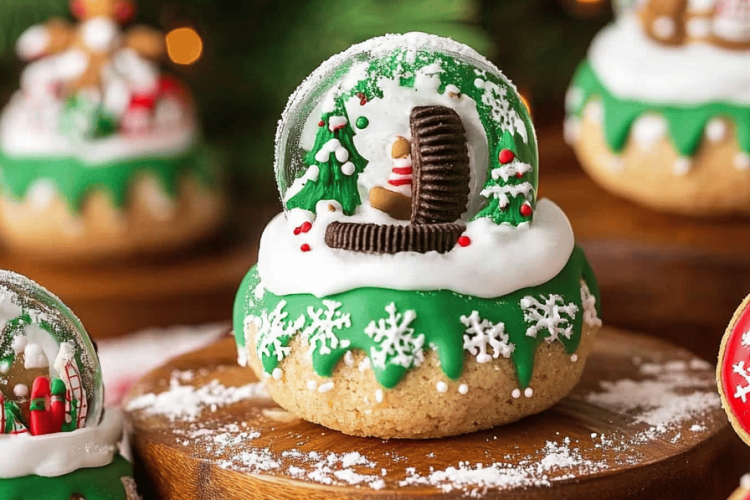
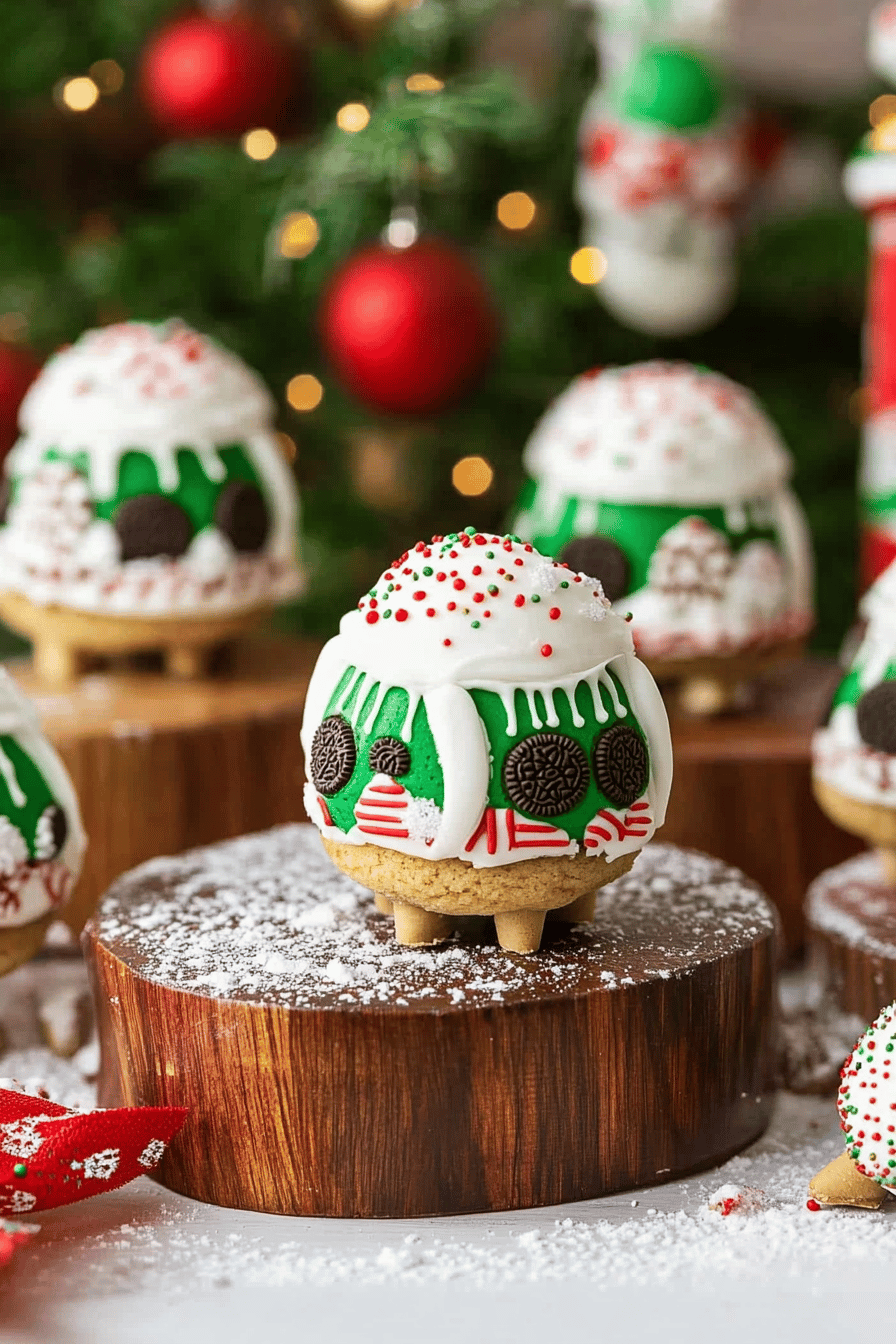
So, what exactly are these whimsical little treats? Think of them as the ultimate fun, no-bake dessert that combines the irresistible crunch of Oreos with a creamy, dreamy filling, all encased in a shimmering, edible shell that looks like a tiny snow globe! The “globe” is actually made from melted candy melts, and inside, you’ve got a delightful mix of crushed Oreos and cream cheese, sometimes with a hint of vanilla or even a touch of espresso powder if you’re feeling adventurous. The magic really happens when you add some edible glitter or sprinkles that swirl around like snowflakes when you move the cookie. It’s essentially a no-bake cookie ball rolled in a candy shell, but with a seriously fun, decorative twist that makes them look like they came straight out of a fairytale. They’re a delightful departure from your usual Chocolate Chip or sugar cookies, offering a unique texture and visual appeal that’s guaranteed to impress.
Why you’ll love this
Oh, where do I even begin with why this recipe is a winner? First off, the flavor is just pure joy. You get that classic, comforting taste of Oreos, but when they’re mixed into that creamy filling, it’s like a whole new level of deliciousness. The crunchy candy shell adds a satisfying snap, and if you add a little edible glitter, it’s just pure sparkle and fun. But what I really, truly love is how surprisingly simple this is. Seriously, no baking required! This is a lifesaver on those sweltering summer days when you don’t want to turn on the oven, or when you need a last-minute showstopper for a bake sale or a school event. And let’s talk cost-efficiency – Oreos and Cream Cheese are pretty budget-friendly ingredients, and a little goes a long way. You can also totally customize these! Want them for a birthday? Add colorful sprinkles. Halloween? Use orange and black candy melts. Christmas? Go with white and silver. They are incredibly versatile. They’re also fantastic for making with kids. They can help crush the Oreos, mix the filling, and even sprinkle the glitter. It’s a recipe that brings everyone together. Compared to more intricate cookie decorating that can take hours, these Oreo snow globe cookies give you maximum impact with minimum fuss. It’s the perfect balance of impressive presentation and accessible deliciousness.
How do you make Oreo Snow Globe Cookies
Quick Overview
Making these Oreo snow globe cookies is a wonderfully straightforward process that mostly involves crushing, mixing, rolling, and dipping. You’ll start by pulverizing those beloved Oreos, then combining them with a creamy binder to form cookie balls. After they firm up in the fridge, you’ll dip them in vibrant candy melts and immediately decorate them to create that signature snow globe effect. The key is really just chilling the balls well so they hold their shape, and working efficiently when dipping in the candy melts. It’s a no-bake wonder that’s practically foolproof, even for beginners.
Ingredients
For the Main Batter (Cookie Balls):
2 cups crushed Oreo cookies (about 20-25 cookies, finely crushed – I like to pulse them in a food processor until they’re like coarse sand)
4 ounces cream cheese, softened (make sure it’s truly softened, not just room temperature, for easy mixing)
1/4 cup powdered sugar (optional, for a little extra sweetness and to help bind)
1 teaspoon vanilla extract (use a good quality one, it makes a difference!)
Pinch of salt (just a tiny bit to balance the sweetness)
For the Globe Coating:
12 ounces white candy melts (or any color you like – pink for Valentine’s, blue for baby showers, etc. – these are usually found in the baking aisle)
1-2 tablespoons vegetable oil or shortening (this helps thin the candy melts for a smoother dip, but don’t add too much or it’ll get greasy)
For the Snow Globe Effect:
Edible glitter, edible glitter dust, or fine edible sprinkles (I love iridescent or silver for a snowy look, but gold or even colorful ones are fun too!)
Optional: Extra crushed Oreos or cookie crumbs for dusting
Step-by-Step Instructions
Step 1: Preheat & Prep Pan
This step is less about preheating an oven and more about preparing your workspace! You’ll want to line a baking sheet with parchment paper or wax paper. This is crucial because once you form the cookie balls, you need a place for them to chill and firm up without sticking. Make sure you have enough space in your refrigerator for this baking sheet.
Step 2: Mix Dry Ingredients
Take your Oreos and crush them. I usually do this in a zip-top bag with a rolling pin, which is a great stress reliever, or I pulse them in a food processor until they’re fine crumbs, almost like sand. You want them really broken down so they incorporate well into the filling. If you’re adding a little extra crushed Oreo for dusting later, set that aside now.
Step 3: Mix Wet Ingredients
In a medium bowl, combine the softened cream cheese, vanilla extract, and the pinch of salt. Beat them together with a fork or an electric mixer until smooth and creamy. If you’re using powdered sugar, beat that in now until it’s fully incorporated and the mixture is light and fluffy. It should look like a smooth, spreadable frosting.
Step 4: Combine
Add the crushed Oreo crumbs to the cream cheese mixture. Stir everything together until it’s just combined. Be careful not to overmix here! You want it to hold together when you press it. The mixture will be quite thick and sticky. If it feels too wet to roll, you can add a tablespoon more of crushed Oreos. If it feels too dry, you can add a tiny bit more cream cheese or a splash of milk, but usually, the Oreo crumbs do the trick.
Step 5: Prepare Filling
This is actually our “filling” in a way – the cookie ball mixture itself. Once everything is combined, it’s time to get your hands a little messy. Take small portions of the mixture (about 1 to 1.5 tablespoons) and roll them into compact balls between your palms. You want them to be nice and smooth. Place these rolled balls onto your prepared baking sheet. Once all the mixture is rolled into balls, pop the baking sheet into the freezer for at least 30 minutes, or the refrigerator for at least an hour. This chilling step is *super* important for them to hold their shape when you dip them in the warm candy melts.
Step 6: Layer & Swirl
This step is about getting ready to coat. Once the cookie balls are firm, melt your white candy melts. You can do this in a microwave-safe bowl in 30-second intervals, stirring well after each, or you can use a double boiler. Once they are mostly melted, stir in the tablespoon or two of vegetable oil or shortening until they are smooth and pourable. Now, working with a few cookie balls at a time (so they don’t get too warm), dip each one into the melted candy melts. Use a fork or a toothpick to gently lift them out, letting the excess drip back into the bowl. Place the coated cookie balls back onto your parchment-lined baking sheet.
Step 7: Bake
No baking required for this recipe, so this step is actually skipped! We’re all about no-bake magic here.
Step 8: Cool & Glaze
Immediately after dipping a cookie ball in the candy melts, while the coating is still wet, sprinkle it generously with your edible glitter or sprinkles. You can also lightly dust it with extra crushed Oreo crumbs if you like. The glitter will adhere to the wet candy coating, creating that beautiful, swirling snow globe effect. If you want an extra bit of definition, you can even use a toothpick to gently swirl the glitter around a bit before it sets. Let the cookies sit at room temperature until the candy coating is completely firm. This usually takes about 15-30 minutes, depending on your room temperature.
Step 9: Slice & Serve
Once the coating is firm, your Oreo snow globe cookies are ready to be enjoyed! You can serve them as is, or if you want to get fancy, you can drizzle a little extra melted candy melt (you can tint it a different color) over them for added decoration. They look stunning presented on a platter or arranged in little treat bags.
What to Serve It With
These Oreo snow globe cookies are so versatile, they fit right in everywhere! For breakfast, imagine serving one or two alongside a steaming mug of coffee or a glass of cold milk. The rich cookie flavor is a fantastic start to the day, especially when you’re feeling a bit whimsical. For brunch, they can be a delightful little treat on a dessert table, nestled amongst fruit salads and pastries. Their festive appearance makes them feel a bit special, so serving them on a nice tiered stand adds a touch of elegance. As a dessert, they are pure indulgence. They are surprisingly rich, so one or two is usually plenty, and they make a wonderful accompaniment to a scoop of vanilla bean ice cream or a creamy panna cotta. And for those cozy snack times? They are absolute perfection. Grab a few with a warm cup of tea or hot chocolate, curl up on the sofa, and enjoy that delightful crunch and creamy center. My family loves them best when we have them with a big bowl of popcorn during movie night; it’s become a bit of a tradition!
Top Tips for Perfecting Your Oreo Snow Globe Cookies
Over the years, I’ve learned a few little tricks that make these Oreo snow globe cookies even better. First, for the crushed Oreos, you really want to get them as fine as possible. If you can, using a food processor is the way to go. If you’re using a zip-top bag and rolling pin, make sure you really get them broken down, almost to a powder consistency. This ensures the balls bind together nicely without being gritty. Speaking of binding, make sure your cream cheese is *fully* softened. I know I mentioned it in the ingredients, but it’s so important! If it’s cold, your mixture won’t be smooth, and it’ll be much harder to get those perfectly round balls. For the candy melts, don’t overheat them. Overheated candy melts can seize up and become unusable. Melt them slowly and stir frequently. If they seem too thick to dip, add that tiny bit of oil or shortening, but start with just a teaspoon and add more *only* if absolutely necessary. Too much oil will make them greasy and they won’t set properly. When you’re dipping, a fork works best for me. Gently lower the cookie ball, use the fork to flip it and ensure it’s fully coated, then lift it up and tap the fork gently on the edge of the bowl to let the excess drip off. This helps create a nice, even coating. Don’t be afraid to be generous with the glitter! It’s what makes them sparkle and look like a real snow globe. I’ve tried using different types of edible glitter, and the finer, iridescent ones give the most magical effect. For the swirl effect, practice a few on a scrap piece of parchment paper first. You want to swirl *just* enough to distribute the glitter, not so much that you disturb the wet candy coating too much. And finally, the chilling time for the cookie balls is non-negotiable! If they aren’t properly chilled, they’ll be soft and might even fall apart when you dip them. Patience here truly pays off.
Storing and Reheating Tips
These Oreo snow globe cookies are best enjoyed fresh, but they do store quite well! If you plan on eating them within a couple of days, you can store them in an airtight container at room temperature. Just make sure the candy coating is completely set before you put them in. I usually let them sit out for at least an hour after dipping just to be safe. They should stay fresh for about 3-4 days this way. If you need to store them for longer, or if your kitchen is particularly warm, popping them in the refrigerator is a good idea. Again, use an airtight container. The candy coating can sometimes get a little condensation on it in the fridge, so when you take them out, let them come to room temperature *before* you open the container to prevent that. They’ll keep well in the fridge for about a week. Freezing these is also an option, though I personally find they are best fresh. If you do want to freeze them, make sure the candy coating is completely hardened. Then, wrap each cookie individually in plastic wrap, and place them in a freezer-safe container or a heavy-duty freezer bag. They can be stored in the freezer for up to 2 months. To thaw, take them out of the freezer and let them thaw in their wrapping at room temperature for a few hours. As for reheating, there’s no real need to reheat these! They are designed to be eaten at room temperature or slightly chilled. Enjoying them as they are will give you the best texture and flavor experience.
Frequently Asked Questions
Final Thoughts
I really hope you give these Oreo snow globe cookies a try! They’re such a fun way to bring a little bit of magic and sparkle into your kitchen, and the joy on people’s faces when they see them is totally worth it. They’re proof that you don’t need to be a master baker to create something truly impressive and delicious. They’re a perfect example of how simple ingredients can be transformed into something truly special. If you’re looking for other fun no-bake treats, you might also enjoy my Easy No-Bake Chocolate Peanut Butter Bars or my Creamy No-Bake Cheesecake Bites. They’re in the same spirit of deliciousness without the oven! I can’t wait to hear how your Oreo snow globe cookies turn out, so please leave a comment below and share your experience, or even better, share a photo of your creations! Happy baking (or in this case, happy no-baking)!

Oreo Snow Globe Cookies
Ingredients
For the Cookies
- 1 package Oreo cookies regular size
- 1 package cream cheese softened
- 2 cups powdered sugar
- 0.5 teaspoon vanilla extract
For Decoration
- 0.25 cup corn syrup
- 1 tablespoon water
- 0.5 cup sprinkles edible glitter or small decorative elements
- 1 cup chocolate chips for melting and piping
Instructions
Preparation Steps
- Separate the Oreo cookies. Carefully twist them apart, keeping the cream filling intact on one side. Scrape the cream filling into a bowl.
- Add softened cream cheese, powdered sugar, and vanilla extract to the bowl with the Oreo cream filling. Beat with an electric mixer until smooth and well combined.
- Place the cream filling mixture back onto the Oreo cookie halves, spreading it evenly to create a dome shape. This will be the 'snow' inside your globe.
- Gently place the other Oreo cookie half on top of the filling to form a sandwich. Press lightly.
- In a small bowl, combine corn syrup and water. Heat gently in the microwave or on the stovetop until warm and pourable. Brush this mixture onto the top of the cookie sandwiches.
- Immediately sprinkle the tops of the cookies with edible glitter or decorative sprinkles to resemble snow.
- Melt the chocolate chips. Place them in a piping bag with a small tip, or use a ziplock bag with a corner snipped off. Pipe decorative outlines or designs on the cookies to represent the glass of the snow globe.
- Allow the chocolate to set completely before serving or storing.
