
Oh, Boston Cream Donuts. Just saying the name makes me feel all warm and fuzzy inside, like a cozy blanket on a chilly morning. This isn’t just any donut recipe; it’s the one that’s been passed down through generations in my family, tweaked a little here and there, but always with that same incredible flavor that transports me straight back to my grandmother’s kitchen. You know, the one with the slightly chipped Formica countertops and the faint smell of cinnamon always in the air? Yeah, that one. I remember watching her make these, mesmerized by how she’d fill them with that luscious custard and then drizzle that glossy chocolate over the top. It was pure magic. And the taste? A perfectly soft, yeasty donut encasing a rich, creamy vanilla custard, all topped off with a decadent chocolate glaze. It’s honestly the perfect antidote to a long week or a surprising craving that hits around 9 PM. Forget those store-bought versions; this homemade Boston Cream donut recipe is so much better, and honestly, not as complicated as you might think!
What is Boston Cream Donuts?
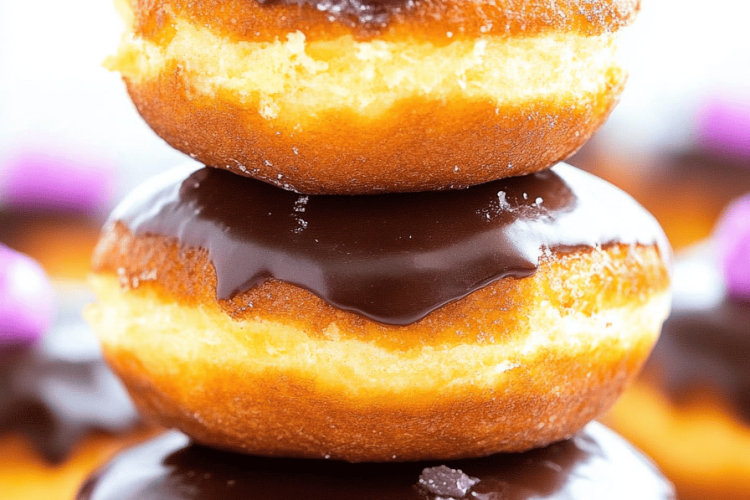
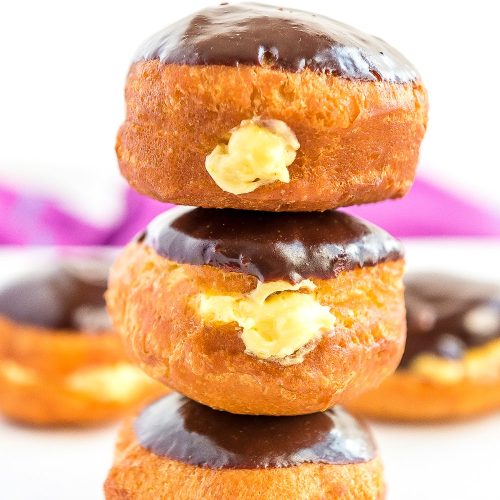
So, what exactly are these delightful little treasures? Think of them as the ultimate indulgence for your sweet tooth. Boston Cream Donuts are essentially a classic yeast donut, fried to a perfect golden brown, then injected with a smooth, rich pastry cream (that’s the “cream” part). To finish them off, they get a generous pour of a shiny, chocolate ganache or glaze. It’s this trifecta of textures and flavors – the airy donut, the silky custard, and the deep chocolate – that makes them so irresistible. The name “Boston Cream” actually comes from the famous Boston cream pie, which was invented in Boston back in the late 1800s. Someone, likely a brilliant baker with a penchant for innovation, decided to take that incredible flavor combination and put it into donut form. And boy, are we ever grateful they did! It’s a simple concept, really, but when you nail that balance of fluffy dough, creamy filling, and sweet chocolate, it’s pure bliss.
Why you’ll love this recipe?
There are so many reasons why this Boston Cream donut recipe has become my absolute go-to, and I just know you’re going to love it too. First off, let’s talk about the flavor. It’s everything you dream of and more! The donut itself has that perfect balance of sweet and slightly yeasty, giving it a wonderful chewiness that’s just divine. Then comes the pastry cream – it’s not overly sweet, just wonderfully creamy and vanilla-scented, like a cloud of pure comfort. And that chocolate glaze? It’s rich, glossy, and the perfect amount of bittersweet to cut through the creaminess. Honestly, the smell alone when these are baking and the glaze is melting is enough to get everyone in the house to gather around the kitchen counter, noses practically pressed against the oven door.
But it’s not just about the taste; it’s also surprisingly easy to make! I know, I know, donuts can sound intimidating, but I promise, this recipe breaks it down into simple steps. Once you get the hang of making the dough, it’s quite straightforward. And think about the cost! Making these at home is SO much more budget-friendly than buying them from a specialty bakery, and you get to control the quality of every single ingredient. Plus, the versatility! You can adjust the sweetness of the glaze, add a hint of coffee to the custard, or even try a different flavor of chocolate. This recipe is also a lifesaver when you need a special treat that feels fancy but doesn’t require all-day commitment. It’s perfect for weekend mornings, holidays, or just because you deserve a little something special. What I love most about this recipe, though, is the joy it brings. Seeing the smiles on people’s faces when they take that first bite… it’s truly priceless. It reminds me of my own childhood, and it’s so rewarding to create those same happy memories for my own family.
How do you make Boston Cream Donuts?
Quick Overview
In a nutshell, we’ll be making a simple yeast dough, letting it rise, shaping and frying the donuts until they’re golden and puffed, whipping up a quick and luscious pastry cream, and finally, drizzling them all with a glossy chocolate glaze. It sounds like a lot, but each step is manageable and builds towards that perfect Boston Cream donut experience. The beauty of this method is that it yields consistently delicious results, and you’ll find yourself looking forward to making them again and again. Don’t worry if your first batch isn’t perfectly shaped; they’ll still taste absolutely amazing!
Ingredients
For the Main Batter:
This is your classic yeast donut dough. The key here is using good quality ingredients for the best flavor and texture. I always use whole milk because I find it gives the dough a richer flavor and better rise, but 2% works fine too. Make sure your yeast is fresh – if it’s old, your donuts won’t puff up properly, and that would be a tragedy! I usually buy my yeast in bulk and keep it in the freezer to ensure it stays active.
- 2 ¼ teaspoons (1 packet) active dry yeast
- ½ cup warm milk (105-115°F)
- 2 tablespoons granulated sugar
- 2 large eggs, at room temperature
- ¼ cup unsalted butter, melted and slightly cooled
- 1 teaspoon vanilla extract
- 1 teaspoon salt
- 3 ½ to 4 cups all-purpose flour, plus more for dusting
- Vegetable oil or other neutral oil, for frying
For the Filling:
This is where the magic happens! A good pastry cream is smooth, rich, and perfectly vanilla-forward. I’ve tried adding other extracts, but honestly, the classic vanilla is what makes a Boston Cream donut so iconic. Make sure to cook it gently to avoid scorching, and chilling it completely is crucial for it to thicken properly.
- 2 cups whole milk
- ½ cup granulated sugar, divided
- ¼ cup cornstarch
- 4 large egg yolks
- 2 tablespoons unsalted butter, cut into pieces
- 1 teaspoon vanilla extract
For the Glaze:
This chocolate glaze is so simple but makes all the difference. It should be pourable but thick enough to coat the donuts nicely. If it gets too thick, you can always whisk in a tiny bit more milk or cream. I like a good Dark Chocolate here for a nice contrast to the sweet filling.
- 1 cup powdered sugar
- ¼ cup unsweetened cocoa powder
- 3 tablespoons melted unsalted butter
- 2-3 tablespoons milk or cream
- ½ teaspoon vanilla extract
Step-by-Step Instructions
Step 1: Preheat & Prep Pan
This step is all about getting your environment ready for happy donut-making. First, take out a large, clean baking sheet and line it with parchment paper. You’ll need this to place the cut donuts on before they go for their first rise. It makes transferring them so much easier and prevents sticking. While we’re not preheating an oven yet, it’s good to get into the habit of prepping your workspace. Make sure you have enough room to knead the dough and let it rise without being disturbed.
Step 2: Mix Dry Ingredients
In a large mixing bowl, whisk together 3 cups of the all-purpose flour, the granulated sugar, and the salt. Whisking them together ensures that the salt and sugar are evenly distributed throughout the flour, which is important for consistent texture and flavor. This simple step also helps to aerate the flour a bit, which can make for a lighter dough. I always give it a good few whisks, just to be sure.
Step 3: Mix Wet Ingredients
In a separate, medium-sized bowl, warm your milk until it’s lukewarm – about 105-115°F. You don’t want it too hot, or it’ll kill the yeast! Sprinkle the active dry yeast over the warm milk and let it sit for about 5-10 minutes until it gets foamy and bubbly. This “proofing” step is your sign that the yeast is alive and ready to work its magic. Once it’s foamy, whisk in the two large eggs, the melted butter (make sure it’s cooled slightly so it doesn’t cook the eggs!), and the vanilla extract until everything is well combined. This wet mixture is going to give our dough its structure and richness.
Step 4: Combine
Now, pour the wet ingredients into the bowl with the dry ingredients. Start mixing with a wooden spoon or a spatula until a shaggy dough forms. Gradually add the remaining ½ cup of flour, a little at a time, until the dough pulls away from the sides of the bowl. You might not need all of it, or you might need a touch more – the exact amount depends on your flour and the humidity! Turn the dough out onto a lightly floured surface. Knead the dough for about 8-10 minutes, or until it’s smooth and elastic. It should feel soft and slightly tacky, but not sticky. If it’s too sticky, add a little more flour, a teaspoon at a time. If it feels too dry, add a tiny bit of milk. Once it’s kneaded, place it in a lightly greased bowl, turn it to coat, cover it with plastic wrap or a damp kitchen towel, and let it rise in a warm place for about 1 to 1 ½ hours, or until it has doubled in size. I usually pop mine in a slightly warm (but turned off!) oven, or just by a sunny window.
Step 5: Prepare Filling
While the dough is rising, let’s get that luscious pastry cream ready. In a medium saucepan, whisk together the cornstarch and half of the sugar (¼ cup). Then, whisk in the egg yolks until they’re well combined and smooth. Gradually whisk in the milk until there are no lumps. Place the saucepan over medium heat and cook, stirring constantly, until the mixture thickens to a pudding-like consistency and starts to bubble. This usually takes about 8-10 minutes. Keep stirring! Scrape the bottom and sides of the pan frequently to prevent scorching. Once thickened, remove it from the heat and stir in the butter and vanilla extract until the butter is melted and everything is smooth and glossy. Pour the pastry cream into a clean bowl, cover it tightly with plastic wrap, pressing the wrap directly onto the surface of the cream to prevent a skin from forming. Refrigerate for at least 2-3 hours, or until completely chilled and firm. This chilling time is crucial for it to thicken up properly for filling.
Step 6: Layer & Swirl
Once the dough has doubled in size, gently punch it down to release the air. Turn the dough out onto a lightly floured surface and roll it out to about ½ inch thickness. Using a donut cutter (or two different-sized round cutters, like a biscuit cutter and a smaller one for the hole), cut out your donuts. As you cut them, place them onto your prepared parchment-lined baking sheet, making sure they have a little space between them. Let them rest, covered loosely with plastic wrap, for another 30-45 minutes while you prepare your frying station. This second rise is really important for light, airy donuts!
Step 7: Bake
Now for the fun part – frying! Heat about 2-3 inches of vegetable oil in a large, heavy-bottomed pot or Dutch Oven to 350°F (175°C). It’s really important to maintain this temperature; if it’s too hot, the donuts will burn on the outside and be raw inside, and if it’s too cool, they’ll be greasy. Carefully slide 2-3 donuts into the hot oil at a time, being careful not to overcrowd the pot. Fry for about 1-2 minutes per side, or until they are beautifully golden brown. Use a slotted spoon or spider strainer to carefully flip them and remove them from the oil. Place the fried donuts on a wire rack set over a baking sheet to drain any excess oil and cool slightly.
Step 8: Cool & Glaze
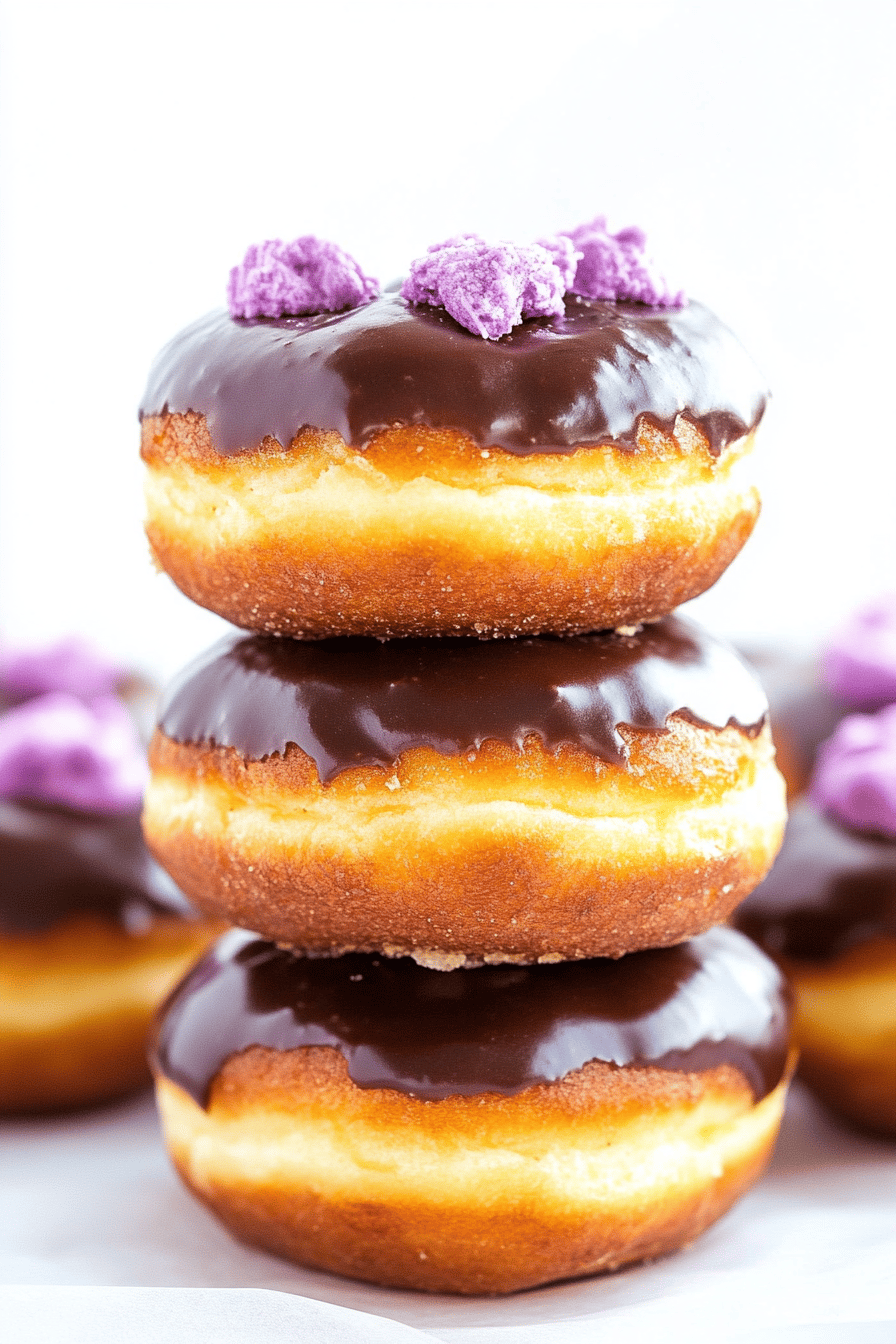
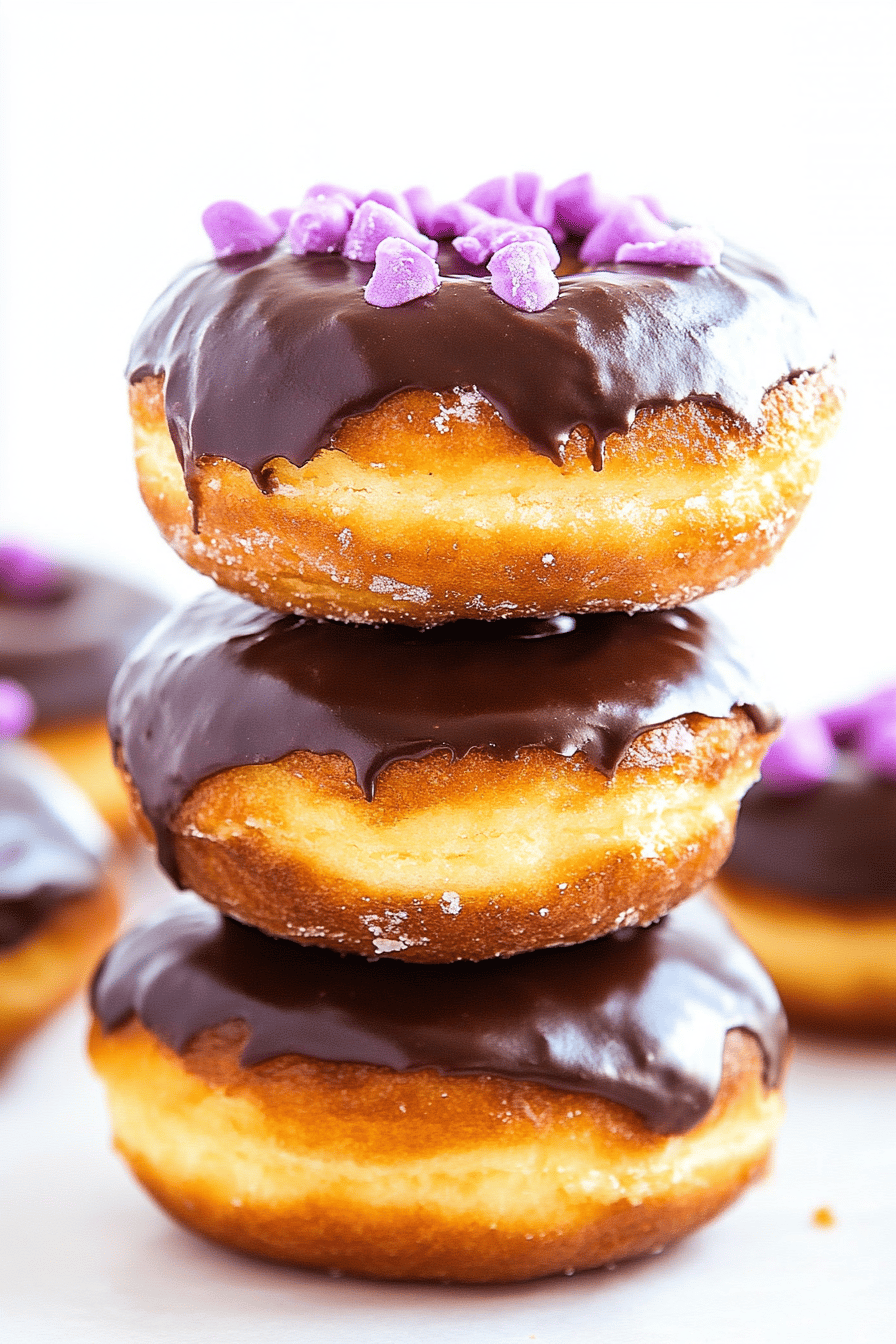
Once the donuts have cooled enough to handle (they should still be a little warm, which helps the glaze adhere), it’s time to fill them. You can use a piping bag fitted with a long, narrow tip, or even just a sharp knife to make a small slit in the side of each donut. Gently pipe or spoon the chilled pastry cream into each donut until it feels full and slightly plump. For the glaze, in a medium bowl, whisk together the powdered sugar and cocoa powder. Then, whisk in the melted butter, vanilla, and 2 tablespoons of milk or cream until you have a smooth, pourable glaze. If it’s too thick, add a little more milk, a teaspoon at a time. If it’s too thin, add a bit more powdered sugar. Dip the top of each filled donut into the glaze, letting any excess drip back into the bowl. Place the glazed donuts back on the wire rack to let the glaze set. This is my favorite part – watching that glossy chocolate coat the creamy filling!
Step 9: Slice & Serve
Once the glaze has set for about 15-20 minutes, your Boston Cream Donuts are ready to be devoured! The best way to serve them is fresh, while the donut is still tender and the filling is perfectly creamy. If you want to admire your handiwork, you can slice one in half horizontally to show off that beautiful cream filling and golden donut interior. They are truly a sight to behold!
What to Serve It With
Honestly, Boston Cream Donuts are a star all on their own, but pairing them with the right beverage or alongside other dishes can elevate the experience. For a classic breakfast treat, a steaming mug of good quality coffee is an absolute must. The slight bitterness of the coffee cuts through the sweetness of the donut and glaze beautifully. I love serving them just as they are, maybe with a dusting of powdered sugar on the side of the plate for a little extra flair.
When it comes to brunch, these donuts feel wonderfully indulgent. They look fantastic presented in a tiered stand alongside fruit salads, bacon, and maybe some fluffy pancakes. A glass of cold milk or even a mimosa would be a delightful accompaniment for a more festive brunch. If you’re serving them as a dessert after a meal, they’re a perfect stand-in for a slice of cake. Imagine them after a rich chocolate lava cake or even a lighter lemon tart – they offer a different kind of decadence. And for those cozy snack moments, especially on a rainy afternoon? A warm cup of hot chocolate and a Boston Cream donut is pure comfort. My kids also love them with a side of berries, so the tartness of the fruit balances the sweetness. My family has a tradition of having one “special” treat on Sunday mornings, and these Boston Cream donuts are always the winner!
Top Tips for Perfecting Your Boston Cream Donuts
I’ve made these Boston Cream Donuts more times than I can count, and along the way, I’ve picked up a few tricks that really make a difference. For instance, when you’re kneading the dough, don’t be afraid to get your hands in there! It might feel a bit messy at first, but feeling the dough change and become smooth and elastic is part of the process. If your dough feels too dry, add a tablespoon of milk at a time, and if it’s too sticky, add a tablespoon of flour. It’s a living thing, that dough!
When it comes to the pastry cream, the most important thing is constant stirring. I’ve had times where I got distracted for just a moment, and ended up with little bits of cooked egg yolk at the bottom, which is just not what we want in our smooth, creamy filling. Using a whisk and scraping the bottom and sides of the pan diligently will prevent this. Also, chilling it completely is non-negotiable. If you try to fill warm donuts with not-quite-set cream, it’s going to be a mess! Trust me on this one.
For the frying, using a thermometer is key. It takes the guesswork out of it and ensures your donuts cook evenly. If you don’t have a thermometer, you can test the oil by dropping a tiny bit of dough in; it should sizzle immediately and float to the top, turning golden brown in about a minute. Don’t overcrowd the pot; frying in batches ensures the oil temperature stays consistent. I also like to turn the donuts gently with tongs to get an even golden color all around.
If you’re looking for ingredient swaps, I’ve experimented with using almond milk in the pastry cream, and it actually made it even creamier, with a subtle nutty undertone. You can also experiment with different types of chocolate for the glaze – dark chocolate gives a lovely sophisticated flavor, while milk chocolate makes it a bit sweeter. For the donuts themselves, I’ve found that using good quality all-purpose flour yields the best results. If you’re adventurous, you could try a touch of cinnamon or nutmeg in the dough, but I personally love the pure, classic flavor.
My biggest lesson learned has been about the second rise. Don’t skip it! It’s that second puff that makes the donuts light and airy. If you’re short on time, you can let them rise in the refrigerator overnight, and then bring them to room temperature for about an hour before frying. It’s a little trick that has saved me many times when I’ve planned a bit too late. Lastly, for the glaze consistency, you want it thick enough to coat but thin enough to drip beautifully. It’s a balance, but once you get it right, your donuts will look professionally made!
Storing and Reheating Tips
I get asked all the time about how to store these beauties, and the good news is, they keep pretty well! The best way to enjoy them is definitely the day they’re made, when the donut is softest and the filling is at its peak creaminess. However, if you do have leftovers, you can store them at room temperature for up to a day. Just make sure to keep them in an airtight container. I usually pop them back into the same container they came in, or a cake keeper, if I have one. This prevents them from drying out too quickly.
If you think you’ll have them for longer than a day, your refrigerator is your friend. You can store them in an airtight container in the fridge for up to 3 days. Be aware that the donut might firm up a bit in the fridge, but the filling will stay perfectly chilled. To bring them back to life a little, you can let them sit at room temperature for about 30 minutes before enjoying. Some people like to gently warm them, but I find they’re best served at room temp or chilled from the fridge.
Freezing is also an option, but I recommend freezing them *before* glazing. Once your donuts are fried and filled, wrap them tightly in plastic wrap, then place them in a freezer-safe bag or container. They should keep well for about 1-2 months. To thaw, remove them from the freezer and let them thaw at room temperature for a few hours before glazing. I’ve found that glazing them after thawing gives you the best visual appeal and texture. If you’ve already glazed them, you can still freeze them, but the glaze might become a little softer upon thawing.
A word of advice on the glaze timing: it’s always best to glaze your donuts right before serving them, especially if you plan to store them. If you glaze them and then store them for a long time, the glaze can sometimes become a bit sticky or dull. So, if you’re storing them, keep them un-glazed and dip them in your glaze just before you’re ready to eat them. This ensures that perfect shiny finish and that wonderful contrast between the creamy filling and the crisp glaze!
Frequently Asked Questions
Final Thoughts
There you have it – my absolute favorite Boston Cream Donuts recipe. I truly believe that everyone should experience the joy of making and eating these homemade delights. They are proof that with a little bit of love and care, you can create something truly spectacular in your own kitchen. The combination of the soft, airy donut, the velvety smooth pastry cream, and that rich chocolate glaze is just unparalleled. It’s a recipe that brings comfort, happiness, and a touch of indulgence to any occasion.
If you love this recipe and are looking for more baked goods that bring that same sense of cozy satisfaction, you might also enjoy my Homemade Cinnamon Rolls or my Classic Apple Pie. They share that same spirit of homemade goodness and family-favorite appeal.
I genuinely can’t wait to hear how your Boston Cream Donuts turn out! Please leave a comment below to share your experience, any variations you tried, or just to say hello. Your feedback means the world to me, and I love seeing your baking adventures. Happy baking, everyone!
Boston Cream Donuts
Ingredients
For the Donuts
- 0.5 cup milk
- 0.25 cup granulated sugar
- 2.25 teaspoons active dry yeast
- 4 cups all-purpose flour
- 0.5 teaspoon salt
- 2 large eggs
- 0.5 cup unsalted butter, softened
- 2 quarts vegetable oil, for frying
For the Custard Filling
- 2 cups milk
- 0.5 cup granulated sugar
- 4 large egg yolks
- 0.25 cup cornstarch
- 1 teaspoon vanilla extract
For the Chocolate Glaze
- 1 cup semisweet chocolate chips
- 0.25 cup unsalted butter
- 0.5 cup corn syrup
Instructions
Prepare the Dough
- In a small bowl, combine warm milk (about 110°F/43°C) and granulated sugar. Sprinkle yeast over the top and let it bloom for 5-10 minutes until foamy.
- In a large bowl of a stand mixer fitted with the dough hook, combine flour and salt. Add the bloomed yeast mixture, eggs, and softened butter. Mix on low speed until a shaggy dough forms.
- Increase speed to medium-low and knead for 8-10 minutes, or until the dough is smooth and elastic.
- Grease a clean bowl. Place the dough in the bowl, turning to coat. Cover with plastic wrap and let rise in a warm place for 1-1.5 hours, or until doubled in size.
Make the Custard Filling
- In a medium saucepan, heat milk over medium heat until steaming but not boiling.
- In a separate bowl, whisk together egg yolks, sugar, and cornstarch until smooth.
- Slowly temper the egg yolk mixture by whisking in about half of the hot milk. Pour the tempered egg mixture back into the saucepan with the remaining milk.
- Cook over medium-low heat, whisking constantly, until the custard thickens and bubbles. Remove from heat and stir in vanilla extract.
- Pour custard into a bowl, cover the surface directly with plastic wrap to prevent a skin from forming, and refrigerate until completely chilled.
Shape and Fry the Donuts
- Punch down the risen dough and turn it out onto a lightly floured surface. Roll out the dough to about 0.5-inch thickness.
- Cut out donuts using a donut cutter or two round cutters of different sizes.
- Place donuts on parchment-lined baking sheets, cover loosely with plastic wrap, and let them rise for another 30-45 minutes until puffy.
- Heat vegetable oil in a Dutch oven or deep skillet to 350°F (175°C).
- Carefully fry donuts in batches for 2-3 minutes per side, until golden brown. Drain on paper towels.
Make the Chocolate Glaze and Assemble
- In a heatproof bowl set over a saucepan of simmering water (double boiler), melt chocolate chips, butter, and corn syrup, stirring until smooth.
- Once donuts are cool enough to handle, use a piping bag or a sharp knife to make a hole in the side of each donut. Fill with chilled custard.
- Dip the top of each filled donut into the chocolate glaze. Let the glaze set before serving.
