
Oh, the holiday season! It’s my absolute favorite time of year, filled with twinkling lights, cozy sweaters, and the irresistible urge to bake. And if there’s one treat that perfectly captures that festive spirit and is surprisingly simple to whip up, it has to be these Santa Hat Brownies. Seriously, you guys, these are pure magic. Imagine rich, fudgy brownies with a bright, creamy swirl that looks just like Santa’s hat. They’re not just pretty; they’re ridiculously delicious. My kids go absolutely bonkers for them, and honestly, so do I. They’re so much easier than trying to make elaborate cookies, and they always get rave reviews. If you’ve ever thought baking for the holidays felt too daunting, trust me, this recipe is your new best friend. It’s like the ultimate hug in brownie form, dressed up for Christmas.
What are Santa Hat Brownies?
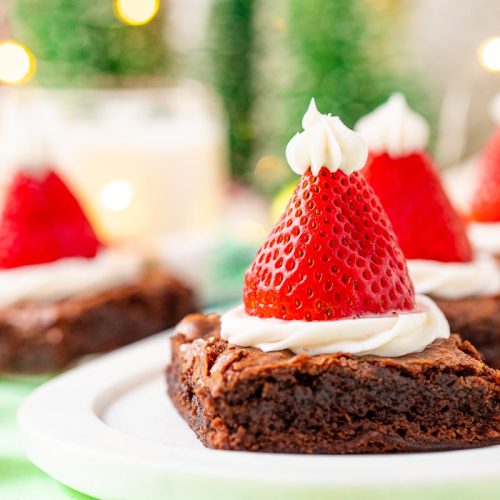
So, what exactly are these festive delights? Think of them as your favorite, classic, fudgy brownie recipe, but with a whimsical holiday twist. We’re talking about a base that’s deep, chocolatey, and utterly satisfying, topped with a vibrant red and white swirl that mimics Santa’s iconic hat. It’s essentially a no-fuss brownie that gets a super fun makeover with minimal effort. The “hat” effect comes from a simple cream cheese frosting or a red-tinted icing swirled into the Brownie Batter just before baking. It sounds fancy, but I promise it’s one of the most forgiving baking techniques out there. It’s the perfect way to elevate a simple brownie into something truly special for parties, school treats, or just because the season calls for it!
Why you’ll love this recipe?
What are some of the best Santa Hat Brownies recipes?flavor is out of this world. We’re talking deep, rich chocolate that’s not too sweet, with that delightful creamy tang from the swirl. It’s a perfect balance that makes you want another bite, and another. Then there’s the simplicity. Seriously, if you can make a basic brownie, you can make these. There’s no complicated piping or frosting involved. The swirl is the star, and it’s incredibly forgiving. What I love most about this is how cost-efficientIs it possible to have all the ingredients in your pantry right now?versatility! These aren’t just for Christmas Eve. They’re perfect for any holiday gathering, teacher gifts, or even just a fun weekend baking project with the kids. I’ve tried many holiday treats over the years, and this one always hits the sweet spot without taking up hours of my precious holiday time. It’s a lifesaver when I want something festive and homemade but I’m already juggling a million other things.
How to Make Santa Hat Brownies
Quick Overview
Making these Santa Hat Brownies is a straightforward two-part process: first, you’ll whip up a classic, decadent brownie batter. Then, you’ll create a simple, vibrant topping and swirl it into the batter before baking. It’s designed to be as foolproof as possible, so even if you’re new to baking, you’ll end up with beautiful, delicious results. The magic really happens in that final swirl, turning a simple treat into a holiday showstopper with minimal fuss.
Ingredients
For the Main Batter:
1 cup (2 sticks) unsalted butter, melted. Using good quality butter really does make a difference here; it adds such a lovely richness.
2 cups granulated sugar. Granulated sugar keeps them fudgy and provides that classic brownie texture.
4 large eggs. Room temperature eggs incorporate better, so I usually let mine sit out for about 30 minutes before I start.
1 teaspoon vanilla extract. A good vanilla extract is key to bringing out all those chocolatey notes.
1 cup all-purpose flour. Don’t overmeasure your flour; spoon it into your measuring cup and level it off for the best texture.
⅔ cup unsweetened cocoa powder. For that deep, Dark Chocolate flavor, I always go for a good Dutch-processed cocoa powder.
½ teaspoon baking powder. Just a touch to give them a little lift without making them cakey.
½ teaspoon salt. Crucial for balancing the sweetness and enhancing the chocolate flavor.
For the Filling (Santa’s Hat Swirl):
8 ounces Cream Cheese, softened. Make sure it’s truly softened, not just slightly warm, for a smooth swirl. I’ve tried this with dairy-free cream cheese, and it works well too!
½ cup powdered sugar. Sifted, if you can, to avoid lumps.
2 tablespoons milk (any kind works – dairy, almond, oat). This helps get the right consistency.
½ teaspoon vanilla extract. A little extra vanilla never hurt anyone!
Red food coloring. Gel food coloring works best for a vibrant red without adding too much liquid.
Step-by-Step Instructions
Step 1: Preheat & Prep Pan
First things first, get your oven preheating to 350°F (175°C). Grab a 9×13 inch baking pan. I like to grease it generously with butter or non-stick spray, and then line it with parchment paper, leaving an overhang on the sides. This makes it super easy to lift the brownies out later without any sticking drama. I learned this trick years ago after a brownie-related disaster!
Step 2: Mix Dry Ingredients
In a medium bowl, whisk together the flour, cocoa powder, baking powder, and salt. Whisking them together ensures everything is evenly distributed, so you don’t end up with pockets of flour or unsweetened chocolate. Give it a good whisk until it looks uniformly blended and a beautiful chocolatey brown.
Step 3: Mix Wet Ingredients
In a large bowl, combine the melted butter and granulated sugar. Whisk them together until they’re well combined. Then, add the eggs one at a time, whisking after each addition until fully incorporated. Stir in the vanilla extract. The mixture should look glossy and smooth.
Step 4: Combine
Gradually add the dry ingredients to the wet ingredients. Stir with a spatula or wooden spoon until *just* combined. It’s really important not to overmix here. A few streaks of flour are okay; they’ll disappear as you continue. Overmixing develops the gluten in the flour, which can lead to tough brownies, and nobody wants that!
Step 5: Prepare Filling
While the brownie batter is resting, let’s make the Santa hat swirl. In a separate bowl, beat the softened cream cheese with an electric mixer until it’s smooth and creamy. Gradually add the powdered sugar and milk, beating until well combined and smooth. Stir in the vanilla extract. Now, divide this mixture in half. Tint one half a vibrant red with your food coloring. You want a bright, cheerful red!
Step 6: Layer & Swirl
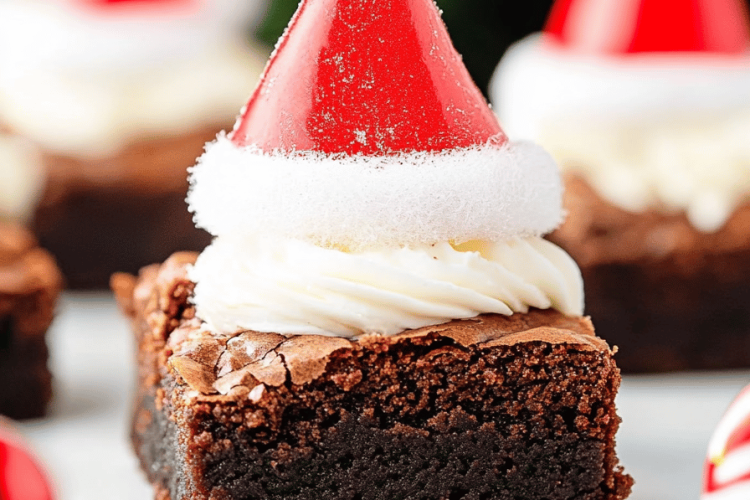
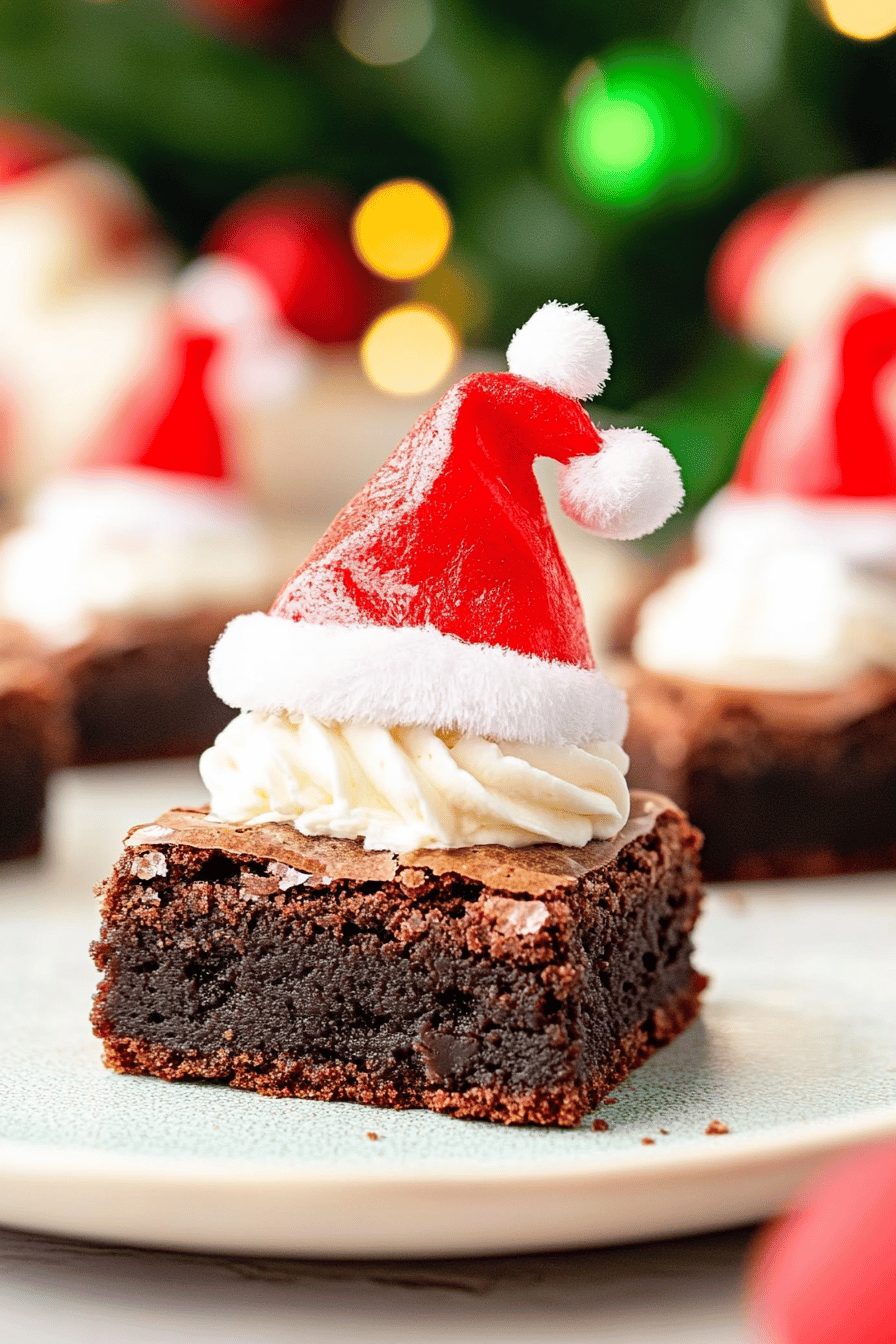
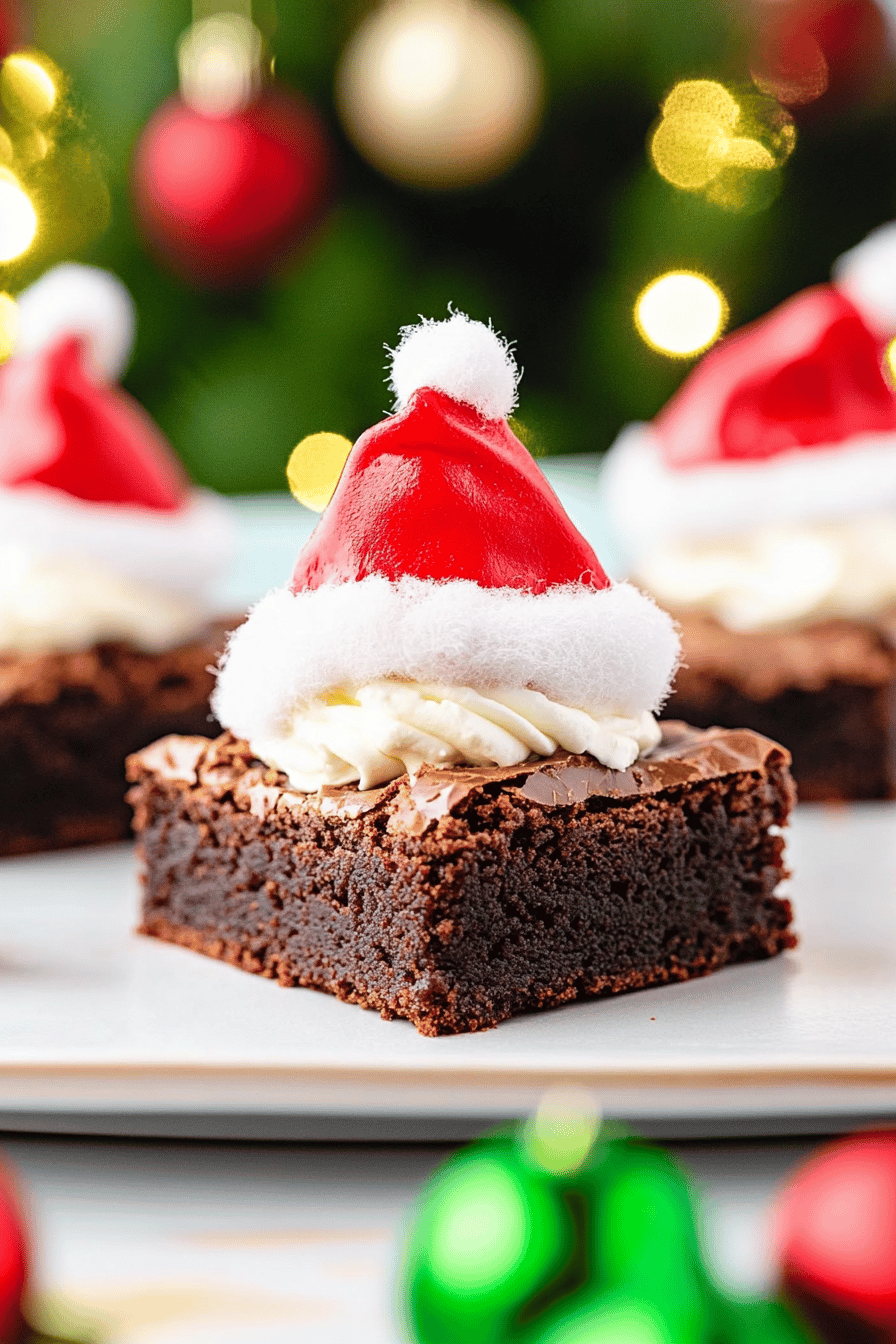
Pour the brownie batter into your prepared baking pan and spread it out evenly. Dollop spoonfuls of the red cream cheese mixture and the white cream cheese mixture randomly over the top of the brownie batter. Don’t be shy! Then, using a knife or a skewer, gently swirl the two colors together. You can make figure-eights, circles, or just random strokes. Don’t over-swirl, or the colors will blend too much. You want distinct swirls that look like Santa’s hat.
Step 7: Bake
Bake in your preheated oven for about 30-35 minutes. You’ll know they’re done when a toothpick inserted into the center comes out with moist crumbs attached, but not wet batter. Keep an eye on them, as ovens can vary. Overbaking is the enemy of fudgy brownies!
Step 8: Cool & Glaze
Let the brownies cool completely in the pan on a wire rack. This is crucial for them to set properly and for clean slicing. Once cooled, you can optionally add a little extra touch. If you want a fluffy pom-pom on Santa’s hat, you can mix a little more cream cheese frosting with a touch of white food coloring (or leave it plain white) and dollop it on top of the red swirls. This is totally optional but adds to the cuteness!
Step 9: Slice & Serve
Once completely cool, use the parchment paper overhang to lift the brownies out of the pan. Place them on a cutting board and slice into squares. The edges will have that beautiful swirled pattern. For the cleanest cuts, you can wipe your knife between each slice. These are best served at room temperature.
What to Serve It With
These Santa Hat Brownies are so versatile, they fit into almost any holiday gathering! For breakfast, imagine these alongside a steaming mug of coffee or a creamy hot chocolate. They’re a sweet little surprise to start the day, maybe even served with a side of fresh berries to cut through the richness. For brunch, they look absolutely stunning on a dessert platter. I like to arrange them artfully with some mini gingerbread cookies or peppermint bark for a festive display. A crisp mimosa or a sparkling cranberry juice would be the perfect beverage pairing. As a stand-alone dessert, they’re a guaranteed hit after any holiday meal. A scoop of vanilla bean ice cream or a drizzle of extra chocolate ganache would take them to another level. And for those spontaneous cozy snacks when you just need a little holiday comfort? These are perfect. Grab one (or two!) with a glass of cold milk while you’re watching your favorite Christmas movie. My family tradition is to have these on Christmas Eve after Santa’s been ‘checked’ on, accompanied by warm cider.
Top Tips for Perfecting Your Santa Hat Brownies
I’ve made these Santa Hat Brownies more times than I can count, and along the way, I’ve picked up a few tricks that I think you’ll find helpful. For the swirl itself, don’t overwork it! You want to see distinct red and white patterns, not a muddy pink mess. A gentle swirl with a knife or skewer is all you need. If your cream cheese frosting seems a bit stiff, don’t be afraid to add a tiny bit more milk, just a teaspoon at a time, until it’s spreadable but not runny. When it comes to the brownie batter, remember the golden rule: do not overmix! As soon as you don’t see any dry flour streaks, stop mixing. This is probably the most critical step for achieving that perfectly fudgy texture. Overmixing is the number one culprit for dry, cakey brownies. For the red coloring, I highly recommend using gel food coloring. It gives you a much more intense color without adding extra liquid, which could potentially affect the consistency of your swirl. Liquid food coloring can sometimes dilute the cream cheese mixture and make it harder to get that perfect swirl effect. If you’re aiming for a super vibrant red, a little bit of gel goes a long way. For baking, keep a close eye on them. Ovens really do vary, and overbaked brownies are a sad, dry fate. A toothpick with moist crumbs is your goal, not a clean toothpick. The brownies will continue to cook slightly as they cool in the pan, so it’s better to underbake them slightly than overbake. If you find your brownies are browning too quickly on top, you can loosely tent the pan with aluminum foil for the last 10-15 minutes of baking.
Storing and Reheating Tips
One of the best things about these Santa Hat Brownies is how well they store. For room temperature storage, once they’re completely cool, I like to keep them in an airtight container or wrap the pan tightly with plastic wrap. They’ll stay fresh and delicious for about 3-4 days. The swirl might soften slightly over time, but the flavor is still fantastic. If you need them to last a bit longer, refrigerator storage is your best bet. Pop them into an airtight container, and they should be good for up to a week. Just be aware that the texture can become a little firmer when chilled, so you might want to let them sit out for about 15-20 minutes before serving if you prefer them at room temp. For those who like to get a head start or save some for later (if there are any leftovers!), these freeze beautifully. Wrap individual squares or the entire pan (once completely cooled and set) tightly in plastic wrap, then in aluminum foil, or place them in a freezer-safe bag. They can be stored in the freezer for up to 2-3 months. To thaw, simply unwrap them and let them come to room temperature. For the glaze, it’s always best to apply it *after* the brownies have completely cooled. If you’re planning to freeze them, I recommend applying the glaze just before serving after they’ve thawed, or you can add a little swirl of frosting to each piece individually. This helps keep the glaze looking its best!
Frequently Asked Questions
Final Thoughts
I truly hope you get a chance to make these Santa Hat Brownies this holiday season. They’re more than just a dessert; they’re little packages of joy that bring smiles and festive cheer wherever they go. The rich chocolate flavor, the fun, festive design, and the surprising ease of making them all combine to make this recipe a real winner in my book. It’s the kind of treat that makes you feel like you’ve accomplished something special, even on the busiest days. If you love these, you might also enjoy my Gingerbread Blondies or my Melt-in-Your-Mouth Sugar Cookies – they’re other holiday favorites that are always a big hit! I’d absolutely love to hear how your Santa Hat Brownies turn out! Please leave a comment below with your thoughts, and don’t be shy about sharing any fun variations you try. Happy baking and happy holidays!
Santa hat brownies
Ingredients
Brownie Base
- 0.5 cup Butter
- 1 cup Sugar
- 2 large Eggs
- 1 teaspoon Vanilla Extract
- 0.33 cup Unsweetened Cocoa Powder
- 0.5 cup All-Purpose Flour
- 0.25 teaspoon Salt
Santa Hat Decoration
- 1 package Strawberry Frosting
- 1 can Whipped Cream (for the pom-pom)
Instructions
Preparation Steps
- Preheat oven to 350°F (175°C). Grease and flour a 9x13 inch baking pan.
- In a medium bowl, melt the butter. Whisk in the sugar until well combined.
- Beat in the eggs one at a time, then stir in the vanilla extract.
- In a separate bowl, whisk together the cocoa powder, flour, and salt.
- Gradually add the dry ingredients to the wet ingredients, mixing until just combined. Do not overmix.
- Spread the batter evenly into the prepared baking pan.
- Bake for 25-30 minutes, or until a toothpick inserted into the center comes out with moist crumbs.
- Let the brownies cool completely in the pan.
- Once cooled, cut the brownies into squares.
- To decorate, spread a triangle of strawberry frosting onto each brownie square to form the Santa hat.
- Add a dollop of whipped cream to the tip of each frosting triangle for the pom-pom.
